Pages

Sunday, August 30, 2009

Plan - New File - Download from Ancestry.com - Version 2010

In an earlier post, the ability to download a file from Ancestry.com was discussed, using Family Tree Maker, Version 2009

Plan - New File - Download from Ancestry.com


There is also an entry on how to upload a file from the Family Tree Maker program to a Member Tree at Ancestry.com.

Publish - Upload to Ancestry.com


One of the new features of Version 2010, is the ability to download a file from Ancestry.com that Includes Images that are in the online Member Tree.

You will notice a new option on the Plan Workspace a new option, that is Download a tree from Ancestry.

Selecting that option, Family Tree Maker will connect to your Member Family Trees. You will notice that in this screen there are 4 trees on Ancestry that can be downloaded or exported. The one with the images and the one to be downloaded is hi-lited. Clicking the Download button will begin the process.


Figure 229

There will be a downloading process window that appears and the proces bar will be active.


Figure 230
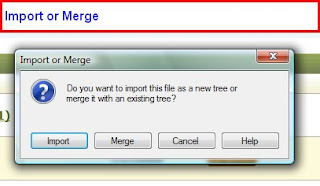
You will be asked to Import that file, into a new file, or Merge this download into an existing file.


Figure 231


In this case, the selection was to Import the file. The next screen is where you name this new file (for import) or select the file to Merge this download into.


Figure 232

Again the download process bar will make a couple of passes as the file downloads.
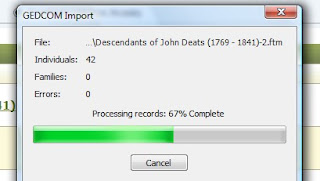


Figure 233

When the download completes the Import Complete status will be given. You will notice that there is a new item, that is the Media status. This screen is similar to

Plan - New File - Download from Ancestry.com figure 218

This download is of the same file as the earlier download. This time the images are now in the file on the PC.
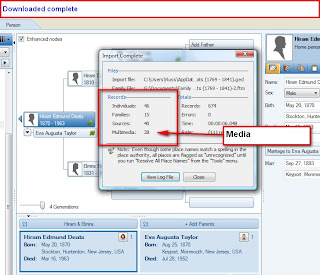


Figure 234

Just a note, there are 16 figures to do this same process in Version 2009 and do not end up with Images. In Version 2010, on this blog entry, there are only 6 AND the Images or Media files are included.

Helpful Hints from the Family Tree Maker Knowledge Base website:

How to download your personal member family tree

Importing an Existing File in Family Tree Maker 2009

GEDCOM files and how they are used

Posted by Picasa

Monday, August 24, 2009

Multiple Marriages and Remarriage

How do you enter Multiple Marriages, where the first (or other) spouse was remarried.

Please note that this example is where there was a marriage. However, other FACTs can be selected to clarify the type of Relationship the two individuals had.

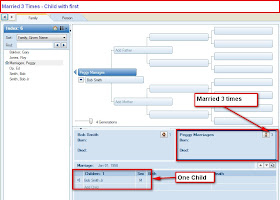
Peggy Marriage was married 3 times. See the number next to the spouse ICON.


Figure 223

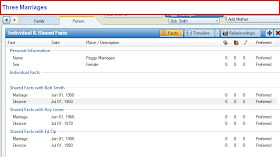
Going to the People Workspace, Person Tab, FACTs page, the three marriages are listed. The Date of the Marriage and the fact that, in this example, the marriages ended in Divorce (with dates). They are listed in the Shared FACTs for each relationship.


Figure 224

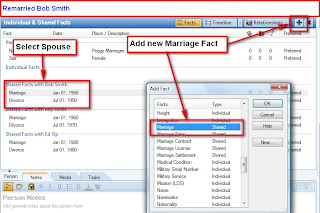
To add a new Marriage to the First Spouse, click on the Green Plus sign and a New FACT screen will appear, where Marriage is selected. Note that the cursor is on the First Spouse (Select Spouse)


Figure 225

The date of the new marriage was added and marked as Preferred.


Figure 226


What will this look like in a Genealogy Report (Collection Tab), Register Report (Detail Tab), in the Publish Workspace?

By default, the Preferred only FACTs are selected. The three marriages are reported, BUT the first marriage is not. Removing the Check Mark, in the Items to Include ICON, will resolve this.


Figure 227


The result shows the complete set of relationships and the fact that there was a child from the first relationship.


Posted by Picasa

Friday, August 21, 2009

Family Tree Maker: Upgrading from previous versions

Information from the Ancestry.com Family Tree Maker Blog:

http://blogs.ancestry.com/ancestry/

Family Tree Maker: Upgrading from previous versions

* Posted by Michelle Pfister
* August 21, 2009


We are often asked about the process of upgrading to Version 2010 from older versions of Family Tree Maker. If you’re upgrading, here are some answers to frequently asked questions:

Q: Will FTM 2010 run on my computer?
A: Your computer must meet the minimum system requirements in order to run the program. A list of system requirements can be found here. By going to the Start menu and selecting the Help option, you can search for “About this computer” to find your system information and compare to the list on the Web site.

Q: Will FTM 2010 replace my old version?
A: No. Family Tree Maker 2010 will install as a completely separate program and will not affect your old program. If you do not want to keep your old version you will need to uninstall it.

Q: Do I need to install FTM 2009 before I can upgrade to FTM 2010?
A: No. Because FTM 2010 installs as a separate program you can upgrade to 2010 directly, without having to install any older software.

Q: Will FTM 2010 automatically open my files from the old version?
A: This depends on which version you’re upgrading from. If you’re upgrading from version 2008 or 2009, your old file names will appear in your list of trees. Then opening the files will convert them to the new format. If you’re upgrading from an older version (Version 16 or older) you will need to import your files into the new program. You can see instructions on how to upload your files from the older version, or how to import files from other programs to your new Family Tree Maker here.

Q: When I import my file will it get ALL of the data?
A: Family Tree Maker 2010 will import all of the data contained in the file you are importing. If you have multiple files in the old program to represent different families, you will have to import each one separately.

Q: I can’t find my files from the old version to import them. Where are they?
A: You can use either your old version’s Find file utility or use Windows Search to locate the files on your computer. These are detailed here.

Q: My old version is on a different computer. How can I transfer the file to my new computer?
A: By exporting your old files to an external drive, you can transfer your files from one computer to another. Detailed instructions for this can be found here.

Q: Do I need to keep my old version on the computer after upgrading?
A: No. Once you have imported your data files into FTM 2010 you can uninstall your old version, it is not required for FTM 2010 to operate. Removing your older version is optional, but doing so will leave more memory available for use on your computer. Even if you remove your old program, you can keep your old data files for safekeeping.

Q: I imported my files, but I don’t know where they are now. Where does FTM 2010 store the data files?
A: The default save location is in a Family Tree Maker folder in your Documents folder. Any imported files will be here unless you changed the File Location on the import screen. If your files are not in your Documents folder and you don’t remember if you changed the File Location or what you changed it to, you can use Windows Search to locate the files. The search tool can be found under the Start menu on your computer.

Q: How can I make FTM 2010 look like my old program?
A: Family Tree Maker 2010 is built on our new platform, which has many similarities to the older versions but looks quite different. The People workspace, Family tab is a combined Pedigree View and Family View from the old programs.

Q: I need help working in the new format. Are there any tutorials available?
A: There are Training Tutorials available in the Help menu and a Getting Started Guide available on our website to help you get started working in the new format. You can view the Getting Started Guide by clicking here.

I hope these answers help. If you’ve already made the transition to Family Tree Maker 2010, please offer your helpful questions and answers here. Thanks!

Monday, August 17, 2009

File Organization - Filenameing Convention - Individuals

Among the Genealogy Blogging community, there have been a number of Bloggers talking about 'Getting Organized". There have also been a couple of PodCasts talking about the same topic.

Please see my earlier Blog on this topic: http://ftmuser.blogspot.com/search/label/Organization. This link will bring up any blog entries that I have posted on Organization.

In my first post on this topic, I talked about what file naming convention I used in a specifc file. I have given this some serious thought, but in a more generic, not file specific file naming.

In the Family Tree Maker program, all Images are, by default, are stored in a Media Folder based on the File Name of the family file.

For example: The family file is located in:

My Documents\Family Tree Maker\MasterFile.FTM

The Media Items are in:

My Documents\Family Tree Maker\MasterFile Media

Here is what the filenames look like using Windows Explorer:


Figure 220

This JPG files are a results of a Web Merge.

There is no meaningful information in the names of these files. For example, the second filename on that list is:

08061202192718.JPG


Figure 221

It is a Registration Report. Looking at the Image with any photo editor doesn't really say what time of Registration Report it is. Of interest, for entry into Family Tree Maker is his Occupation.

So, looking at the Files, external to the Family Tree Maker is of little help.

The view within the Family Tree Maker is a little clearer:


Figure 222

From the People Workspace, Person tab, selecting the Occupation FACT, Farmer in 1918 (signature line on 2nd page) there is a Source Citation Image of this World War I Registration Report.

Figure 222 shows the Source-Citation information, the Filename and the Location of the file. That agrees with what is seen in Figure 220.

The task here is to have the ability to look externally to Family Tree Maker and Internally to Family Tree Maker to know what image is.

The format of Filenames that is under consideration is:

Surname_FirstnameMiddlename-year-Event

The Surname followed by an Underscore, followed by the Firstname, followed by the Middlename (if appropriate), followed by a Dash and Year, followed by a Dash and the Event.

In this case:

Worrell_JosephWilson-1918-WWI-Registration

In the External view, all images for Joseph Wilson Worrell will be sorted together with Windows Explorer, then sotret by Year, followed by the Event. For sorting purposes, the plan is to keep an individuals images together, then by years. The Event sorting isn't that important for this user at this time.

Will have another blog post on other types of Records.

Sunday, August 9, 2009

More on Family Tree Maker 2010

There has been a number of discussions on the Internet Message Boards and among several Bloggers about the pending release of Family Tree Maker Version 2010. Randy Seaver just posted another blog on 2010.

Which Family Tree Maker version to use?


I see that Family Tree Maker Version 2010 is now listed at the Ancestry.com Store:

We have seen the information at the store, but I might suggest that you click on this link, also found there for some screen shots.

See an overview of all the features in Family Tree Maker 2010

You might want to take a look at these screen shots

Family Tree Maker Screenshots
For the People Work Space, Family View:

Family View

This isn't much different in this screen, BUT, the Navigation has been updated from here. However, I think there is a new feature that is not on that screen. It's an Enhanced nodes option. From my notes, the Enhance View will allow more information on the Family View screen. This screen shot just shows names, but with the Enhanced View, you will be able to have an Image of each person in the view AND birth and death dates.

Media View

Looks familiar, however, this is really where the use of Categories. In the image provided, you can see any Media, in your file, that are not linked to an individual or Source.

Places View

From my notes, in the Left Hand Panel, with the Place Name above and list of people who had an event there, is a field, not on the screen shot, for the GPS coordinates. As I remember, with the GPS information the Push Pin can be moved.

Timeline

In the People, Person View, Timeline Tab, we have had the capability to view an Individuals Time Line. Currently, we can add Historical Events and Family Events. With 2009, we did not have the capability to Print the Time Line. From my notes again, we have the capability to Print the Publich, Person Report, Time Line.

Web Search

In the Demonstration that I saw, the capability to take information of another website, like a book, hi-light information AND pictures from that online book and merge it into the Family File. The details of this feature went by very quickly, but the information, picture include, that was online was brought into the file on the computer. Don't know about you, but I could have used that many times in the past, and look forward to exploring this feature in the future.

Tuesday, August 4, 2009

Family Tree Maker 2010 - Download from Ancestry.com

In an earlier post:

Family Tree Maker Version 2010 at Ancestry.com

the features that are to be in Version 2010 were listed.

A follow up was posted here:

What's New in Family Tree Maker 2010


As mentioned, there was a demo of Version 2010. From my notes, some observations of the new features will be posted here. There will be follow up posts when the software is received.

What’s New?

* Easy family tree download from Ancestry.com – Import your Ancestry.com family tree, along with attached photos.


From a previous message, another Blogger, Randy Seaver from the Genea-Musings Blog posted this:

Genea-Musings: Family Tree Maker 2010 software - what? when?


To understand a little more about this feature a review of Version 2009 might be helpful.

There is the ability to Publish the information that is on the PC, in Family Tree Maker Version 2009 and Publish it to a a Member Family Tree at Ancestry.com. That capability is posted here:

Publish - Upload to Ancestry.com


Put, what if the Member Family Tree is where your information has been researched and recorded on Ancestry.com and now you want to have that information in the Family Tree Maker program on your PC.

That capability is posted here:

Plan - New File - Download from Ancestry.com


There has been some discussion about the Synchronization of the data between the PC and the Member Family Tree. The short coming of the Download process, mentioned above, is that the information from Ancestry.com is in the form of a GEDCOM file. That means that media items (images, PDF files) are not included. This has also been discussed.

Family Tree Maker 2010 <=> Ancestry Member Tree Synchronization


So, from the Demo at the Convention showed that this new capability in Version 2010 will now INCLUDE the images and other media in the Member Family Tree in the download. As this demo was done pretty quickly, the details on the screen changes are not available, but the download did include those images.

From what this participant saw in the demo, what will be in Version 2010 will NOT be a complete full synchronization of the same file in two places. But it does allow for updates to the files in two places be shared to both locations. (PC or on Ancestry.com). The full feature, from the Q&A (Questions and Answer session), is understood by the development team. This clearly, for this user, another step in the right direction.

Please note: these comments are made from the observation of the Demo and the notes that were taken during the presentation. Follow up posts will be made on this feature when the program is made available..

Plan - New File - Download from Ancestry.com

From within Family Tree Maker, Version 2009, there is the capability to download your Member Family Tree from Ancestry.com. To start, you can open Family Tree Maker, from the Plan Workspace, New Tree. In the Right Panel, clicking on Ancestry.com will take you to the Ancestry.com website.


Figure 203

In your Browser, you should be taken to your Ancestry.com page. If you are not logged in, do so. Once logged in, selecting Family Tree will take you to the last Member tree that you had open. In this case, there are several member Family Trees that have been created for this Blog. Select the Family Tree do be downloaded.


Figure 204

A review of the tree is suggested, if you have more than one tree.


Figure 205
For this blog, this is NOT the tree to be downloaded. Double clicking on Family Trees will bring up a screen where you can select Manage Family Tree.


Figure 206

In this case, the tree that was uploaded on August 3, 2009, is the one do be downloaded. (see previous Blog for the upload)


Figure 207

The Tree Name and Description are provided and the home person is shown. This home person can be changed at this point. Clicking on Export will begin the download process.


Figure 208

The download begins by generating a GEDCOM file that will be downloaded.

Figure 209


Once the GEDCOM file has been generated, it is ready to be downloaded. Clicking on Download this file will begin the download process.


Figure 210

Use the Save button to save the GEDCOM file during the download.


Figure 211

Since the GEDCOM file is going to be saved on your computer, the location is then requested. Note the Location. In this case, its in Documents, Family Tree Maker, a folder on this computer. Note the Filename and that it is a GEDCOM file.


Figure 212

A download progress bar will appear while the file is being downloaded. When complete, click on Close.


Figure 213


The file is now on your computer. Back to the Plan Workspace, New Tree Tab, Import from an existing file, click on the Browse button.


Figure 214

navigate to the folder where the download was saved. In this case, Documents, Family Tree Maker. There are other files listed in this screen that have been blocked out, but other Files and Folders are listed. If there are other files and you want to just see GEDCOM files, select GEDCOM from the pull down menu. Select the GEDCOM filename that was downloaded.


Figure 215
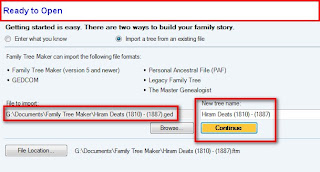
You will be returned to the Plan, New file screen with the Location of the file and the new Family Tree Name. Clicking on Continue will begin the import process.


Figure 216

A process bar will appear as the file is imported. Watch this screen for any errors that may appear.

Figure 217

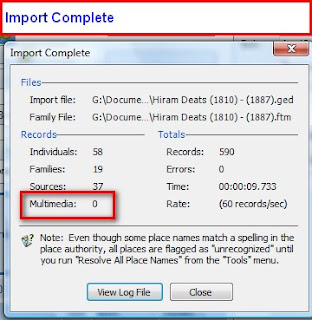
A summary report will appear at the completion of the creation of the new Tree. Note that there are NO images that were online. This is due to the nature of a GEDCOM file. No images are contained in a GEDCOM file.


Figure 218

More details can be seen on the View Log File.

Once this screen is closed, the People work space, Family view will be displayed.


Figure 219

Monday, August 3, 2009

Publish - Upload to Ancestry.com

One of the Publish Work Space options, is the ability to Upload a Family File from Family Tree Maker version 2009 (Product Version 18.0.0.307) to a Personal Family Tree on Ancestry.com. This is one way to Share your research. The options on what you can publish will be described in this Blog.

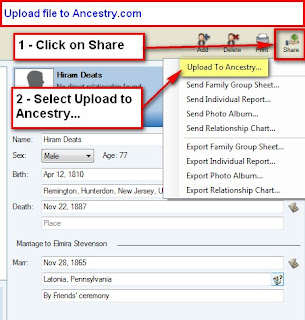
On the Publish Work Space is a Share ICON (1) on the Right side of that work space. One of the options is Upload to Ancestry.com(2)


Figure 196


This will bring up a screen that will provide the Options of WHAT and the Individuals you want to include in the Online Tree.

The options are:

  • Privatize Living Individuals
  • Include Private Facts
  • Include Private Notes
  • Include Media Files
For this example, the Entire file will be uploaded, there are no living Individuals in the file. Check marks for Including Private Facts and Notes were removed but the Check Mark for the Media Files remained. The click OK.


Figure 197


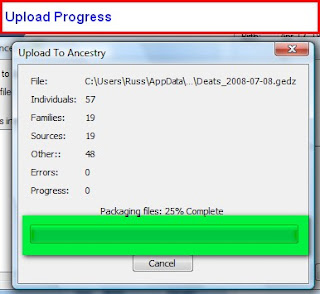
When OK is clicked, a Progress window will open showing what is being uploaded. On the screen shot below, it was 25% uploaded. That green bar will move back and forth as the upload is taking place.


Figure 198

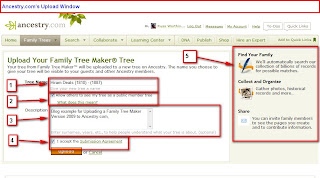
When this is completed, your Browser will open on Ancestry.com. Below will not provide the details of what is on the Ancestry.com website, only how to use Family Tree Maker while making your Family File available online.

  1. Tree Name - enter information to help you and others to identify what information in the Tree. For this example, the Name of the focus person and his Birth and Date Year was entered
  2. Allow others to see my tree as a public member tree? There is a link to explain "What does this mean". It is suggested that you read that.
  3. Description - Enter additional information that might be helpful to you or others
  4. I accept the submission agreement? Again, it is strongly recommended that this is read
  5. Other online Options - The user should take some time to determine what Online Tree Options that might be useful for Sharing and doing additional research.
Clicking Upload will complete this part of the process.


Figure 199

At the conclusion of the upload, the browser window will show that the upload was successful.


Figure 200

Like the Family Tree Maker (version 2009), you are asked to identify the Home Person for this online tree.


Figure 201

You will then be able to view and manage your Ancestry.com Family Tree.


Figure 202

Some helpful Knowledge Base Articles for the Ancestry.com Personal Member Tree:

Using Personal Member Trees on Ancestry

Manage a Personal Member Tree

Posted by Picasa

What's New in Family Tree Maker 2010

As followers of this Blog and that of Randy Seaver and his super genea-musings blog, we have been looking at what is in store for us in Family Tree Maker version 2010.

Sunday, August 2, 2009, I had a chance to sit in on a Presentation by Duff Wilson, of Ancestry.Com on Version 2010 as a preview. You may know Duff from the Webinar's that Ancestry.com has provided us about Family Tree Maker. This presentation was part of the
29th IAJGS International Conference on Jewish Genealogy. You can follow what is going on there on

A Version 2010 is not yet available, I don't have screen shots, but a bunch of notes on each of the new features that Duff went through. Over the next couple of days, I will try to describe what I saw during the presentation to put a little more information about the features listed below.

The audience was a very wide variety of Family Tree Maker users. One user said she started using Family Tree Maker with Version 1.0. So there were users from Version 1.0 (DOS days) to Version 2009 (Product Version 18.0.0.307). A large number of 2009 users were in the group of about 90.

Duff is a great presenter and teacher. He took this group of users through the Various Work Spaces in the Current Version (2009) and some of the neat things that we, users, might have overlooked. I know there were a couple that I hadn't seen, or recognized before. I may have seen them, but not part of my normal way of using the program. I have a list of existing features to Blog about in the future. Little tricks that we might use.

Then he launched into the New stuff. I will start to talk about them from my notes and will return to them when 2010 is released.

From the Ancestry.com's website, found through a Google Search, here is a list of what is New in 2010. You see the earlier postings on 2010 here:

http://ftmuser.blogspot.com/search/label/FTM2010


What’s New?

  • Easy family tree download from Ancestry.com – Import your Ancestry.com family tree, along with attached photos.
  • Improved organization – Enjoy new ways to organize photos and other media.
  • Slideshows – Create slideshows from photos in your tree.
  • Family books – Publish beautiful keepsakes and books to share with friends and family.
  • Standard source templates – Cite the right information every time.
  • A new person view – View relationships within the context of your entire family tree.
  • Scanner support – Add photos directly from your scanner.
  • Family migration paths – View timelines and interactive maps highlighting events and places in your ancestors’ lives.
  • Better Performance – Experience faster load times and navigation.

Saturday, August 1, 2009

Family Tree Maker 2010 <=> Ancestry Member Tree Synchronization

Would invite you to read Randy Seaver's Blog on this new version of Family Tree Maker and Ancestry.com Family Trees.

http://www.geneamusings.com/2009/08/family-tree-maker-2010-ancestry...


He addresses his understanding and leaves us with come questions about the ability to synchronize a PC Based Family file and an Ancestry Member Tree.

When Version 2010 is made available to us, I will be posting my finding on the Blog.

Thank you Randy !!