For those preparing to transition to another Genealogy software program.
This is one of several videos on transitioning to another Genealogy Software program. I think this is important to understand a few things about Family Tree Maker if you are going to move your genealogy database from Family Tree Maker to another program.
The move will be different based on the VERSION of Family Tree Maker that you have AND the Genealogy Program you might move to. This video is to help you find the Version of the program you are using and what you need to do just before you make that move.
Family Tree Maker started in the DOS days, and the Version numbers were just that, a version number. For example, my first version was Version 3.4. The Version number when up to Version 9, then Version 10, then Version 11. BUT in 2005, then changed to Version 2005, then 2006, then back to Version 16.
In 2008, then structure of the program was moved out of the DOS environment into the Windows environment. The Version numbers then started with FTM2008, FTM2009, FTM2010, FTM2011, FTM2012, and FTM2014.
In the Version 16 and earlier, all Media Files were INCLUDED in the FTW (file extension), making the files very large over time. This important to note for your transition.
Starting with FTM2008, the Media Files were in a < filename > Media folder. You would have a Filename for the Data, and a < filename > Media folder for all of the Media Files. Those media files would normally be in Media folder, but some users and their own filing structure for their media, maybe leaving those media files elsewhere on the computer. The program "knows" where they are so there are links from the database to those media files.
For Back Ups: as long as you manually back up, or Back Up as I demonstrate in this video, those Media Files will be in the Back Up file. For Version 16, the back up file extension would be FBC. For FTM2008 - FTM2014,the file extension is FTMB. Both the FBC and the manually generated FTMB file include those media files. IF you find a FTMB file that has the words "Automatic Back Up" that FTMB file would NOT include the media files, only the Data. The automatic back up would be generated if you just closed down the program without manually backing up the file.
In upcoming blog posts, I will deal with GEDCOM files. A GEDCOM will NOT include any media files. It is important thing to understand, with this transition, is the links to the Media Files. In FTM2008 through FTM2011 a GEDCOM file will NOT contain any information linking to the media files. With FTM2012 and FTM2014, the GEDCOM WILL include Links to those media files.
Here is a link to a number of blog posts on this
http://ftmuser.blogspot.com/search/label/GEDCOM
Here is a blog post I did about transferring a GEDCOM to Roots Magic
http://ftmuser.blogspot.com/2013/12/blog-post-on-hold-update.html
Bottom line here, KNOW the Specific Version of Family Tree Maker that you are using and Compact and Back Up your file when the option is offered using the Compact File utility.
Me: No Change. FTM2014 and all of its features work for me.
_______________________________________________________________
Copyright © 2015 by H R Worthington
Showing posts with label 2009. Show all posts
Showing posts with label 2009. Show all posts
Thursday, December 10, 2015
Monday, January 10, 2011
Family Tree Maker Tutorials
Posted: 10 Jan 2011 07:00 AM PST

Have you ever wanted a personal tutor to sit at your computer and show you how to use Family Tree Maker? We have a solution. Family Tree Maker has a variety of short video tutorials (each about 3 to 5 minutes long) that can help you quickly learn how to add, organize, and share your family history. They’re perfect for visual learners or anyone who wants a little direction or help using the software.
Here’s a list of the eight tutorials that are available:
Workspaces–teaches you about the seven workspaces that make up the Family Tree Maker software.
Building Family Tutorial–Shows you how to add spouses, children, and parents, and navigate in the People workspace.
Building Person Tutorial–Explains how to add events, facts, and media items for an individual.
Places Tutorial–Explains how the place authority works and teaches how to resolve unrecognized place names.
Media Tutorial–Illustrates the various ways to add media items and record details about them.
Sourcing Tutorial–Shows you how and where to create sources and source citations.
Publishing Tutorial–Explains the Publish workspace and also chart/report options and settings.
Web Search Tutorial–Illustrates Ancestry hints and search results and shows how to merge this information into your tree.
You can access all these tutorials online on the Family Tree Maker website. If you’re using versions 2009, 2010, or 2011, you can also access these tutorials within your Family Tree Maker software; simply select the Help menu, and choose Training Tutorials.
| You are subscribed to email updates from Ancestry.com Blog To stop receiving these emails, you may unsubscribe now. | Email delivery powered by Google |
| Google Inc., 20 West Kinzie, Chicago IL USA 60610 | |
Copyright © 2010 by H R Worthington
Friday, December 3, 2010
Family Tree Maker: Improving Performance
Posted on the Family Tree Maker Blog:
We all wish we had an unlimited amount of time to work on our family history. But since none of us do, it can be frustrating when the software you’re using seems to get in the way instead of helping. If Family Tree Maker starts running more slowly than you expect, here are six steps you can take to increase the software’s performance:
To work offline, go to the File menu and select Go Offline. To reenable Internet access, go to the File menu and select Go Online.
To disable Fastfields, go to the Tools menu and select Options. Deselect the checkboxes in the “Use fastfields for section” and click OK.
Copyright © 2010 by H R Worthington
Posted by Tana L. Pedersen on November 29, 2010 in Family Tree Maker
We all wish we had an unlimited amount of time to work on our family history. But since none of us do, it can be frustrating when the software you’re using seems to get in the way instead of helping. If Family Tree Maker starts running more slowly than you expect, here are six steps you can take to increase the software’s performance:
Verify that your computer meets the minimum system requirements
Make sure that your computer meets or exceeds the minimum requirements. You can find them listed in the packaging and documentation that came with your software. Also, keep in mind that the more information you enter, the greater the amount of free hard drive space and available RAM you will need.Make sure you are using the latest version of the software
Periodically, Family Tree Maker releases updates that fix various software bugs and issues. Make sure that the Family Tree Maker software is up-to-date by going to the Help menu and choosing Check for Update. A message alerts you if you need to update the software.Run the Compact File tool
The Compact File tool re-indexes your file, removes unnecessary data, and optimizes your tree’s performance. You can learn more on this blog post.Check your tree for duplicate individuals
Duplicate individuals can increase the overall size of your tree and make running reports, creating charts, and navigating your tree inefficient. Periodically you’ll want to make sure you’ve merged or deleted any unnecessary people. You can find detailed instructions on merging individuals in the Family Tree Maker Knowledgebase.Work offline
If you have a day where you’re simply entering information and not using the Web Search or virtual maps, consider temporarily disabling your Internet connection within Family Tree Maker. This can really speed up your system, especially if you’re working in a large tree.To work offline, go to the File menu and select Go Offline. To reenable Internet access, go to the File menu and select Go Online.
Disable Fastfields
Fastfields speed up data entry by automatically filling in repetitive data as you type. For example, if you type “San Jose, California” into a location field, then go to another location field and begin to type “San,” Family Tree Maker will recognize the similarity and suggest “San Jose, California.” Disabling this feature can increase performance, especially in large databases.To disable Fastfields, go to the Tools menu and select Options. Deselect the checkboxes in the “Use fastfields for section” and click OK.
Copyright © 2010 by H R Worthington
Wednesday, March 31, 2010
How to Source a Baptismal Record
After a visit to a church, I found a copy of a of a Baptismal Certificate, in the Church books. How do I record that?
Please note: a Source, in Family Tree Maker is an artifact, book, document, film, person, recording, website, etc., from which information is obtained. The Source-Citation is where in the Source the information was found.
The first step would be to go to the Source Workspace, and on the right click on Add:

The next screen, you will select New, since this a new Source for this file:

To select the appropriate Template for this Source, this is the screen that will be presented:

The next thing to do, is to note the Source Repository.For this example, I have a copy of the Baptismal Certificate, so the repository is in my files.

So, New is selected, which will bring up the following screen:

At this point, just fill in the blanks on this screen.

The Repository field has now been filled in. Now, click on the More button on the Right:

This is where the Template is Selected. The Source Group is Church Records. The Category is Church Books, as that is where the document was found, and that original record is held by the Church, so that is the Template Selected.

Clicking on OK, will bring up the Template to be completed. The Source Template is filled in. The book that was looked at was at St. Mary's Church in Windber, PA. The Record Book is recorded, the Repository is selected from the pull down menu, and the comment is made that a paper copy is in the family file.

At this point, the completed template form indicates where the information came from and where a copy is now.
Clicking on OK will bring up the Source-Citation information screen. The Source Title is presented, and the Repository is completed. This Baptismal Record was a form attached to Page 74 and it listed the Parents, God Parents, and Clergy. The Citation Detail was entered (where in that book) and the text or summary of what was there is entered in the Citation Text.

Clicking OK will return you to the Source Workspace. Selecting the Source that was just entered, will present the Source-Citation Information.

Now, it's time to use that Source-Citation. Going to the People Workspace and selecting the person who is listed on that Baptismal Record and using the Person Tab, the list of Facts are seen. Since the Certificate had her name, the Name Fact is selected.

Since we want to add a Source-Citation to the Name Fact, the down arrow next to the New button is selected, or the use of the Control (CTRL) Key and the letter "S", will take you to where you select the Source-Citation. If that Source-Citation is used in subsequent People and Facts, use Existing Source Citation would be selected.
 From here, you select the Source Title from the Pull down menu to the right of the Source title.

Here is where you would enter specific information for this individual from this Source..

The Source-Citation has been completed. Below is what the Family Group Sheet would look like, if the Items to Include had a Check Mark in the Sources box for the Family Group Sheet.
 Family Group Sheets are found in the Publish Workspace, Relationship Reports, from in the list under Publication Types.
© 2010, copyright H R Worthington
Please note: a Source, in Family Tree Maker is an artifact, book, document, film, person, recording, website, etc., from which information is obtained. The Source-Citation is where in the Source the information was found.
The first step would be to go to the Source Workspace, and on the right click on Add:
The next screen, you will select New, since this a new Source for this file:

To select the appropriate Template for this Source, this is the screen that will be presented:

The next thing to do, is to note the Source Repository.For this example, I have a copy of the Baptismal Certificate, so the repository is in my files.

So, New is selected, which will bring up the following screen:

At this point, just fill in the blanks on this screen.

The Repository field has now been filled in. Now, click on the More button on the Right:

This is where the Template is Selected. The Source Group is Church Records. The Category is Church Books, as that is where the document was found, and that original record is held by the Church, so that is the Template Selected.

Clicking on OK, will bring up the Template to be completed. The Source Template is filled in. The book that was looked at was at St. Mary's Church in Windber, PA. The Record Book is recorded, the Repository is selected from the pull down menu, and the comment is made that a paper copy is in the family file.

At this point, the completed template form indicates where the information came from and where a copy is now.
Clicking on OK will bring up the Source-Citation information screen. The Source Title is presented, and the Repository is completed. This Baptismal Record was a form attached to Page 74 and it listed the Parents, God Parents, and Clergy. The Citation Detail was entered (where in that book) and the text or summary of what was there is entered in the Citation Text.

Clicking OK will return you to the Source Workspace. Selecting the Source that was just entered, will present the Source-Citation Information.

Now, it's time to use that Source-Citation. Going to the People Workspace and selecting the person who is listed on that Baptismal Record and using the Person Tab, the list of Facts are seen. Since the Certificate had her name, the Name Fact is selected.

Since we want to add a Source-Citation to the Name Fact, the down arrow next to the New button is selected, or the use of the Control (CTRL) Key and the letter "S", will take you to where you select the Source-Citation. If that Source-Citation is used in subsequent People and Facts, use Existing Source Citation would be selected.


Here is where you would enter specific information for this individual from this Source..

The Source-Citation has been completed. Below is what the Family Group Sheet would look like, if the Items to Include had a Check Mark in the Sources box for the Family Group Sheet.

© 2010, copyright H R Worthington
Wednesday, October 21, 2009
Source Citation Template - Find-A-Grave
This series of Blog posts will expand each of the Groups and show the various Categories that will appear on the Category menu. The list of Categories to select from. Each of these categories are referred to in Evidence Explained by Elizabeth Shown Mills
There have been several Blogs, written today (10/21/09), on How to Cite a Gravestone from the Find-A-Grave website.
As a contributor to Find-A-Grave as well as posting a blog on Tombstone Tuesday, I thought it was time to continue the Use of the New Templates found in Family Tree Maker Version 2009 and now 2010 and address this specific issue..
Here are two Blog Entries that might be of interest on the topic of Citing Find-A-Grave information:
and
How To Cite A Gravestone from Find A Grave by Thomas MacEntee
In researching Tombstone Pictures on Find-A-Grave, a photograph of the Headstone of Hiram Deats, Jr. Based on the information in my Family File, this was the correct Hiram Deats, Jr.

Figure 246
Downloaded the image to the Media Folder for this Family File, gave it a filename that was meaningful (Deats-HiramJr) and Added it to the Media section for this person (People Workspace, Person Tab, Media tab in the Center).
Hi-Lighting that image, and going to the Right Hand Panel (RH Panel), and selecting the Burial FACT that was already known, from a Cemetery Visit, Selected New, Add New Source-Citation in the Source-Citation portion of the RH Panel.

Figure 247
This brought up a New Source-Citation Screen (2), where New was selected. This brought up another screen, where More (3) was selected, as this is where the Templates are chosen from.
There is a more detailed description on this blog post:
Source Citation Template - Source Group
In that blog the various Source Groups were discussed. From the list of Groups, Cemetery Records (1 below) appear to be the best match. That would be Group 3

Figure 248
Looking at the Category Listing, Grave Markers appear to be the best choice for this Headstone photograph. Selecting the specific Template would be the next choice and that would be Online Image.

Figure 249
This completes the Selection of the Template, but now to "fill in the blanks" for the Find-A-Grave Source.

Figure 250
The Create surname, in this case, is Find-A-Grave. No Creator forname is required, but the Web Site Title (Find-A-Grave) and URL (http://findagrave.com) is entered. The year is also entered.

Figure 251
For this example, the Date of the Citation was entered in the Citation Details, and in the Citation Text box, the information was transcribed from the photograph of the headstone. Giving Credit to the photographer would also be acceptable.
The Source-Citation will appear like this:
Find-A-Grave, Find-A-Grave, digital images (http://findagrave.com), October 21, 2009. Photograph of the headstone of Hiram Deats Jr - Born Sept 10 1853 - Died Feb 6 1928 - Cherryville Baptist Cemetery Cherryville, Hunterdon County, New Jersey.
Note: When entering information into the Citation Text field, the Enter Key (return) will NOT be recognized in the end note (Source-Citation). In this example you will see Dashes (-) in the entry. "Hiram Deats Jr - Born Sept 10 1853"
Evidence Explained: 5,16, page 229
Monday, August 24, 2009
Multiple Marriages and Remarriage
How do you enter Multiple Marriages, where the first (or other) spouse was remarried.
Please note that this example is where there was a marriage. However, other FACTs can be selected to clarify the type of Relationship the two individuals had.
Peggy Marriage was married 3 times. See the number next to the spouse ICON.

Going to the People Workspace, Person Tab, FACTs page, the three marriages are listed. The Date of the Marriage and the fact that, in this example, the marriages ended in Divorce (with dates). They are listed in the Shared FACTs for each relationship.

The date of the new marriage was added and marked as Preferred.

What will this look like in a Genealogy Report (Collection Tab), Register Report (Detail Tab), in the Publish Workspace?
By default, the Preferred only FACTs are selected. The three marriages are reported, BUT the first marriage is not. Removing the Check Mark, in the Items to Include ICON, will resolve this.

Figure 227
The result shows the complete set of relationships and the fact that there was a child from the first relationship.

Figure 228

Please note that this example is where there was a marriage. However, other FACTs can be selected to clarify the type of Relationship the two individuals had.
Peggy Marriage was married 3 times. See the number next to the spouse ICON.

Figure 223
Going to the People Workspace, Person Tab, FACTs page, the three marriages are listed. The Date of the Marriage and the fact that, in this example, the marriages ended in Divorce (with dates). They are listed in the Shared FACTs for each relationship.

Figure 224

To add a new Marriage to the First Spouse, click on the Green Plus sign and a New FACT screen will appear, where Marriage is selected. Note that the cursor is on the First Spouse (Select Spouse)

Figure 225
The date of the new marriage was added and marked as Preferred.

Figure 226
What will this look like in a Genealogy Report (Collection Tab), Register Report (Detail Tab), in the Publish Workspace?
By default, the Preferred only FACTs are selected. The three marriages are reported, BUT the first marriage is not. Removing the Check Mark, in the Items to Include ICON, will resolve this.

Figure 227

Figure 228
References:
Adding a Spouse in Family Tree Maker 2009 & 2010
Adding Multiple Spouses on Family Tree Maker 2009
Adding a Spouse in Family Tree Maker 2009 & 2010
Adding a Spouse in Family Tree Maker 2009 & 2010
Adding Multiple Spouses on Family Tree Maker 2009
Adding a Spouse in Family Tree Maker 2009 & 2010

Monday, August 17, 2009
File Organization - Filenameing Convention - Individuals
Among the Genealogy Blogging community, there have been a number of Bloggers talking about 'Getting Organized". There have also been a couple of PodCasts talking about the same topic.
Please see my earlier Blog on this topic: http://ftmuser.blogspot.com/search/label/Organization. This link will bring up any blog entries that I have posted on Organization.
In my first post on this topic, I talked about what file naming convention I used in a specifc file. I have given this some serious thought, but in a more generic, not file specific file naming.
In the Family Tree Maker program, all Images are, by default, are stored in a Media Folder based on the File Name of the family file.
For example: The family file is located in:
My Documents\Family Tree Maker\MasterFile.FTM
The Media Items are in:
My Documents\Family Tree Maker\MasterFile Media
Here is what the filenames look like using Windows Explorer:

This JPG files are a results of a Web Merge.
There is no meaningful information in the names of these files. For example, the second filename on that list is:
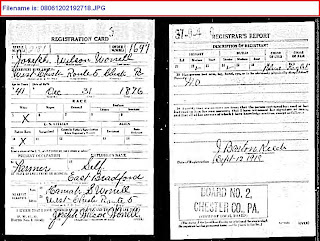
It is a Registration Report. Looking at the Image with any photo editor doesn't really say what time of Registration Report it is. Of interest, for entry into Family Tree Maker is his Occupation.
So, looking at the Files, external to the Family Tree Maker is of little help.
The view within the Family Tree Maker is a little clearer:
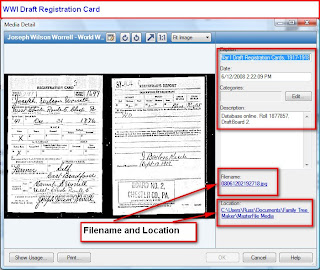
From the People Workspace, Person tab, selecting the Occupation FACT, Farmer in 1918 (signature line on 2nd page) there is a Source Citation Image of this World War I Registration Report.
Figure 222 shows the Source-Citation information, the Filename and the Location of the file. That agrees with what is seen in Figure 220.
The task here is to have the ability to look externally to Family Tree Maker and Internally to Family Tree Maker to know what image is.
The format of Filenames that is under consideration is:
The Surname followed by an Underscore, followed by the Firstname, followed by the Middlename (if appropriate), followed by a Dash and Year, followed by a Dash and the Event.
In this case:
Please see my earlier Blog on this topic: http://ftmuser.blogspot.com/search/label/Organization. This link will bring up any blog entries that I have posted on Organization.
In my first post on this topic, I talked about what file naming convention I used in a specifc file. I have given this some serious thought, but in a more generic, not file specific file naming.
In the Family Tree Maker program, all Images are, by default, are stored in a Media Folder based on the File Name of the family file.
For example: The family file is located in:
My Documents\Family Tree Maker\MasterFile.FTM
The Media Items are in:
My Documents\Family Tree Maker\MasterFile Media
Here is what the filenames look like using Windows Explorer:

Figure 220
This JPG files are a results of a Web Merge.
There is no meaningful information in the names of these files. For example, the second filename on that list is:

Figure 221
It is a Registration Report. Looking at the Image with any photo editor doesn't really say what time of Registration Report it is. Of interest, for entry into Family Tree Maker is his Occupation.
So, looking at the Files, external to the Family Tree Maker is of little help.
The view within the Family Tree Maker is a little clearer:

Figure 222
From the People Workspace, Person tab, selecting the Occupation FACT, Farmer in 1918 (signature line on 2nd page) there is a Source Citation Image of this World War I Registration Report.
Figure 222 shows the Source-Citation information, the Filename and the Location of the file. That agrees with what is seen in Figure 220.
The task here is to have the ability to look externally to Family Tree Maker and Internally to Family Tree Maker to know what image is.
The format of Filenames that is under consideration is:
Surname_FirstnameMiddlename-year-Event
The Surname followed by an Underscore, followed by the Firstname, followed by the Middlename (if appropriate), followed by a Dash and Year, followed by a Dash and the Event.
In this case:
Worrell_JosephWilson-1918-WWI-Registration
In the External view, all images for Joseph Wilson Worrell will be sorted together with Windows Explorer, then sotret by Year, followed by the Event. For sorting purposes, the plan is to keep an individuals images together, then by years. The Event sorting isn't that important for this user at this time.
Will have another blog post on other types of Records.
Will have another blog post on other types of Records.
Tuesday, August 4, 2009
Plan - New File - Download from Ancestry.com
From within Family Tree Maker, Version 2009, there is the capability to download your Member Family Tree from Ancestry.com. To start, you can open Family Tree Maker, from the Plan Workspace, New Tree. In the Right Panel, clicking on Ancestry.com will take you to the Ancestry.com website.
 Figure 203
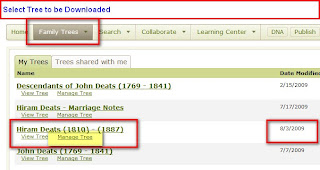
In your Browser, you should be taken to your Ancestry.com page. If you are not logged in, do so. Once logged in, selecting Family Tree will take you to the last Member tree that you had open. In this case, there are several member Family Trees that have been created for this Blog. Select the Family Tree do be downloaded.
 Figure 204
A review of the tree is suggested, if you have more than one tree.
 Figure 205
 Figure 206
In this case, the tree that was uploaded on August 3, 2009, is the one do be downloaded. (see previous Blog for the upload)
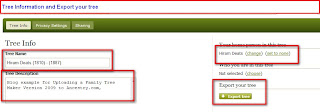
The Tree Name and Description are provided and the home person is shown. This home person can be changed at this point. Clicking on Export will begin the download process.
The download begins by generating a GEDCOM file that will be downloaded.
 Figure 209
Once the GEDCOM file has been generated, it is ready to be downloaded. Clicking on Download this file will begin the download process.
 Figure 210
Use the Save button to save the GEDCOM file during the download.
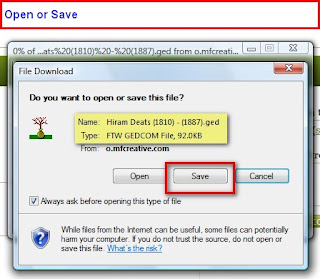
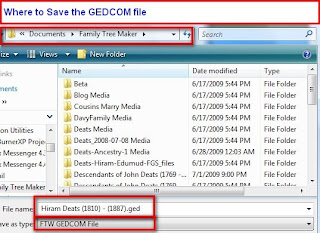
Since the GEDCOM file is going to be saved on your computer, the location is then requested. Note the Location. In this case, its in Documents, Family Tree Maker, a folder on this computer. Note the Filename and that it is a GEDCOM file.
A download progress bar will appear while the file is being downloaded. When complete, click on Close.
 Figure 213
The file is now on your computer. Back to the Plan Workspace, New Tree Tab, Import from an existing file, click on the Browse button.
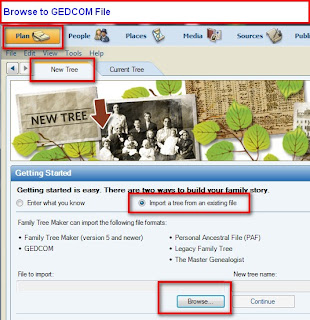
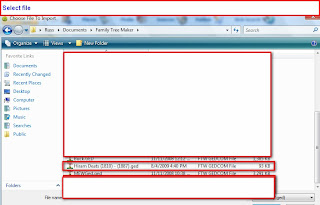
navigate to the folder where the download was saved. In this case, Documents, Family Tree Maker. There are other files listed in this screen that have been blocked out, but other Files and Folders are listed. If there are other files and you want to just see GEDCOM files, select GEDCOM from the pull down menu. Select the GEDCOM filename that was downloaded.
A process bar will appear as the file is imported. Watch this screen for any errors that may appear.

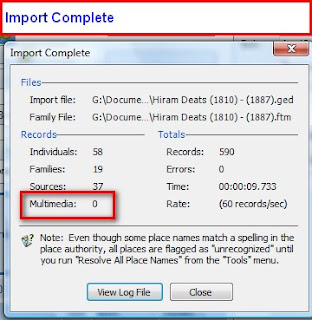
More details can be seen on the View Log File.
Once this screen is closed, the People work space, Family view will be displayed.

Figure 219
 Figure 203
In your Browser, you should be taken to your Ancestry.com page. If you are not logged in, do so. Once logged in, selecting Family Tree will take you to the last Member tree that you had open. In this case, there are several member Family Trees that have been created for this Blog. Select the Family Tree do be downloaded.
 Figure 204
A review of the tree is suggested, if you have more than one tree.
 Figure 205
 Figure 206
In this case, the tree that was uploaded on August 3, 2009, is the one do be downloaded. (see previous Blog for the upload)

Figure 207
The Tree Name and Description are provided and the home person is shown. This home person can be changed at this point. Clicking on Export will begin the download process.

Figure 208
The download begins by generating a GEDCOM file that will be downloaded.
 Figure 209
Once the GEDCOM file has been generated, it is ready to be downloaded. Clicking on Download this file will begin the download process.
 Figure 210
Use the Save button to save the GEDCOM file during the download.

Figure 211
Since the GEDCOM file is going to be saved on your computer, the location is then requested. Note the Location. In this case, its in Documents, Family Tree Maker, a folder on this computer. Note the Filename and that it is a GEDCOM file.

Figure 212
A download progress bar will appear while the file is being downloaded. When complete, click on Close.
 Figure 213
The file is now on your computer. Back to the Plan Workspace, New Tree Tab, Import from an existing file, click on the Browse button.

Figure 214
navigate to the folder where the download was saved. In this case, Documents, Family Tree Maker. There are other files listed in this screen that have been blocked out, but other Files and Folders are listed. If there are other files and you want to just see GEDCOM files, select GEDCOM from the pull down menu. Select the GEDCOM filename that was downloaded.

Figure 215
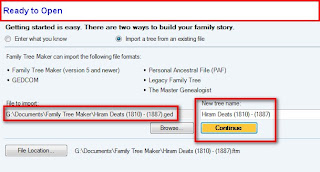
You will be returned to the Plan, New file screen with the Location of the file and the new Family Tree Name. Clicking on Continue will begin the import process.

Figure 216
A process bar will appear as the file is imported. Watch this screen for any errors that may appear.

Figure 217
A summary report will appear at the completion of the creation of the new Tree. Note that there are NO images that were online. This is due to the nature of a GEDCOM file. No images are contained in a GEDCOM file.

Figure 218
More details can be seen on the View Log File.
Once this screen is closed, the People work space, Family view will be displayed.

Figure 219
Helpful Hints from the Family Tree Maker Knowledge Base website:
How to download your personal member family tree
Importing an Existing File in Family Tree Maker 2009
GEDCOM files and how they are used
How to download your personal member family tree
Importing an Existing File in Family Tree Maker 2009
GEDCOM files and how they are used
Subscribe to:
Posts (Atom)