Took a couple of days to actually do some research and to give a presentation on Family Tree Maker 2012 to a local Family History Interest Group. The great thing about working on this Brick Wall, is that I was able to share some of the experiences of the Brick Wall as part of the FTM2012 presentation. Use of some of the new features, as shared here, were examples for this group.
My colleague and friend is exploring Roots Magic 5, specifically, in the area of the Research Manager.
Exploring RootsMagic 5 - Post 2: The Research Manager
Earlier, I posted about File Sharing and Brick Walls - Part 5 - Task List.
I am afraid, from what I have read, they aren't quite the same. That is, Research Log and a Task List or To Do List.
This post will talk about the Task List.
Instead creating a bunch of screens on the Task feature, a screen capture of what is in the Help Menu might be helpful. To get there, click on Help, select the Index Tab, then scroll down to Tasks. The View selection provides some details on how to use the Task List.
When I am working with Tasks, I keep in mind a couple of things: 1) Tasks for a Person, 2) Generic Tasks for the File, and 3) File Notes.
File Notes: These notes are for generic notes that I want to include about the file, so that if I were to share the file with another researcher, it might answer some of the "why did he do that" questions. An example for this file is:
Identify Parents
Another is:
If document says "of" a place, will be reflected with a Residence Fact
I make all of my File Notes High Priority Tasks. No specific reason, but what them visible when I open the file.
What I am trying to relate in the first Task is that when I seen a reference to a person, and the reference says [ person's name ] is "OF" [ place ] that I will put that place name into the Residence Fact. That has helped me, in the past, to track where a person lived over time.
The second task here, is assigned to William Knapp (on the right side of the screen), as the Task is Identify Parents, of William Knapp. That Task will appear on the Task tab, in the People Workspace, Person View for William Knapp.
There are also Task Categories / Locations. The First Task is in a Category of File Notes, so that all of the File Notes can be seen by selecting that Category, and the Identify Parents has a Category of Locate. I keep these, as High Priority. Any other File Notes, will end up in the High Category, but I will have other "locate" items, but with a lower priority, as with trying to locate a document, or a book.
Right now, and this will certainly change, I have the following Categories.
- Census - Census Related
- Clean Up - To clean up an item for the file or a person
- Conflict - Need to Resolve conflicting information
- File Note - Notes about the file
- Locate - Find a item
- Review - Review data already entered, or another document
To see this list, I clicked on the Filter ICON
This ICON allow me to select only those Tasks for a select(ed) Category. Clicking on that ICON will bring up this screen.
Here is a couple of examples of the Tasks:
You will notice check marks in a number of these items. That means that they are one. I reviewed the Birth notes for David Auble, and the Residence notes for him. I cleaned up a couple of times, one for the file, where I removed all of the Death Description = Y from the GEDCOM, and I cleaned up Burial Notes for William Knapp.
There is one Conflict list above, where I need to resolve some conflicting information about Sarah Smith.
This task list helps me understand the work that needs to be done, or the work that HAS been done in this file. Again, generically or for a specific person.
A couple of days ago, I sent Randy an update on the work that I had done. I did that from the Publish Workspace, Person Category, Task List report.
Here is a sample of that report.
The two High Priority items are listed first, and that conflict is the 4th item. If an Item is complete, there will be a check mark in the Status Box.
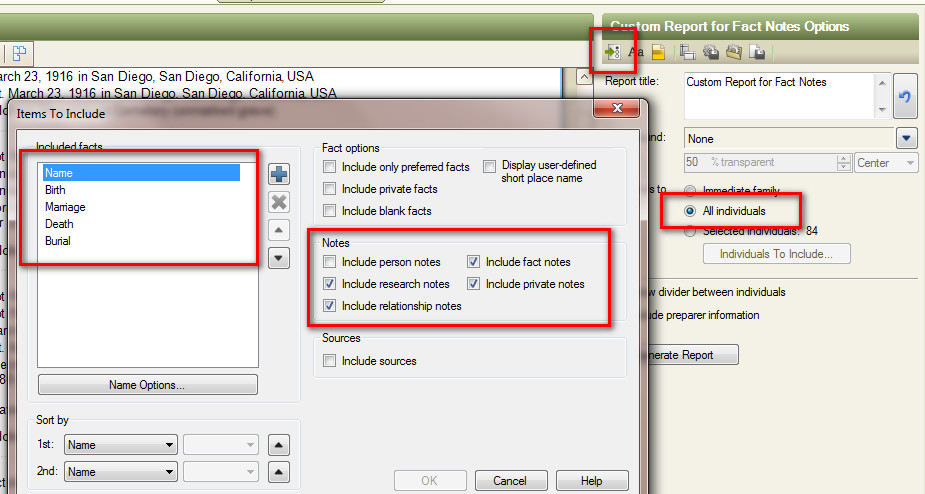
There are controls over what is in this report, as with other reports and charts in FTM2012.
One of the nice features about the Task List, from the Plan Workspace, is that you can get to a specific person's Task, but high lighting that person's name, and clicking on the GoTo button in the upper right corner of the Plan Workspace.
People Workspace, Person View:
Copyright © 2011 by H R Worthington