So, you created a Descendant Chart for a display or sending it to a cousin. This cousin may not be a genealogist or not familiar with such a Chart. So, you want to High Light or Color Code that chart for a couple of branches of this Chart.
Here is a piece of such a chart:
This chart covers 40 pages of 8.5 x 11. The red box indicates the branch to be highlighted for this person (or branch).
To Select the individual boxes, select the first box, hold the CTRL key, and select the other boxes that you want to highlight.
This will turn the outline of the boxes Blue.
Right Click on one of the boxes and a window will appear.
We're going to Mark Selected this group as Marking 1. So now this group of boxes, (or branch) are marked.
Selecting the 3rd ICON in the Right Hand Panel, will bring up a window where you can define the Color of the Border, Shading of the box, Shadow of the box, for Marked Boxes 1.
So all of the boxes Marked 1 will have a Red Outline and will have a gray fill, within the box. Make your own choices. I used these colors for the Blog, not necessarily good for reading on a chart. Below are the result of the choices what were made.
There are three Marked Groups available and many other options for how the Chart will display. This is only an example of highlighting a specific branch.
If you are going to Email this type of chart, you can Generate a PDF file, and attach it to an Email. Color another Branch to be sent to another cousin. Select Share, and select Export to PDF, and that will bring up a window to name the PDF file to be attached to the email.
________________________________________________________________
Copyright © 2012 by H R Worthington
These are notes from a Family Tree Maker User. With FTM2017 and FTM2019 the blog posts will apply to both the PC and the Mac Versions of the programs. Any differences will be noted
Showing posts with label Chart_Descendant. Show all posts
Showing posts with label Chart_Descendant. Show all posts
Wednesday, March 28, 2012
Monday, October 24, 2011
Direct Descendant Chart
A friend has returned to Family Tree Maker Version 2012. The chart will allow us to show the direct Descendant Chart between two people.
First, go to the Publish Workspace, and the Chart Collection. Choose the Descendant Chart. You can click on Generate Chart or double click on the Descendant Chart ICON.

Go to the Right Hand (RH) Panel and you will see some new selections. The default for the Descendants is All. but in this case we want to select one of the descendants. Selecting the pull down menu we will see the list of Descendants.
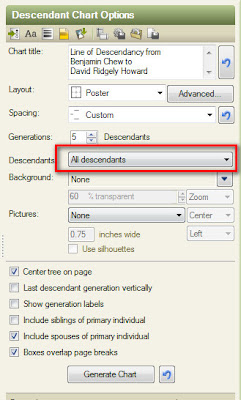
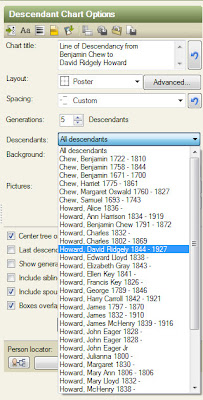
For this example, Benjamin Chew has been selected as the Ancestor and we want to show the Direct Descendant Chart down to David Ridgely Howard. So in the pull down menu we select David Ridgely Howard
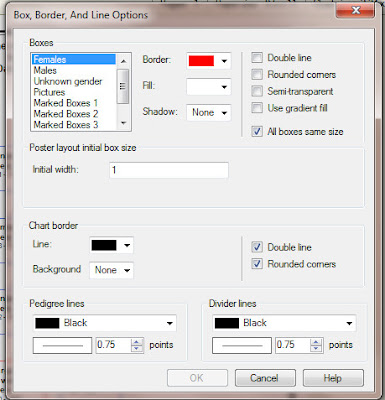
In the Box, Border, and Line Options we can do some color coding. In this example Red will be for Females and Blue for Males.
The borders of the boxes can be formatted with Double lines, Rounded Corners and other options.
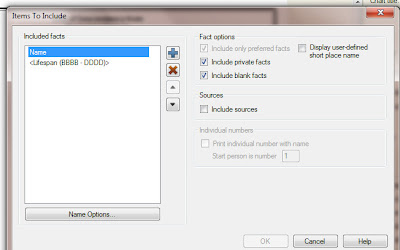
Will add the Birth - Death years to this Chart (YYYY - YYYY) or the Lifespan selection for each person to go along with the name. This is in the Items to Include ICON in the RH Panel.
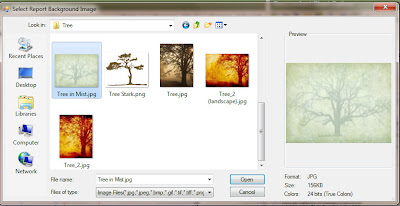
Will add a background to the chart, by selecting Background in the RH Panel, scroll through the selections and choose one.
The default Page Set Up for the Descendant Chart is Landscape. For this chart the Portrait setting was selected. The final chart is below.
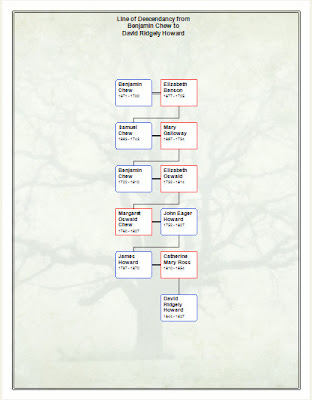
There are many ways that you can customize this Chart. To this user, this is much improved over what was in the earlier versions of Family Tree Maker.
Copyright © 2011 by H R Worthington
First, go to the Publish Workspace, and the Chart Collection. Choose the Descendant Chart. You can click on Generate Chart or double click on the Descendant Chart ICON.

Go to the Right Hand (RH) Panel and you will see some new selections. The default for the Descendants is All. but in this case we want to select one of the descendants. Selecting the pull down menu we will see the list of Descendants.

For this example, Benjamin Chew has been selected as the Ancestor and we want to show the Direct Descendant Chart down to David Ridgely Howard. So in the pull down menu we select David Ridgely Howard

In the Box, Border, and Line Options we can do some color coding. In this example Red will be for Females and Blue for Males.
The borders of the boxes can be formatted with Double lines, Rounded Corners and other options.

Will add the Birth - Death years to this Chart (YYYY - YYYY) or the Lifespan selection for each person to go along with the name. This is in the Items to Include ICON in the RH Panel.

Will add a background to the chart, by selecting Background in the RH Panel, scroll through the selections and choose one.

The default Page Set Up for the Descendant Chart is Landscape. For this chart the Portrait setting was selected. The final chart is below.

There are many ways that you can customize this Chart. To this user, this is much improved over what was in the earlier versions of Family Tree Maker.
Copyright © 2011 by H R Worthington
Subscribe to:
Posts (Atom)


