For those preparing to transition to another Genealogy software program.
This is one of several videos on transitioning to another Genealogy Software program. I think this is important to understand a few things about Family Tree Maker if you are going to move your genealogy database from Family Tree Maker to another program.
The move will be different based on the VERSION of Family Tree Maker that you have AND the Genealogy Program you might move to. This video is to help you find the Version of the program you are using and what you need to do just before you make that move.
Family Tree Maker started in the DOS days, and the Version numbers were just that, a version number. For example, my first version was Version 3.4. The Version number when up to Version 9, then Version 10, then Version 11. BUT in 2005, then changed to Version 2005, then 2006, then back to Version 16.
In 2008, then structure of the program was moved out of the DOS environment into the Windows environment. The Version numbers then started with FTM2008, FTM2009, FTM2010, FTM2011, FTM2012, and FTM2014.
In the Version 16 and earlier, all Media Files were INCLUDED in the FTW (file extension), making the files very large over time. This important to note for your transition.
Starting with FTM2008, the Media Files were in a < filename > Media folder. You would have a Filename for the Data, and a < filename > Media folder for all of the Media Files. Those media files would normally be in Media folder, but some users and their own filing structure for their media, maybe leaving those media files elsewhere on the computer. The program "knows" where they are so there are links from the database to those media files.
For Back Ups: as long as you manually back up, or Back Up as I demonstrate in this video, those Media Files will be in the Back Up file. For Version 16, the back up file extension would be FBC. For FTM2008 - FTM2014,the file extension is FTMB. Both the FBC and the manually generated FTMB file include those media files. IF you find a FTMB file that has the words "Automatic Back Up" that FTMB file would NOT include the media files, only the Data. The automatic back up would be generated if you just closed down the program without manually backing up the file.
In upcoming blog posts, I will deal with GEDCOM files. A GEDCOM will NOT include any media files. It is important thing to understand, with this transition, is the links to the Media Files. In FTM2008 through FTM2011 a GEDCOM file will NOT contain any information linking to the media files. With FTM2012 and FTM2014, the GEDCOM WILL include Links to those media files.
Here is a link to a number of blog posts on this
http://ftmuser.blogspot.com/search/label/GEDCOM
Here is a blog post I did about transferring a GEDCOM to Roots Magic
http://ftmuser.blogspot.com/2013/12/blog-post-on-hold-update.html
Bottom line here, KNOW the Specific Version of Family Tree Maker that you are using and Compact and Back Up your file when the option is offered using the Compact File utility.
Me: No Change. FTM2014 and all of its features work for me.
_______________________________________________________________
Copyright © 2015 by H R Worthington
Showing posts with label 2010. Show all posts
Showing posts with label 2010. Show all posts
Thursday, December 10, 2015
Friday, July 22, 2011
People Workspace - How To Resize Panels
How to change the size of the Panels in the People Workspace.
Here is the normal view of the People Workspace. The LH (Left Hand) Panel is the Index, or list of people in your file.
In the Center Panel, at the top, is the Pedigree View of your tree, based on the selected person. Below that, is the Family View, listing Parents and Children. The RH (Right Hand) Panel, is selected (user selected fact from the Custom View) information about the hilighted or selected person.

The Index and the Family View parts of this screen can be reduced or removed. Each panel can be selected to drag (open or close) these two portions of the screen, or resize them.
Look at this next screen to see how to Hide these two panels.

You will notice a Left Pointing arrow at the Top of the Index Panel, and a down pointing arrow above the Family View.
Clicking on either of these arrows will Hide that part of the screen.
See the Index (LH) Panel being closed.

And the Family View Closed.

Those same two arrows will allow you to restore the LH Panel or the Family View back to the original configuration.
Copyright © 2011 by H R Worthington
Monday, January 10, 2011
Family Tree Maker Tutorials
Posted: 10 Jan 2011 07:00 AM PST

Have you ever wanted a personal tutor to sit at your computer and show you how to use Family Tree Maker? We have a solution. Family Tree Maker has a variety of short video tutorials (each about 3 to 5 minutes long) that can help you quickly learn how to add, organize, and share your family history. They’re perfect for visual learners or anyone who wants a little direction or help using the software.
Here’s a list of the eight tutorials that are available:
Workspaces–teaches you about the seven workspaces that make up the Family Tree Maker software.
Building Family Tutorial–Shows you how to add spouses, children, and parents, and navigate in the People workspace.
Building Person Tutorial–Explains how to add events, facts, and media items for an individual.
Places Tutorial–Explains how the place authority works and teaches how to resolve unrecognized place names.
Media Tutorial–Illustrates the various ways to add media items and record details about them.
Sourcing Tutorial–Shows you how and where to create sources and source citations.
Publishing Tutorial–Explains the Publish workspace and also chart/report options and settings.
Web Search Tutorial–Illustrates Ancestry hints and search results and shows how to merge this information into your tree.
You can access all these tutorials online on the Family Tree Maker website. If you’re using versions 2009, 2010, or 2011, you can also access these tutorials within your Family Tree Maker software; simply select the Help menu, and choose Training Tutorials.
| You are subscribed to email updates from Ancestry.com Blog To stop receiving these emails, you may unsubscribe now. | Email delivery powered by Google |
| Google Inc., 20 West Kinzie, Chicago IL USA 60610 | |
Copyright © 2010 by H R Worthington
Friday, December 3, 2010
Family Tree Maker: Improving Performance
Posted on the Family Tree Maker Blog:
We all wish we had an unlimited amount of time to work on our family history. But since none of us do, it can be frustrating when the software you’re using seems to get in the way instead of helping. If Family Tree Maker starts running more slowly than you expect, here are six steps you can take to increase the software’s performance:
To work offline, go to the File menu and select Go Offline. To reenable Internet access, go to the File menu and select Go Online.
To disable Fastfields, go to the Tools menu and select Options. Deselect the checkboxes in the “Use fastfields for section” and click OK.
Copyright © 2010 by H R Worthington
Posted by Tana L. Pedersen on November 29, 2010 in Family Tree Maker
We all wish we had an unlimited amount of time to work on our family history. But since none of us do, it can be frustrating when the software you’re using seems to get in the way instead of helping. If Family Tree Maker starts running more slowly than you expect, here are six steps you can take to increase the software’s performance:
Verify that your computer meets the minimum system requirements
Make sure that your computer meets or exceeds the minimum requirements. You can find them listed in the packaging and documentation that came with your software. Also, keep in mind that the more information you enter, the greater the amount of free hard drive space and available RAM you will need.Make sure you are using the latest version of the software
Periodically, Family Tree Maker releases updates that fix various software bugs and issues. Make sure that the Family Tree Maker software is up-to-date by going to the Help menu and choosing Check for Update. A message alerts you if you need to update the software.Run the Compact File tool
The Compact File tool re-indexes your file, removes unnecessary data, and optimizes your tree’s performance. You can learn more on this blog post.Check your tree for duplicate individuals
Duplicate individuals can increase the overall size of your tree and make running reports, creating charts, and navigating your tree inefficient. Periodically you’ll want to make sure you’ve merged or deleted any unnecessary people. You can find detailed instructions on merging individuals in the Family Tree Maker Knowledgebase.Work offline
If you have a day where you’re simply entering information and not using the Web Search or virtual maps, consider temporarily disabling your Internet connection within Family Tree Maker. This can really speed up your system, especially if you’re working in a large tree.To work offline, go to the File menu and select Go Offline. To reenable Internet access, go to the File menu and select Go Online.
Disable Fastfields
Fastfields speed up data entry by automatically filling in repetitive data as you type. For example, if you type “San Jose, California” into a location field, then go to another location field and begin to type “San,” Family Tree Maker will recognize the similarity and suggest “San Jose, California.” Disabling this feature can increase performance, especially in large databases.To disable Fastfields, go to the Tools menu and select Options. Deselect the checkboxes in the “Use fastfields for section” and click OK.
Copyright © 2010 by H R Worthington
Saturday, August 21, 2010
FTM 2010 - Plan Workspace - New Tree
This is the Family Tree Maker Plan Workspace
New Tree Tab

There are options as to how to start a new tree in the left part of this screen.
In the Right Hand Panel, at the top, is a list of files that has been opened in the past.
Below that is the Web Dashboard which will reflect any Ancestry.com Online Subscription information and status. Below that is a list of any Member Family Trees that you may have, and below that is any Postings or status from Ancestry.com. For example, if there was a planned outage, that would be posted in the lower right panel.
One way to start a New Tree, is to Enter the information that you may have.
Enter What You Know
In the example below, only the Name is entered, as Source-Citation will be added for each FACT entered, including the name, but that will be in a different workspace.
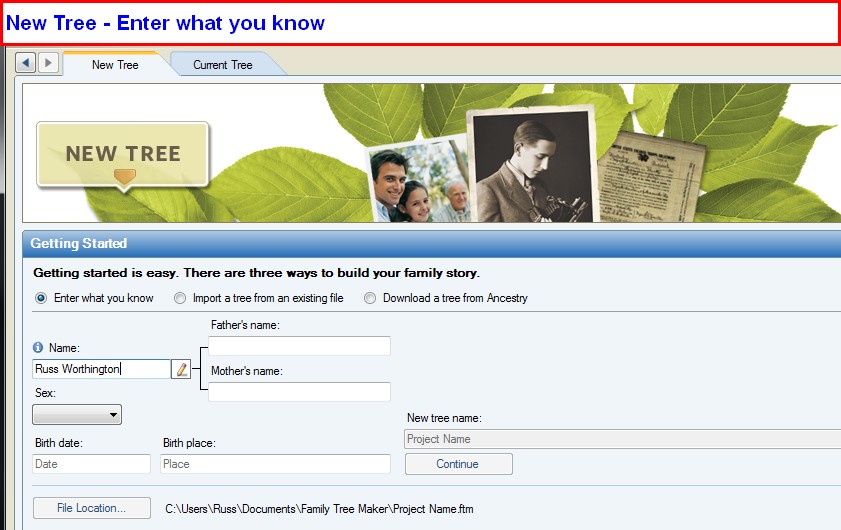
The Project Name field would become the Filename, so enter the name of this Family File. The File Location is near the bottom of this screen. Where on your hard drive is this file located.
Other ways to start a new Tree or File will follow.
Thursday, August 12, 2010
Family Tree Maker Verison 2010 - Web Search Workspace
If you have an Internet connection and Ancestry.com account, you can search the vast store of databases at Ancestry.com to find more information about the people in your tree. With an Internet connection you can also search other sites that are part of Ancestry.com or other independent genealogy sites.
Copyright © 2010 by H R Worthington
Copyright © 2010 by H R Worthington
Family Tree Maker Verison 2010 - Publish Workspace
Lets you print or share charts and reports from a variety of templates. You can customize a chart or report according to your needs, including background images, colors, and fonts.
Copyright © 2010 by H R Worthington
Copyright © 2010 by H R Worthington
Family Tree Maker Verison 2010 - Sources Workspace
Helps you manage the sources associated with facts. You can quickly locate sources, view what they are connected to, remove connections, and edit citations, sources, and repositories quickly.
Copyright © 2010 by H R Worthington
Copyright © 2010 by H R Worthington
Family Tree Maker Verison 2010 - Media Workspace
Helps you manage images, audio recordings, movies, documents, and more. You can easily view media by category, person, source, and other groupings. You can see what a media file is linked to and link it to other people or sources, or unlink it.
Copyright © 2010 by H R Worthington
Copyright © 2010 by H R Worthington
Family Tree Maker Verison 2010 - Plan Workspace
Helps you organize, create, and import projects into Family Tree Maker. Once you have a project to work on, Plan shows you the status of your projects, the tasks are left uncompleted, and the last person you were working on. It is the initial workspace each time you start up Family Tree Maker.
Copyright © 2010 by H R Worthington
Copyright © 2010 by H R Worthington
Family Tree Maker Verison 2010 - Places Workspace
Helps you locate the places associated with a person. Seeing the locations and viewing who spent their lives there can help lead you to breakthroughs.
Copyright © 2010 by H R Worthington
Copyright © 2010 by H R Worthington
FTM2010 - Workspaces
Family Tree Maker has seven Workspaces that were introduced with Family Tree Maker version 2008. New articles will be posted providing additional information for each of these Workspaces.
Workspaces
Copyright © 2010 by H R Worthington
Workspaces
- Plan
- People
- Places
- Media
- Sources
- Publish
- Web Search
Copyright © 2010 by H R Worthington
Family Tree Maker Verison 2010 - People Workspace
Helps you enter and manage all of the names and facts of the people and families in your family tree. This is the place where you will probably spend most of your time. It displays the Family view and Pedigree view and conveniently combines them with the Index, Notes, Sources, Edit Individual and a few more functions.
Copyright © 2010 by H R Worthington
Copyright © 2010 by H R Worthington
Tuesday, June 8, 2010
Family Tree Maker Version 2010 - Patch for Windows Vista or Windows 7
There is a Patch for Family Tree Maker Version 2010 for computers using Windows Vista or Windows 7. Clicking on this link will take you to the Knowledge Base website with instructions and the patch. I till bring the Product Version to 19.0.0.207.
From the Knowledge Base website:
© 2010, copyright H R Worthington
From the Knowledge Base website:
| Question: | ||||
| How do I resolve issues creating, importing, or downloading a tree into Family Tree Maker 2010 on Windows Vista or 7? | ||||
| ||||
After releasing Family Tree Maker 2010, we’ve had some members using Windows Vista or Windows 7 experience issues creating, importing, or downloading trees. Many of these issues can be resolved by installing the update patch from the links below.
|
© 2010, copyright H R Worthington
Wednesday, May 26, 2010
Family Tree Maker Webinar, Wednesday, June 16, 2010 at 8:00pm Eastern
Ancestry.com | Family Tree Maker 2010
Your family tree has come so far.
Now let us help you extend it.
Family Tree Maker Advanced Topics
Wednesday, June 16, 2010 at 8:00pm Eastern
Register today for this FREE WEBINAR
Join the Family Tree Maker 2010 team as we take you on a tour of the software and demonstrate some of the advanced features available in Family Tree Maker 2010—Ancestry’s premium family tree software.
In the webinar we will share tips on features like these:
* Publishing charts and reports
* Working with Web Search
* Merging
* Exporting different branches of your tree
* Using keyboard shortcuts
* Attaching and detaching people
* Choosing relationship types (for souses and children)
* Resolving unrecognized place names
Additionally, we will have some of our developers—the folks behind the scenes—answer some of your questions. Please submit your questions in advance by visiting the Family Tree Maker blog.
We hope you will join us and the Family Tree Maker community to learn more about some advanced tools that will help you create a more complete and accurate tree.
Register now
SPEAKER — Duff Wilson, Sr.
User Interface Designer — Family Tree Maker
Duff has 20 years of software design and development experience creating user-friendly interface designs which have earned national awards. He holds a master’s degree from Utah State University in instructional technology with an emphasis in computer-based instruction. He is an avid genealogist. In the process of designing Family Tree Maker, Duff has worked closely with countless genealogists, ranging from novice to expert.
Moderator — Michelle Pfister
Senior Product Manager — Family Tree Maker
Michelle has 20 years industry experience with companies such as Microsoft, WordPerfect, and NTT/Verio. Products she has worked on include Microsoft SharePoint, WordPerfect Suite, Corel WordPerfect Legal Edition, and several Verio eCommerce offerings. One of her passions is making software simple to use, yet powerful for the pros.
© 2010 Ancestry.com
PRIVACY STATEMENT
Ancestry.com does not sell, rent or otherwise distribute the personal information you provide us to third party advertisers.
Questions? Comments? Please don’t reply to this email as we cannot respond to messages sent to this address. Instead, visit our online help center to get answers to common questions or send us a message. You can also contact us at:
Ancestry.com Operations Inc.
Attn: Customer Service
360 West 4800 North
Provo, UT 84604
USA
© 2010, copyright H R Worthington
Your family tree has come so far.
Now let us help you extend it.
Family Tree Maker Advanced Topics
Wednesday, June 16, 2010 at 8:00pm Eastern
Register today for this FREE WEBINAR
Join the Family Tree Maker 2010 team as we take you on a tour of the software and demonstrate some of the advanced features available in Family Tree Maker 2010—Ancestry’s premium family tree software.
In the webinar we will share tips on features like these:
* Publishing charts and reports
* Working with Web Search
* Merging
* Exporting different branches of your tree
* Using keyboard shortcuts
* Attaching and detaching people
* Choosing relationship types (for souses and children)
* Resolving unrecognized place names
Additionally, we will have some of our developers—the folks behind the scenes—answer some of your questions. Please submit your questions in advance by visiting the Family Tree Maker blog.
We hope you will join us and the Family Tree Maker community to learn more about some advanced tools that will help you create a more complete and accurate tree.
| Family Tree Maker Advanced Topics Wednesday, June 16, 2010 at 8:00pm Eastern Register today for this FREE WEBINAR |
Register now
SPEAKER — Duff Wilson, Sr.
User Interface Designer — Family Tree Maker
Duff has 20 years of software design and development experience creating user-friendly interface designs which have earned national awards. He holds a master’s degree from Utah State University in instructional technology with an emphasis in computer-based instruction. He is an avid genealogist. In the process of designing Family Tree Maker, Duff has worked closely with countless genealogists, ranging from novice to expert.
Moderator — Michelle Pfister
Senior Product Manager — Family Tree Maker
Michelle has 20 years industry experience with companies such as Microsoft, WordPerfect, and NTT/Verio. Products she has worked on include Microsoft SharePoint, WordPerfect Suite, Corel WordPerfect Legal Edition, and several Verio eCommerce offerings. One of her passions is making software simple to use, yet powerful for the pros.
© 2010 Ancestry.com
PRIVACY STATEMENT
Ancestry.com does not sell, rent or otherwise distribute the personal information you provide us to third party advertisers.
Questions? Comments? Please don’t reply to this email as we cannot respond to messages sent to this address. Instead, visit our online help center to get answers to common questions or send us a message. You can also contact us at:
Ancestry.com Operations Inc.
Attn: Customer Service
360 West 4800 North
Provo, UT 84604
USA
© 2010, copyright H R Worthington
Tuesday, May 18, 2010
How To Enter an individual who Never Married
The Family Tree Maker Blog has a great article on how to enter an individual who Never Married. Please stop by and see the article at:
http://blogs.ancestry.com/ancestry/2010/05/17/family-tree-maker-unmarried-or-childless-relatives/#comment-45983
I actually ran into this situation in my own file. In the source I was reading, it actually stated that this person Never Married with the "UNM" abbreviation. Here is what the source said:
Mary Virginia, b. Nov. 25, 1878, East Bradford; d. Aug. 5, 1946, West Chester; unm
Here is what I did:
In the People Workspace, Person Tab, clicked on the "+" on the Individual & Shared Facts bar, on the right, and selected New.

Entered "No Descendants" into the Fact Label, and selected Description Only.

To have the No Descendants appear in Charts and Reports, the words No Descendants is typed into the Description field.

To indicate that this person Never Married, the Marriage Fact is selected from the "+" menu, and typed Never Married into the Description field in the Marriage Fact.

The appropriate Source-Citations are added to both entries.
Changes may need to be made in how the Marriage Fact is displayed in Charts and Reports. In this example, will use the Family Group Sheet.
Go to the Publish Workspace, selecting Relationship Reports from the Collection, and Family Group Sheet from the Detail selection. When the initial report is generated, click on the "Items to Include" in the Right Hand Panel under the Family Group Sheets Options. Then select Marriage, then Select Marriage Options.

This will bring up the Marriage Options, where the Description field will be clicked to add the bullet into that field.

To Add the No Descendants to the Family Group Sheet, the Green Plus sign, at the top of the Items to Include screen and selecting No Descendants from the pull down menu will result in this:

The Family Group Sheet now included the the Never Marriage (Marriage Fact) Description and the No Descendants Fact.

Although the Spouse and the parents of the Spouse and list of children are reported, the reason that them being blank is shown in the in the Marriage Fact Description and the No Descendants Fact.
Note: other information has been grayed out on purpose for this example.
© 2010, copyright H R Worthington
Wednesday, May 12, 2010
Use of Source Citation Template - LDS Film - Same Film, New Person
In Use of Source Citation Template - LDS Film the steps were described to locate the appropriate Template for an LDS Film that had a Baptismal Record for Michael Hricz-Gyurik, some one in the Family File. Looking further, in that same Film, another record was found. This time it was for his sister, Joannes. However, this information was found on Page 133, Entry 27, in June 1862.
Because this information is on a Different Page, that would mean that a New Source-Citation would be created from the Same Source.
To add the Child, go to the People Workspace, Family Tab where you see Michael, Select Add Child:

A pop up window will open where the child's name is added, and the sex selected.
Going to Joannes Person Tab, Selecting the Name Fact, (center panel), the Source in the Right Panel, the Add New Source Citation is added. The reason that the Existing Source Citation is NOT used, is because this information is on a Different Page in the Source.

Selecting the Source, is the same as the previous most. Clicking on the Down Arrow on the Right of the Source title: will bring up the list of Sources. In this case, the Greek Catholic Church entry is selected.

With the Source selected, the Citation Details and Citation Text is entered.

Notice the new (different) information for this Source Citation.
Returning to the Source Workspace, selecting the Greek Catholic Church Source, the New Source-Citation is listed, with the new Citation Details and Text.

Returning to the Publish Workspace, Relationship Collection, Family Group Sheet, we will see:

The new Source Citation is now listed for Joannes.
As before, a Link was added to Hiram (the father's name, as his name was listed) Name Fact, using the Link To Existing Source Citation, and selecting the new Source Citation.
Looking a little closer to the Family Group Sheet, you will see the subscript numbers pointing to the two Sources. #1 and #2 are to the right of Hiram's Name, while #1 is by Michael's, and #2 is by Joannes Name.

© 2010, copyright H R Worthington
Because this information is on a Different Page, that would mean that a New Source-Citation would be created from the Same Source.
To add the Child, go to the People Workspace, Family Tab where you see Michael, Select Add Child:

A pop up window will open where the child's name is added, and the sex selected.
Going to Joannes Person Tab, Selecting the Name Fact, (center panel), the Source in the Right Panel, the Add New Source Citation is added. The reason that the Existing Source Citation is NOT used, is because this information is on a Different Page in the Source.

Selecting the Source, is the same as the previous most. Clicking on the Down Arrow on the Right of the Source title: will bring up the list of Sources. In this case, the Greek Catholic Church entry is selected.

With the Source selected, the Citation Details and Citation Text is entered.

Notice the new (different) information for this Source Citation.
Returning to the Source Workspace, selecting the Greek Catholic Church Source, the New Source-Citation is listed, with the new Citation Details and Text.


The new Source Citation is now listed for Joannes.
As before, a Link was added to Hiram (the father's name, as his name was listed) Name Fact, using the Link To Existing Source Citation, and selecting the new Source Citation.
Looking a little closer to the Family Group Sheet, you will see the subscript numbers pointing to the two Sources. #1 and #2 are to the right of Hiram's Name, while #1 is by Michael's, and #2 is by Joannes Name.

© 2010, copyright H R Worthington
Monday, May 10, 2010
Use of Source Citation Template - LDS Film
This blog post will show how to use the Family Tree Maker Template, for an LDS Film that was located at a local Family History Library. The film was found at the North Caldwell, New Jersey, Family History Library. This was a Baptisms, Marriages, and Deaths file rom 1831-1864 for the Greek Catholic Church located in Cemerne, Saris, Slovakia.
One way to start the documentation for this record is to go to the Sources Workspace, then clicking on the Add ICON in the upper right of the list of Sources. This will bring up the following window, where the New button will be selected.
The first thing to be recorded, starting from the Source Workspace, is a New Document or Book, or in this case a Microfilm from the LDS Family History Library.

The new Source will allow us to enter a "Keyword". Since we know this is a LDS film, typing the letters L, D, then S, will bring up the suggested Template for an LDS Film.

Selecting the suggtion will bring up an Add Source Screen, since this is the first new Source using the Microfilm template. The screen below will show the fields that will be filled in during this process.

For this case, the Source Repository is in my genealogy filing cabinet. Using the Down Arrow to the right of the Source repository, my name was selected.
The Church name and location was entered, "Greek Catholic Church" in the Church/author field, Cemerne, Saris, Slovakia, in the Church Location field. The Record Series "Baptisms, Marriages, Deaths, 1831-1864" was entered. This information was found with the LDS Film. The Film ID was also recorded as found in the film documentation. There was no Call Number for this film. Wanting to remember that a Copy of the film was in my possession, a Comment was made for this Source.

At this point, we have created a New Source.
The person whose record was found was Michael Hricz-Gyunik. Going to the People Workspace, Person Tab, and selecting the Name (Fact), in the Right Hand Panel, under the name, the New, Down Arrow showed this menu, and Add New Source Citation was selected, as this is the first Source Citation to be entered for this Source.

Since the Source has already been created, clicking on the Pull Down Menu (1) has the list of Sources already in the file. Selecting the Greek Catholic Church item will open a Source Citation window for this specific Source Citation.

The two fields to be completed are the Citation Detail and the Citation Text. In these two fields, what should be entered into them is shows in light gray. "Enter the record book, volume, page, and description of the item (including date)", for the Citation Detail, and "Enter pertinent text from the source and/or an explanation of the relevance of the data to your research", for the Citation Text.

From the film, the LDS Film Number, the Item, Page, and Entry numbers are recorded in the Citation Detail. The Citation Text included the Individuals Name, the Parents Names, the Birth Date, the Baptism Date, and God Parents names, as they appeared in the Film.

The following step will be done for each Fact that is entered into Family Tree Maker. For example, the Father's Name, as shown below. The Father's name, Hiram Hricz-Gyunik was selected, but this time the "Use an Existing Source Citation" menu item would be selected, as the Source-Citation for this document has already been filled about.

The list of Source-Citations is brought up and by letting the Mouse rest over the Source-Citation, the details are shown in order to select the correct Source-Citation.

Selecting Greek Catholic Church, the clicking on Link to Citation will put this Source-Citation onto Hiram's Name Fact.

To see what the Source-Citation will look like, go to theSources Workspace, selecting the Greek Catholic Church entry, in the Left Panel, then selecting the Print ICON on the right, will bring up a Source-Citation Usage Report.


Going to the Publish, Relationship Collection and Family Group Sheet, for the Father, Hiram, the Sources are listed. Note: these are the only Source-Citations for this family. Additional Source-Citations would be listed as entered.

This process would be used to document the names and facts obtained from this specific part of the Film. If other information was obtained from a different part of this same file, another Source-Citation would be created, starting at the New Source-Citation, under New Source above. The New Source would allow for new / different Citation Details and Text. Do Not Use the "Use Existing" further down this blog item, as it will bring up the existing Citation Details and Source Text.
© 2010, copyright H R Worthington

Friday, April 2, 2010
How To: Source a Book - Copy / Paste Source-Citation - A Short Cut
In How To: Source a Book a family book was found and it showed how to create a Source and Source-Citations from information from that book. As you might expect, there may be many Source-Citation entries to be done.
This post how to use a built in short cut to speed up this process.
In the notes, from the book, the wife, Rachel Pearl Johnston's father's name was mentioned. So, we want to add him to the file. For this example, the Add Father button, in the Mini-Pedigree navigation part of the People Workspace, Person Tab is used. With the pull down menu, to the Right of Add Father, the Add Father item is selected.

This will open an Add Father window, where the Name is added. Filling in that field, checking the Sex, Clicking OK will add the father's name to the file.

In the earlier Blog:How To: Source a Book a Source-Citation was created. Clicking on the Pull Down menu, to the Right of New, in the Sources tab, Use Existing Source Citation (CTRL+SHFT+S) will be used.

As before, a list of Source-Citations will be listed, letting the mouse hover over the Source-Citation, more information is provided. The high-lighted one, is the one from the previous Blog that referred to #338 Ellwood Palmer Strode.

The Link to Citation was selected for this Source-Citation. This Source-Citation has been added. Now another Fact, from that same Source-Citation is going to be added, and we want to Copy that Source-Citation to the 'next' Fact.
Right Clicking on that listed Source-Citation will bring up another piece of that Menu. Selection Copy, will be used to Copy that Source-Citation to the Next Fact.

The next Fact was added, in this case a Residence Fact, then using the pull down menu to the Right of New, will provide the Paste Duplicate Source Citation option.

Completing that Paste, the Source-Citation is added to that Fact.

© 2010, copyright H R Worthington
Thursday, April 1, 2010
How To: Source a Book
So, you found and purchased a book that has genealogical information about your Family. How do you Cite your Sources from this book.
When I pick up a book, for the first time, I start at the Sources Workspace. This same process can be done from the People Workspace, Person Tab, and selecting a Fact. But I will start in the Sources Workspace to enter the information about this book. Will add Source-Citation information later.
Going to the Sources Workspace, selecting Add, on the Right side of that screen, an Add Source window will open. For this example, a Keyword will be used to locate the correct Template. "Book" is entered:

Below is the types of Books that have specific Templates.

The Book is a Print Publication. So that entry is selected:

Selecting that will bring up the Add Source Screen to be filled in. All of this information is in the front cover of the book. There is no call number or an ISBN number.

Clicking OK will bring up a completed Source Citation screen.

As it appears that there is a lot of information in this book, the other fields will be left blank, at this point.
Since some of the following steps have been covered in other blog posts, screen prints won't be here.
Going to the People Workspace, Person Tab, the information about the individual is entered. In this case, the Name is Ellwood Palmer Strode. The Name Fact is selected, at the top of the list of Facts, the Right Hand (RH) Panel will present his name and under the name is the Fact, Sources, Media, Notes line. Selecting New and select Use Existing Source-Citation selection, which will bring up a screen, where you select a New Copy. Keep in mind that earlier, the Source-Citation was left blank, but want to use that same Source-Citation for specific information about this person and fact.

The new (copy) of the Source-Citation screen is presented and is filled in. In this specific book, each individual has a Number followed by the name. In addition to the number and name, the page number is entered. Since there is more information on this page, the details of that information will be put into the Notes section for this individual. That is noted in the Citation text, for clarity in End Notes.

Going to the notes section for this individual, specific information is recorded. Because there are written notes in the book, they are also noted. Also, there is some missing information in the book. For clarity, the Text in this paragraph are marked in Bold, as a reminder to pick them up as Facts for this person and other people in this family.

Since this has his Birth Date, that Fact is entered, with birth date and location.

This time, since the same source-citation is going to be used, the New pull down menu, and the Use Existing Source Citation and the Link to Citation option is used. Since there may be multiple 'existing' Source-Citations, placing the mouse cursor over the specific Source-Citation will bring up more details on that Source-Citation. The screen capture would not show in the following screen. The right Source-Citation entry is selected AND the Link to Citation button is used this time.

Let's see what we have so far. Going to the Publish Workspace, Individual, Individual Report, the following Report is generated. The Items to include ICON, in the RH Panel, is verified to Include Sources in the Report. The Birth and Death Facts were entered and Cited. There are subscript number at the end of the Facts with Source-Citations and the Source is shown at the end. The text from the Notes section is also included.

After entering more information from what is indicated in the Notes, return to the Publish Workspace, Relationship Collection and the Family Group Sheet to see the current statue of this Family. As above, each fact indicates that a Source-Citation is associated with it, and is presented at the end of Family Group Sheet.

Going back to the Source Workspace, each Source can be Rated. In the Center panel, at the bottom, is a list of people using that Source-Citation. on the tool bar between the top and bottom of the center panel is a Start. Clicking on that Star will allow the user to Rate the Source. Selecting the "Use standardized ratings" check mark, there are four questions that you select and the details are on the Right. In this case, there are primary sources needed and needs some follow up. As noted above, some of the information on the page about this person are hand written. You can note your justification at the bottom of that screen.

Closing that window, with the OK button, the Source-Citation screen appears. So see details about that specific Source-Citation, hi-lighting it will provide the details on the Right and who is using that Source-Citation on which Facts.

Selecting the "[no source-citation information]" link shows blanks on the right and the indication that no one is using it. This is there so that it can be selected for the next person listed in the text from the book. It is basically a blank Source-Citation and not being used. Because there is much more information, that [no source-citation information] line will remain.

Returning to the next person mentioned, selecting the name, or other Facts, the New Source, Link to Existing Source-Citation menu is uses, and Create New Copy

Returning to the updated Family Group Sheet, in the Publish workspace, Relationship Collection, the second Source-Citation appears. What was added, based on the text in the notes, the Birth Date and location was added, with it's source-citation.

These steps are repeated until the information in this book are entered and cited.
© 2010, copyright H R Worthington
Subscribe to:
Posts (Atom)