Wednesday, May 26, 2010

Family Tree Maker Webinar, Wednesday, June 16, 2010 at 8:00pm Eastern

Ancestry.com | Family Tree Maker 2010

Your family tree has come so far.
Now let us help you extend it.
Family Tree Maker Advanced Topics
Wednesday, June 16, 2010 at 8:00pm Eastern

Register today for this FREE WEBINAR


Join the Family Tree Maker 2010 team as we take you on a tour of the software and demonstrate some of the advanced features available in Family Tree Maker 2010—Ancestry’s premium family tree software.

In the webinar we will share tips on features like these:

* Publishing charts and reports
* Working with Web Search
* Merging
* Exporting different branches of your tree
* Using keyboard shortcuts
* Attaching and detaching people
* Choosing relationship types (for souses and children)
* Resolving unrecognized place names

Additionally, we will have some of our developers—the folks behind the scenes—answer some of your questions. Please submit your questions in advance by visiting the Family Tree Maker blog.

We hope you will join us and the Family Tree Maker community to learn more about some advanced tools that will help you create a more complete and accurate tree.


Family Tree Maker Advanced Topics
Wednesday, June 16, 2010 at 8:00pm Eastern

Register today for this FREE WEBINAR
Register


Register now

SPEAKER — Duff Wilson, Sr.

User Interface Designer — Family Tree Maker

Duff has 20 years of software design and development experience creating user-friendly interface designs which have earned national awards. He holds a master’s degree from Utah State University in instructional technology with an emphasis in computer-based instruction. He is an avid genealogist. In the process of designing Family Tree Maker, Duff has worked closely with countless genealogists, ranging from novice to expert.

Moderator — Michelle Pfister

Senior Product Manager — Family Tree Maker

Michelle has 20 years industry experience with companies such as Microsoft, WordPerfect, and NTT/Verio. Products she has worked on include Microsoft SharePoint, WordPerfect Suite, Corel WordPerfect Legal Edition, and several Verio eCommerce offerings. One of her passions is making software simple to use, yet powerful for the pros.
© 2010 Ancestry.com

PRIVACY STATEMENT
Ancestry.com does not sell, rent or otherwise distribute the personal information you provide us to third party advertisers.

Questions? Comments? Please don’t reply to this email as we cannot respond to messages sent to this address. Instead, visit our online help center to get answers to common questions or send us a message. You can also contact us at:

Ancestry.com Operations Inc.
Attn: Customer Service
360 West 4800 North
Provo, UT 84604
USA


© 2010, copyright H R Worthington

Tuesday, May 18, 2010

How To Enter an individual who Never Married

The Family Tree Maker Blog has a great article on how to enter an individual who Never Married. Please stop by and see the article at:

http://blogs.ancestry.com/ancestry/2010/05/17/family-tree-maker-unmarried-or-childless-relatives/#comment-45983


I actually ran into this situation in my own file. In the source I was reading, it actually stated that this person Never Married with the "UNM" abbreviation. Here is what the source said:

Mary Virginia, b. Nov. 25, 1878, East Bradford; d. Aug. 5, 1946, West Chester; unm

Here is what I did:

In the People Workspace, Person Tab, clicked on the "+" on the Individual & Shared Facts bar, on the right, and selected New.


 Entered "No Descendants" into the Fact Label, and selected Description Only.


To have the No Descendants appear in Charts and Reports, the words No Descendants is typed into the Description field.


To indicate that this person Never Married, the Marriage Fact is selected from the "+" menu, and typed Never Married into the Description field in the Marriage Fact.


The appropriate Source-Citations are added to both entries.

Changes may need to be made in how the Marriage Fact is displayed in Charts and Reports. In this example, will use the Family Group Sheet.

Go to the Publish Workspace, selecting Relationship Reports from the Collection, and Family Group Sheet from the Detail selection. When the initial report is generated, click on the "Items to Include" in the Right Hand Panel under the Family Group Sheets Options. Then select Marriage, then Select Marriage Options.


This will bring up the Marriage Options, where the Description field will be clicked to add the bullet into that field.


To Add the No Descendants to the Family Group Sheet, the Green Plus sign, at the top of the Items to Include screen and selecting No Descendants from the pull down menu will result in this:


The Family Group Sheet now included the the Never Marriage (Marriage Fact) Description and the No Descendants Fact.


Although the Spouse and the parents of the Spouse and list of children are reported, the reason that them being blank is shown in the in the Marriage Fact Description and the No Descendants Fact.


Note: other information has been grayed out on purpose for this example.


© 2010, copyright H R Worthington

Wednesday, May 12, 2010

Use of Source Citation Template - LDS Film - Same Film, New Person

In  Use of Source Citation Template - LDS Film the steps were described to locate the appropriate Template for an LDS Film that had a Baptismal Record for Michael Hricz-Gyurik, some one in the Family File. Looking further, in that same Film, another record was found. This time it was for his sister, Joannes. However, this information was found on Page 133, Entry 27, in June 1862.

Because this information is on a Different Page, that would mean that a New Source-Citation would be created from the Same Source.

To add the Child, go to the People Workspace, Family Tab where you see Michael, Select Add Child:


A pop up window will open where the child's name is added, and the sex selected.

Going to Joannes Person Tab, Selecting the Name Fact, (center panel), the Source in the Right Panel, the Add New Source Citation is added. The reason that the Existing Source Citation is NOT used, is because this information is on a Different Page in the Source.


Selecting the Source, is the same as the previous most. Clicking on the Down Arrow on the Right of the Source title: will bring up the list of Sources. In this case, the Greek Catholic Church entry is selected.


 With the Source selected, the Citation Details and Citation Text is entered.


Notice the new (different) information for this Source Citation.

Returning to the Source Workspace, selecting the Greek Catholic Church Source, the New Source-Citation is listed, with the new Citation Details and Text.


Returning to the Publish Workspace, Relationship Collection, Family Group Sheet, we will see:


The new Source Citation is now listed for Joannes.

As before, a Link was added to Hiram (the father's name, as his name was listed) Name Fact, using the Link To Existing Source Citation, and selecting the new Source Citation.

Looking a little closer to the Family Group Sheet, you will see the subscript numbers pointing to the two Sources. #1 and #2 are to the right of Hiram's Name, while #1 is by Michael's, and #2 is by Joannes Name.


© 2010, copyright H R Worthington

Monday, May 10, 2010

Use of Source Citation Template - LDS Film

This blog post will show how to use the Family Tree Maker Template, for an LDS Film that was located at a local Family History Library. The film was found at the North Caldwell, New Jersey, Family History Library. This was a Baptisms, Marriages, and Deaths file rom 1831-1864 for the Greek Catholic Church located in Cemerne, Saris, Slovakia.

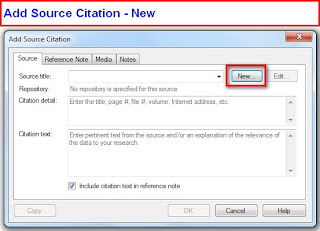
One way to start the documentation for this record is to go to the Sources Workspace, then clicking on the Add ICON in the upper right of the list of Sources. This will bring up the following window, where the New button will be selected.

The first thing to be recorded, starting from the Source Workspace, is a New Document or Book, or in this case a Microfilm from the LDS Family History Library.


The new Source will allow us to enter a "Keyword". Since we know this is a LDS film, typing the letters L, D, then S, will bring up the suggested Template for an LDS Film.


Selecting the suggtion will bring up an Add Source Screen, since this is the first new Source using the Microfilm template. The screen below will show the fields that will be filled in during this process.


For this case, the Source Repository is in my genealogy filing cabinet. Using the Down Arrow to the right of the Source repository, my name was selected.

The Church name and location was entered, "Greek Catholic Church" in the Church/author field, Cemerne, Saris, Slovakia, in the Church Location field. The Record Series "Baptisms, Marriages, Deaths, 1831-1864" was entered. This information was found with the LDS Film. The Film ID was also recorded as found in the film documentation. There was no Call Number for this film. Wanting to remember that a Copy of the film was in my possession, a Comment was made for this Source.


At this point, we have created a New Source.

The person whose record was found was Michael Hricz-Gyunik. Going to the People Workspace, Person Tab, and selecting the Name (Fact), in the Right Hand Panel, under the name, the New, Down Arrow showed this menu, and Add New Source Citation was selected, as this is the first Source Citation to be entered for this Source.


Since the Source has already been created, clicking on the Pull Down Menu (1) has the list of Sources already in the file. Selecting the Greek Catholic Church item will open a Source Citation window for this specific Source Citation.


The two fields to be completed are the Citation Detail and the Citation Text. In these two fields, what should be entered into them is shows in light gray. "Enter the record book, volume, page, and description of the item (including date)", for the Citation Detail, and "Enter pertinent text from the source and/or an explanation of the relevance of the data to your research", for the Citation Text.


From the film, the LDS Film Number, the Item, Page, and Entry numbers are recorded in the Citation Detail. The Citation Text included the Individuals Name, the Parents Names, the Birth Date, the Baptism Date, and God Parents names, as they appeared in the Film.


The following step will be done for each Fact that is entered into Family Tree Maker. For example, the Father's Name, as shown below. The Father's name, Hiram Hricz-Gyunik was selected, but this time the "Use an Existing Source Citation" menu item would be selected, as the Source-Citation for this document has already been filled about.


The list of Source-Citations is brought up and by letting the Mouse rest over the Source-Citation, the details are shown in order to select the correct Source-Citation.


Selecting Greek Catholic Church, the clicking on Link to Citation will put this Source-Citation onto Hiram's Name Fact.


To see what the Source-Citation will look like, go to theSources Workspace, selecting the Greek Catholic Church entry, in the Left Panel, then selecting the Print ICON on the right, will bring up a Source-Citation Usage Report.


Below is that report, showing the Source Title, Repository, since a copy is in my files, the Citation Details, and Citation Text, as reflected above, is presented in the report, along with the Name and Facts that are using this Source-Citation. For this example, its the two name facts.


Going to the Publish, Relationship Collection and Family Group Sheet, for the Father, Hiram, the Sources are listed. Note: these are the only Source-Citations for this family. Additional Source-Citations would be listed as entered.


This process would be used to document the names and facts obtained from this specific part of the Film. If other information was obtained from a different part of this same file, another Source-Citation would be created, starting at the New Source-Citation, under New Source above. The New Source would allow for new / different Citation Details and Text. Do Not Use the "Use Existing" further down this blog item, as it will bring up the existing Citation Details and Source Text.


© 2010, copyright H R Worthington
Posted by Picasa

Print Friendly