Thought I would share this Open Letter from "The Chart Chick". I have used their services in the past and love the outcome. I created a Chart for an elderly aunt, so what she could show her great grand children. Not only did they like it, but others who have see the chart loved it.
The Chart Chick: An Open Letter to MyCanvas Users
Thank you,
Russ
Showing posts with label Charts. Show all posts
Showing posts with label Charts. Show all posts
Monday, September 1, 2014


Saturday, February 7, 2009
Descendant Chart - Page Breaks
One topic that comes up, from time to time, is the ability to print Descendant Charts. They generally are long (wide) when they are to be printed. There are at least two ways to print this type of chart. One is to print individual pages then tape them together. The second is to print the Chart on "Banner Paper" or Continuous Form paper. Version 2009 has the capability to do both.
The first step is to select the Individual that is the focus of the Chart.

Figure 78
Then click on Pubish, where all of the Reports and Charts can be found. Will select Descendant Chart

Figure 80
There are other options in the creation of a Descendant Chart that will be covered elsewhere, but details will be provided in a link to a Knowledge Base Article at the end of this post. The purpose of this Blog entry is for dealing with page breaks.
It's important to look at the Check Marks in the red box on the Right. No Check Mark in the Boxes overlap Page Breaks. You can visually see the changes. The Figure below would be used if you are going to tape the pages together.

Figure 81
Another way to control this, is by using the Advanced Button to the Right of the Layout Poster field, under the Chart Title. This figure is the Default with Page Overlap. The screen gives you an idea of what the pages will look like.

Figure 82
Clicking on the No Page Overlap is seen below. This would be used for Banner Paper. To return to the previous view, click on the Reset Button.

Figure 83
Note where the page breaks are.
Details on how to change the Formatting of a Chart in Family Tree Maker 2009 can be found here:
of by going to this website:
http://ftm.custhelp.com/
Enter 4303 into the Keyword Search box and read that Article.
The first step is to select the Individual that is the focus of the Chart.

Figure 78
Then click on Pubish, where all of the Reports and Charts can be found. Will select Descendant Chart

Figure 80
There are other options in the creation of a Descendant Chart that will be covered elsewhere, but details will be provided in a link to a Knowledge Base Article at the end of this post. The purpose of this Blog entry is for dealing with page breaks.
It's important to look at the Check Marks in the red box on the Right. No Check Mark in the Boxes overlap Page Breaks. You can visually see the changes. The Figure below would be used if you are going to tape the pages together.

Figure 81
Another way to control this, is by using the Advanced Button to the Right of the Layout Poster field, under the Chart Title. This figure is the Default with Page Overlap. The screen gives you an idea of what the pages will look like.

Figure 82
Clicking on the No Page Overlap is seen below. This would be used for Banner Paper. To return to the previous view, click on the Reset Button.

Figure 83
Note where the page breaks are.
Details on how to change the Formatting of a Chart in Family Tree Maker 2009 can be found here:
of by going to this website:
http://ftm.custhelp.com/
Enter 4303 into the Keyword Search box and read that Article.
Wednesday, January 28, 2009
How to create a Bow Tie Chart
One of the new Features of Family Tree Maker version 2009, is the Bow Tie Tree. This tree also has the capability to put an image behind or as background to the tree.
To do this, select the individual (one person) to be the focus of the tree. Select, from the People button (1), and select the Individual (2)
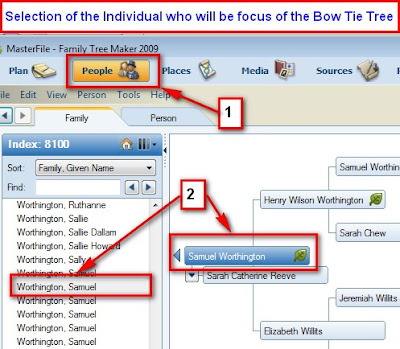
Figure 69
Now select the Publish button (1), and the desired Chart. In this case, the Bow Tie Chart (2) from the Collection and click on Create Chart/Tree (3)
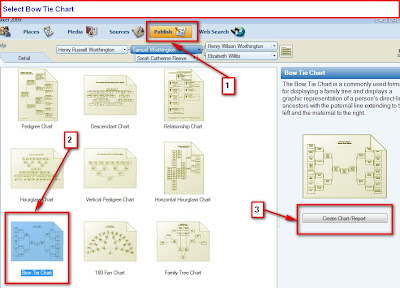
Figure 70
The first version of the Bow Tie Chart indicates 2 Pages. For this example, a One Page Chart is what is needed. The 2 pages are indicated on the top part of the Chart and the bar across the screen (2 pages). Will reduce the Number of Generations from 4 to 3 (1) and will add the Background (2).
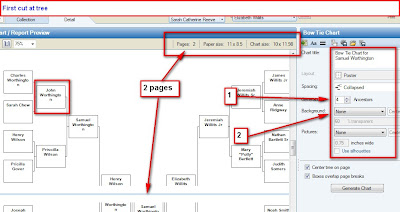
Figure 71
Reducing the number of generations allowed the Chart to be on one page.
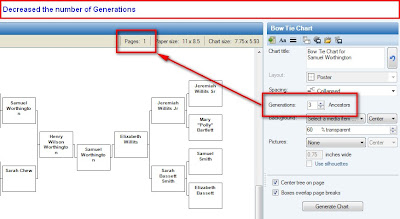
Figure 72
Clicking on the "Aa" ICON at the top of the Right Pane will bring up a Font screen. as indicated below. Please note the "n" not being on the same line as the rest of the surname.
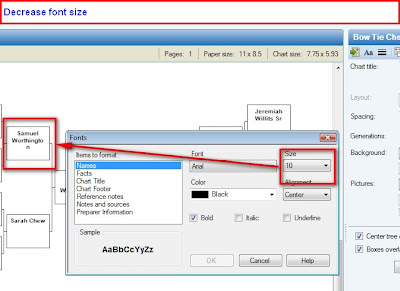
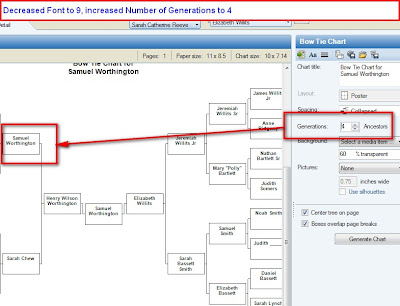
Figure 73
Figure 74
Reducing the font size to 9, allowed the number of Generations to be reset to 4. The changes continues to allow the Chart to be on one page..
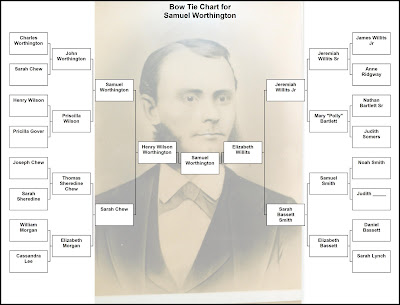
By selecting the Background button, a pull down menu will appear. There are background options available. The last menu option is Select Media. The media files, pictures will be displayed from which to select.
This can be Printed by clicking on the Print ICON. There are Share options available to Export the Chart in a number of formats. The final images is a JPG file.
To do this, select the individual (one person) to be the focus of the tree. Select, from the People button (1), and select the Individual (2)

Figure 69
Now select the Publish button (1), and the desired Chart. In this case, the Bow Tie Chart (2) from the Collection and click on Create Chart/Tree (3)

Figure 70
The first version of the Bow Tie Chart indicates 2 Pages. For this example, a One Page Chart is what is needed. The 2 pages are indicated on the top part of the Chart and the bar across the screen (2 pages). Will reduce the Number of Generations from 4 to 3 (1) and will add the Background (2).

Figure 71
Reducing the number of generations allowed the Chart to be on one page.

Figure 72
Clicking on the "Aa" ICON at the top of the Right Pane will bring up a Font screen. as indicated below. Please note the "n" not being on the same line as the rest of the surname.


Figure 73
Figure 74
Reducing the font size to 9, allowed the number of Generations to be reset to 4. The changes continues to allow the Chart to be on one page..


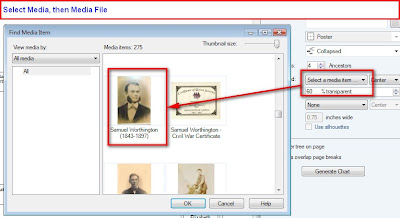
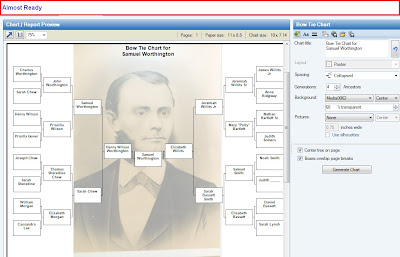
By selecting the Background button, a pull down menu will appear. There are background options available. The last menu option is Select Media. The media files, pictures will be displayed from which to select.
This can be Printed by clicking on the Print ICON. There are Share options available to Export the Chart in a number of formats. The final images is a JPG file.
Subscribe to:
Posts (Atom)