Showing posts with label Filter. Show all posts

Tuesday, January 11, 2022

Preparation for 1950 Census - What Facts to Review

Review of Certain Facts:


In my  review of those I hope to find in the 1950 Census, before they are indexed, I have a series of Facts that I look at and make note of.

  • Do I have an Address
  • Do I have the 1940 Federal Census
  • Do I have a Marriage Date for Females
  • Do I have a Death Date
Some of these Facts are taken care of my the Filter Feature.

I look to see of the Residence Fact indicates that the family moved around. As mentioned in an earlier post, if attempt to get each profile, with each Census Record that I should be able to find for them. If  I don't have a specific year, I put that in the ToDo list, so it is obvious to me that I need to look for it, or a Hint that will take me to that "missing" record. The record isn't really missing, it's just that I haven't gotten to it.

In my Work Flow blog post, I showed that I may go to the Places Workspace, find that Address, then copy the ED information, with Citation, onto that profile.

One of the ToDo Items, was I reviewed the profiles, was "Missing Death Date". Again, it's in the ToDo list for the profile, but it is also in the Plan Workspace. Today, I was working on my "Missing Death Date" in the 1950 Census TaskList Category and was looking at my Hint list, to see who might have Hints for a Death Index. Most of this file is in or around New Jersey, so I really only had ONE Record Collection on Ancestry to look at. I have 30 Hints, for this file, in that record group. So I started to work on those profiles.

Here is an example of why I look specifically at these items.


You may not be able to read this screen capture in detail, but you will see that I have NO Death Date, I have the 1900, 1920, and 1940 Census Records AND I have the ED listing for the 1950 Census. I had added that Fact while working on the street address.

I looked at the Hints for this profile and saw:


She died in January 1950. After I merge that Index record, I will then Delete that 1950 Residence Fact (with ED information), and the profile should be removed from the Filter Feature list.


____________________________________________________________
Copyright © 2022 by Cousin Russ

Wednesday, January 5, 2022

Prep for 1950 - Workflow and Filters

Are you ready for the release of the 1950 US Federal Census ? Watch for this graphic, on this Blog, and DearMYRTLE's Blog and Facebook Groups as we will use this for the DearMYRTLE's CensusGenie branding.


Will demonstrate the three (3) steps that I am using, when working on the 1950 Census Preparation. 1) Who I should find in the Census, 2) Address needed for the One-Step Website, 3) Those who I have 1950 ED's.

Here is a link to my previous 1950 Census Preparation blog posts:

Preparation for the release of the 1950 US Federal Census - Bread Crumbs is my way of using the Steve Morse One Step website.


This video is a brief summary of the work that I am currently do, in preparation for 1 April 2022.


References: 

1 - Preparation for the 1940 US Federal Census on this blog already, can be found in the "Census1940" Label. The 1950 CensusGenie series will use the "Census1950" Label on the Left Column of this blog, or search for "1940census" or "1950census".


Myrt as a Tab on her Website for easy access to this project.


The usual schedule will be:

Weekly - 7 Apr 2021 14 Apr 2021 21 Apr 2021 
Monthly - May 2021 -Feb 2022 Weekly - Mar 2022 
Daily - Apr 2022 until we get the hang of the indexing. 

3 - Register once for this recurring Zoom Meeting. 

Dates for upcoming will appear below. For the most recent dates, be sure to see DearMYRTLE's Calendar located here:


5 Jan 2022
2 Feb 2022
2 Mar 2022
9 Mar 2022
16 Mar 2022
23 Mar 2022
30 Mar 2022
 ____________________________________________________________
Copyright © 2022 by Cousin Russ

Monday, September 30, 2019

Undocumented Fact Report - Update

UPDATE: Undocumented Fact Report Management

Actually, that worked out well, and I have marked all 1,678 Profiles that have undocumented Facts. Far more than what I wanted, but it is now manageable. I know what I have to work with AND a Plan on what to do, going forward.

OBSERVATIONS:

There were two observations: 1 - Most of the Undocumented facts, not going into detail, was PRE-Family Tree Maker Version 2010. As I did not see many Citations that were using the Template Feature, which was added in  FTM2010. 2 - Some of the Undocumented Facts were probably entered in a Version, prior to Version 16,  the last of the DOS Family Tree Maker versions.

We didn't have the tools / features that we have today. AND it reminds me to use the Undocumented Fact Report daily. That does NOT mean that all of the Facts are Documented (yet), but at least I KNOW which profiles have Undocumented Facts.

Going Forward:

Over the past number of years, I spend time moving my Sources (Source Groups) into the Source Template Feature. As I work these undocumented facts, I MUST look at the Citations for the Fact WITH Citations and then make sure that those Sources of the Citations are using the Template Feature.

I have a spreadsheet with all of my Source Groups, I know how many each Citations the Source Groups have, and how many Source Groups are using the Template Feature. So I know where this project stands. As I clear any Undocumented Facts in a profile, I will Delete the No Documentation Fact (marked Private), just to make sure that I did, in fact clear that undocumented Fact.

In the description Field, I entered:

  • Find A Grave
  • No Documentation
  • Undocumented Fact
  • Undocumented Facts
  • and 4 specific Source names, that are books in my library
I explained  about the 2nd though 4th item in the earlier blog post. I did not have to change that Plan.

Using the new "Smart Filter" feature of FTM2019, it really helped me keep track of which Profiles I had identified and those that I needed to identify. It also helped me actually clear the Fact that did not have a Citation in earlier versions of Family Tree Maker. IF the profile fit into those description listed above, I did not resolve them in the report, but will use the No Documentation Fact to clear those up.

I had to keep in mind, which category I was dealing with. For those with the "sex" Fact, I used the Name Citation, and Pasted it, into that Fact. But, for the others, I wanted to use my No Documentation Fact citation for that. Remember that Family Tree Maker has TWO "clipboards", the Windows Clipboard, and the FTM clipboard for those Citations.

The Undocumented Fact Report provides the ability to use the "Individuals to Include" option. I selected Include ALL, then Filtered OUT, any profile where the "No Documentation" fact Existed.

This next image is the New "Smart" Filter feature. I call it the Dynamic Filter. In previous versions, once you set a Filter, it is static. Each time I return to the Individuals to include that number on the Right would decrease, meaning more profiles had that Fact. IF I put that Fact on 5 profiles, that number would decrease by 5. Applying (button at the bottom) the report would update.


I started with 12,636 Profiles (People) in the Left Column and there are 1,678 in the Right Column when I completed AND the Report had NO entries. I have identified everyone that had at least one fact without a citation.

Because I Cited each of that "No Documentation" fact, I had a check and balance. I went to the Source Workspace, found my No Documentation Citation and ensured that I had used that Citation 1,678 times. And I did.


Here is where the "Smart Filter" / Dynamic Filter feature really helps. In the People Workspace, Tree View, Filter, it will open the existing Filter window, where I select Filter IN, No Documentation Exits, which moved that 1,678 names into the Right Panel. 


Then I wanted to Filter OUT the No Documentation (description) "No Documentation", so I can see only those that does include that description. In this case it was 605. None of those profiles have any documentation. Sounds like a lot, and it is, BUT I will look at those profiles that are related to that profile. I got that information from somewhere, and most likely from one of those other family members.


It's not clear on this screen capture, but there is a pencil ICON on the Right, next to the "trash can" where I can Edit that Filter Out, to get the other numbers for each of the above description items. AND, this "Smart Filter" / Dynamic Filter, shows exactly what the various items that make up what has been filtered in and out.

Summary:

Profiles with Undocumented Facts =1.678
No Documentation = 605
Undocumented Fact = 286
Undocumented Facts = 386
Find A Grave = 3

The four books that I have as sources = 398

Now for the Undocumented Fact, where this started, I didn't count. But, I know that my Undocumented Fact Report, when I started this, was 169 pages long. When I completed this, that report was 122 pages. If the report has 20 Profiles per page, that would mean that about 940 profiles, and they have been resolved.

Lesson Learned: Run the Undocumented Fact Report FREQUENTLY, my, now best practice, DAILY.


____________________________________________________________
Copyright © 2019 by Cousin Russ

Saturday, September 28, 2019

Undocumented Fact Report Management

I understand that many users don't care about Sources and Citations. Over the years, I have learned how important they are. I have also learned how to manage that issue. I want ALL Facts with a Citation, even those Facts that I create and the I use for my purposes to maintain the file.

Working with two (2) new files, in the past three years, I learned to run the Undocumented Fact Report Daily. By doing so, and I can keep this issue under control. That is FIX the issue, based on the work that I did that day.

I took those two files and merged them into my Master database. That experience is a whole other topic. Because for the past two or three years I was in the habit of running the Undocumented Fact Report I ran it for the first time in my Master database. What I ended up with was a 169 PAGE Report. Shocked, to say the least.

To run this report, go to the Publish Workspace, select the Source Report in the Collection Tab, select Undocumented Facts, then Create Report.


When the "Create Report" button is selected, I want to make sure ALL Individuals are included.


Then I realized one problem that really brought the importance of this report. A change, many versions ago, about the "Sex" Fact had been changed requiring a Citation. Many Records either state that as a fact or can infer that fact, and should be documented. Family Names / Given Names are not always obvious. So we were given the Citation field for that Fact.

That second image is the clue /  reminder to me as to why there were so many pages of Undocumented Facts. I have some clean up work to do. I had to develop a Plan to deal with all of these Undocumented Facts. What I was NOT going to do, is clean them all up right now.

As you may know, we can Edit the Profile, from the Report, by double clicking on the Name (that is bolded) and the Person View will appear.


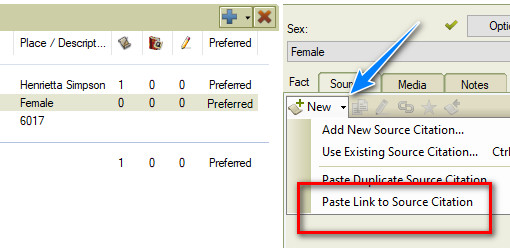
The Sex Fact does not have a Citation, but the Name Fact does have a citation, This is a quick and easy way to resolve this problem, Copy the Citation from the Name Fact, and Paste Link to Source Citation. The Copy source citation is the ICON to the Right of the "New" and left of the Edit (Pencil) ICON. That is the Family Tree Maker Clipboard (not Windows Clipboard)

Then select the "Sex" Fact, and Past Link to Source Citation.


That process will take care of those Facts that did not require a citation from previous versions. Easy but time consuming and needs to be done.

BUT, the next profile had other Facts that did not have Citations. From my analysis since I started this clean up project, over the many versions of Family Tree Maker, some Citations were lost and / or unlinked from Facts. So I needed a PLAN.

My plan is to use the Filter Feature to help me manage those profiles that have one or many Facts without a Citation. To do that, I created a "No Documentation" Fact. That way, I can Filter In or Filter Out, anyone with the No Documentation Fact. The name of the fact is not important, that was just the one I chose.

Keeping in the Undocumented Fact Report, I would ADD that Fact to every person in that report AND put a Citation on that Fact. Here is my citation (Reference Note)
Worthington, Russ, [ ADDRESS FOR PERSONAL USE, ], File Citations; This is a "No Documentation" citation, where there are no citations on Facts.
As I started to go through this process, three things were seen.

  1. No Citations on any Facts in that profile
  2. Only ONE Fact without a Citation
  3. A number of Facts without a Citation
Number 1 was may be a large problem, as there is not clue, on that screen to tell me where that information came from. More time involved, but in the People Workspace, Person View, looking at other information, especially a spouse, parents, or children. Clearly not in the report.

It became clear, that this phase of the project is to Mark All Profiles with a Citation issue. 

Number 2 and 3 are a little easier, in that I have at least ONE Citation on other Facts. I can review those citations to see if that record addresses the Fact(s) that are not documented. The Only one fact, should be an easy fix.

This is time consuming, but here is where the Filter In / Filter Out feature comes in very handy.

Lets say I added the No Documentation Fact to the First Page in the Report. I can now go back to the "Individuals to Include". Select ALL, Filter OUT, select the "No Documentation Fact", Any Data, and those profiles with that Fact will be removed from the report.


For me, this does a couple of things, Lets me focus on the easy fixes, or the ones that will take more time, and I can resolve that one fact that doesn't have the citation from previous versions of the program.

In looking at the Undocumented Fact Report, it became obvious which Profiles had that one fact, not documented. It included on the Name and the Fact.

I can fix them right then and there, as noted above.

Once all of the Undocumented Facts are identified what the No Documentation Fact, I can then get back to research and when I come across a Profile with that FACT, I can deal that that undocumented fact then, because I can see it in the List of Facts.


I marked the No Documentation Fact as Private, so only I can see it. In this example, I do not know the persons Name, (5 underscores), but when I look at the full profile, I see that this is a Spouse of someone in my database. I can look at the Citations for the Spouse, to pick up the Citation for this person, that has NO Citations on either Fact.

The No Documentation in the Fact Description field, may be an easy fix, or may be  not so easy.

My goal is to KNOW who has one or more Facts that are not documented. Using the Filter In / Filter Out feature, and get that Undocumented Fact report to Zero, then I can go back to my research. AND I can also go to the People Workspace, and use the Filter In Feature, to Filter IN all who have the No Documentation Fact, and further include, if I want, the No Documentation, Undocumented Fact, or Undocumented Facts in the description.

NOW, once I have all of the Facts documented in the Profile, I can DELETE that No Documentation Fact from that Profile. Now running the Undocumented Fact Report is important to be run frequently, with the goal of No / Zero profiles on that report (again, filtering out the No Documentation Fact).

Lesson Leaned: Run the Undocumented Fact Report daily
____________________________________________________________
Copyright © 2019 by Cousin Russ

Wednesday, November 15, 2017

How to manage a large Marriage Report ?

A FTM2017 (for the Mac) was having difficulty managing a large Marriage Report, where relationships needed to be updated.


_______________________________________________________________
Copyright © 2017 by H R Worthington

Friday, November 10, 2017

User Question: How to identify people at an Address to add a photograph


There was a question in the Family Tree Maker Facebook Group about how to use the Filter Feature to add a photograph to any one living at that address.

Here is how:


_______________________________________________________________
Copyright © 2017 by H R Worthington

Wednesday, December 14, 2016

Who are my Colonial Ancestors ?

This video / blog post will show how I can identify my Colonial Ancestors. The use of the Filter feature (Filter In and Filter Out), and the double entry of Place Names.


_______________________________________________________________
Copyright © 2016 by H R Worthington

Thursday, July 31, 2014

FTM2014 - How to identify people with no 1900 Census Records - REVISED

This is a revised video for:

Question from the Cousin Russ Community

Question:

Is there a good query language in any tools where you can query your family tree in a more advanced way?

"Give me all people where you have descendants born before 1900 and I have no source connected to it from the Census 1900"


_


Thanks to reader Karen Jaquish for pointing out that I had removed too many people from my search.

______________________________________________________________


Copyright © 2014 by H R Worthington

FTM2014 - How to identify people with no 1900 Census Records


Question from the Cousin Russ Community

Question: Is there a good query language in any tools where you can query your family tree in a more advanced way?

"Give me all people where you have descendants born before 1900 and I have no source connected to it from the Census 1900"


_______________________________________________________________
Copyright © 2014 by H R Worthington

Saturday, October 19, 2013

FTM2014 - Surname Report

There are a number of Reports in Family Tree Maker that I really like. This is just one of them. The Surname Report.

 Right now, I am focusing my research on people who had an event (Fact) in the state of New Jersey and I wanted to have a report of all of the Surnames in New Jersey that I might find in various Sources that I have in my library or might come across in my research.

Going to the Publish Workspace, selecting Person Reports is the Surname Report.


This will generate that report by selecting All Individuals. The Surnames are listed on the Left. Total of individuals for that Surname (birth surnames of females), the number of Males and Females, the Earliest date and most Recent date in the database for that surname follow across the page.


In my case, this was a 38 page report. Probably not going to print this for the task at hand, but it can be printed.

Because it is a long report, I want to make sure that the Report Title, the Page Numbers, and the Date the report was generated (printed) is on each page of the report.

The 2nd ICON, which looks like a switch, will bring up Header/Footer. Hovering over that ICON will say Header/Footer.

In the Header will be the name of the report. In this case, Surname Report, and in the Footer will include the Page Number and the Print Date.


I don't want the entire 38 pages of 8,931 people I only want New Jersey. Clicking on Select Individuals to include will bring up the "filter" screen, where I selected Filter In which will bring up a window where I will select Other, and in the Pull Down menu select Any Fact Places and enter New Jersey in the Value field.


This will move anyone with New Jersey in a Fact, from the Left Panel to the Right Panel. In this case 307 individuals


Clicking on OK will generate that report.


The summary is at the end of the 3 page report.

_______________________________________________________________
Copyright © 2013 by H R Worthington

Saturday, April 21, 2012

Did I caputure everything from the 1940 Census?

I thought I needed a final check up on the data that I collected from the 1940 Census.

I had a blog post that talked about the data I wanted to gather from the 1940 Census.

1940 Census - What Data to be Captured

I created a quick report that I could look at quickly

1940 Census - Data Entry Check

But after I had done that, for another project, within my database, I wanted to Capture Street Addresses and enter Private Address Facts for each of those Census Records that contained Street Address.

What was helpful, for the 1940 Census preparation, was to have the ED as part of the Residence Fact. That is my indication that the data came from a Census Record. Wanting the Sorting capability, the Residence Fact starts with ED numbers, followed by a Identification Indicator, like Family number, Farm number, or Address. IF the address was there, I picked that up, following the ED information.

Since most of the time, the Residence Fact may not be displayed in a report that I might share, it became very helpful when searching Census Records.

When the Census Record had the Address, I put it into the Address Fact, selected the Option to mark that Fact as Private, so that it won't be seen online, but I captured it for my own use.

Having all of the data for the 1940 Census entered (so far), I wanted a report to make sure I have captured everything from the data that I wanted to capture.

Publish Workspace, Person Collection, Custom Report, is the report I selected.


Now for the Facts that I wanted to capture:
  • Name
  • Residence
  • Address
  • Sex
  • Marriage Status
  • Education
  • Birth
  • Occupation
 NOTE: I use the undocumented report feature, so I document the sex of the person, when it is offered in that document. that is a choice each of us has to make.

Another choice, was the use of the Marriage Status fact. It's an entry on the 1940 Census AND it has become very helpful in knowing when to look for a Marriage Record. Capturing that fact from previous census records also helped identify that I may need to look somewhere else, if they were Single in the 1930 Census, but didn't show up in the Household, with the parents, in the 1940 Census. My parents were both single in the 1930 Census, I could see that on the Person View, but neither were in their parents Households in the 1940 Census. In this case, I knew that they were married in 1939. When they didn't show up in either household, I knew that I had to look somewhere else, which I did. It's just been helpful to track the Marriage Status, over time. Widow, Divorced, Single, and Married are the entries on the Census Records, so I captured it.

Selecting Items to Include (Left end of the Right Hand Panel) brings up the list of Items to be included in the Report.


I put them in the order from my EXCEL worksheet that I hand wrote the information onto, making the Occupation the last item.

The reason for that is, many entries did not have an occupation listed on the Census, being last was a reminder to me, that it may or may not be there.

For the Address Fact, I looked at the Residence Fact to see if the identification was a Street Address or a Family Number. If the Address, then Address should have an entry.

The next step is to identify who to include in the Report. Selecting "Selected Individuals" brings up the screen where I Filtered IN > any Residence Fact, where the Date was 1940.


This added the 89 people, who I found, so far, in the 1940 Census.


Now the report is run (after clicking OK) and the Review begins.

This first example, shows that is NO Address Fact, because the 1930 and 1940 records used Family Numbers. I did NOT restrict the Residence nor Address as Preferred Only,  in the Items to include, because I wanted a bigger picture, the Address field was that important for my next project.


This next record shows the Residence Fact and the Address Fact.

Notice that the 1930 and 1940 had street addresses, and have an Address fact for both years.

As a matter of fact, the first time I ran this report, one of the Address entries had a typo. When this Address format is used, the Place Name Authority, warning, is Ignored, so that typo's are ignored as well.

I am now confident that I have captured what I wanted from the 1940 Census, Saved this Report in the Saved Report Collection, so that I can run it again, after I add any new folk from the 1940 census.

________________________________________________________________  

Copyright © 2012 by H R Worthington

Thursday, February 16, 2012

Pennsylvania Birth and Death Public Records Report

Recently some records have been made available in the State of Pennsylvania. For details, please visit this website:


As I have many ancestors in Pennsylvania I wanted to see what records I could find and order them if need be. The website talks about:

Act 110 – Public Records

(formerly known as Senate Bill 361)

It says: "This legislation provides that such documents become public records 105 years after the date of birth or 50 years after the date of death." Looking at this means that only births before 1906 would be available. On the website, they only have 1906. But for deaths, it would be for years prior to 1961. Looking at the site shows that these records start in 1906. Each type listed by year.
Creating a report shouldn't be an issue. But, this list is not indexed, nor can it be searched. Browsing the lists is required. This isn't too bad as when you get into the website, the break down the list alphabetically.
EXCEPT, from the website: "Several years of indices (1920-1924 deaths and 1930-1951 deaths) are listed according to the Russell Soundex method of indexing." Soundex, when was the last time we had to use a Soundex, but this one is very specific. The Russell Soundex is a link to a simple worksheet on how to us it.
Cheyney [ C heyNey ] becomes C 500
Bartram [ B aRTRam ] becomes B 636  
Parameters are, for death records, 1906 to 1961.
In Family Tree Maker (Version 2012), a Custom Report can be run. Since it might be easiest if the Dates were obvious in the report. So, go to the Publish Workspace, Person Collection and select Custom Report.


That generated a 346 page report, for this file. Not very helpful, but it's a start. Next will name the report Pennsylvania Death Records, then select Items to Include:


The title is filled out, and to the upper left of that title is the Items to Include ICON. Clicking on that will bring of the above screen, where the Death Fact as been moved to the top of the list with the Up Arrow, just below the Red "X" and the Sort Order will be Death Date, followed by the Name. Still at 346 page report.

The next step will be to Select the Individuals for the Report. The default is Immediate Family, but we'll select Selected Individuals. The first thing is to Include Everyone who has Died in Pennsylvania, based on the information in my file. Filter IN, the individuals with a Death Fact PLACE that contains Pennsylvania.


That will reduce the list of 8,310 down to 144. Those names will move into the Right Hand panel.


Because there are only a certain number of years available, we can then Filter OUT those who died BEFORE 1906. Clicking on Filter OUT, we'll select Death Date is Before 1906.


Down to 48 people, but there is no information for anyone who died After 1961. Filter Out again, where the Death Date is After 1961.


This gets us to the report to use for this record set for Pennsylvania.

Here is a piece of that report, where the names within the Red Box will use the Russell Soundex.


Of the 28 people on this report, I was able to locate 27 records. In most cases the data that I had, contained the correct Death Date, a couple contained a different Place Name, and found one record for a cousin what had been trying to locate birth information about her mother.  The place name differences, from what I can tell, without the actual record, was a much closer place of death. Other records showed the neighboring town, while these records showed the Township where the person actually. The town was the closest hospital.

________________________________________________________________  
Copyright © 2012 by H R Worthington

Tuesday, July 26, 2011

Use of Filter - update

Here is an update based on the previous two messages:

How to identify Civil War Family Members

How to Identify Civil War era members of your tree (revised)

I wanted to understand what was going on a little what the difference was.


Created a test file with three (3) names. no other information. Using the same steps in the previous blog posts, the use of the Birth fact, "is blank" did not remove anyone.

I then added a birth place to one of the three. Same result, no one filtered out.

To make sure I wasn't missing anything, I filtered out Birth Place is not blank, and the person I had the birth place was filtered out.

Then, Birth Date is Blank, filtered out the same person. So far, it appears that this "logic" works when there is a Birth Fact in use for the person.

Going back to the see how to Filter Out anyone not using the Birth Fact, can be filtered out by using the Birth fact, Any Data, Does Not Exist will Filter Out that condition. Meaning not using the Birth Fact.

The observation from all of this is that the fact must be used to be Filtered Out. Or, If the fact isn't in use, then the conditions in the Filter will not evaluate the conditions in the Filter


Copyright © 2011 by H R Worthington

Monday, July 25, 2011

How to Identify Civil War era members of your tree (revised)

As a follow up to: How to identify Civil War Family Members posted earlier today, it appears that the final step (Birth record Blank) did not remove everyone without a Birth Date by using that Filter. 

After reading a comment in that post, I re-ran the final filter with a much better set of results. I will include the text from that earlier message here.

The first screen is in the People Workspace, Family View, with the Index in the Left Hand Panel. In this file, I have 8,252 people. At the Bottom of that screen is the FILTER feature.


Clicking on Filter, will bring up a window where we will start to Filter people who meet our parameters. The first thing we need to do, is to click on Include All >>. This will move those 8,252 people from the Left Window to the Right Window. This is like Selecting ALL or everyone.


Notice the same number is in both sides of the window. Now we want to < Filter OUT certain groups of people. In this case, we will Filter Out all Females. So, select Sex from the list of Facts, then Equals, and select Female and click OK.


We have a new number (4,343) (see below). Our next Filter will be to < Filter OUT everyone who was born BEFORE 1818, in this example. Selecting the Birth Fact, "is before", and entering 1818. (you can use any date you wish).


Again, we have a new number (3,101) (see below). Next, < Filter OUT everyone who was born AFTER 1846. Again select the Birth Fact, "is after", and enter 1846.


Down to 2,491. Will now < Filter OUT anyone who Died Before 1861. Selecting the Death Fact, "is before" 1861 will do this.


Here is where the change is. In the < Filter OUT window, select the Birth Fact, but this time select "Any Date", just below the Birth Fact, and select Does Not Exist.


We now have reduced our list from 8,252, down to 197.


Looking at the results again, there are still some names without Birth Dates in the list. BUT each of those people have a Birth Place. Go back to the < Filter OUT, Select the Birth Fact, and in the menu just below the Birth Fact, select Place, then select "Is Not Blank". This action took my list down to 102.

The list of people with the Filter Applied, are Males, who were born between 1818 and 1846 and how have not died, but have Birth Date information. A good place to start to look for your Civil Wars family members.


Note: Will have to do some more investigation into why the last filter in the previous blog post didn't work as expected.


Copyright © 2011 by H R Worthington
Posted by Picasa

How to identify Civil War Family Members

As we celebrate the 150th anniversary of the Civil War, How can we identify who might have served in the Civil War? Perhaps we know some of them, but maybe not all of them.

Here is how to Filter your file down to identify those people.

The first screen is in the People Workspace, Family View, with the Index in the Left Hand Panel. In this file, I have 8,252 people. At the Bottom of that screen is the FILTER feature.


Clicking on Filter, will bring up a window where we will start to Filter people who meet our parameters. The first thing we need to do, is to click on Include All. This will move those 8,252 people from the Left Window to the Right Window. This is like Selecting ALL or everyone.


Notice the same number is in both sides of the window. Now we want to Filter OUT certain groups of people. In this case, we will Filter Out all Females. So, select Sex from the list of Facts, then Equals, and select Female and click OK.


We have a new number (4,343) (see below). Our next Filter will be to Filter OUT everyone who was born BEFORE 1818, in this example. Selecting the Birth Fact, "is before", and entering 1818. (you can use any date you wish).


Again, we have a new number (3,101) (see below). Next, Filter OUT everyone who was born AFTER 1846. Again select the Birth Fact, "is after", and enter 1846.


Down to 2,491. Will Filter OUT anyone who Died Before 1861. Selecting the Death Fact, "is before" 1861 will do this.


Reduced to 2,338. Now to Filter OUT anyone without a Birth Date. Birth Fact, "is blank".


This reduced the 8,252 people in my file to 2,304.

To remove the Filter, remove the Check Mark, on the Filter Line, and that will restore your file to everyone.


Copyright © 2011 by H R Worthington
Posted by Picasa

Print Friendly