Sunday, June 28, 2009

Family Tree Maker 2009 Map Feature Example

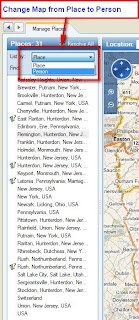
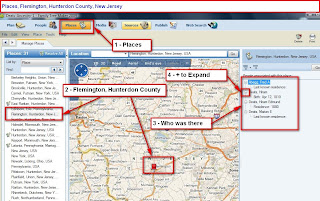
Continuing from the previous Blog, Library Visit - Family Tree Maker Version 2009 map feature offers some additional information. Clicking on the Places Tab, will take you to the Map Feature. In the Left Panel is that list of Place Names that are in this file. Since the family in the previous blog was located in Flemington, Hunterdon County, New Jersey, we can see 1, where it is, 2, and who had an entry in the file, referring to Flemington. In the Right Panel, where the names are listed, clicking on the "+" sign will expand what event / fact took place there.


Figure 165

There is the ability to change the Map based on a Location, to a Map based on an Individual. The down arrow will provide that option.


Figure 166

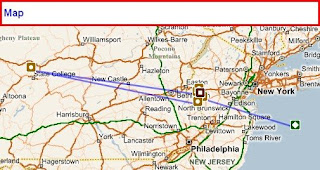
In this example, Hiram Deats is selected (1). A map will appear with some lines and ICONs, representing specific locations. The Right Panel (2) will indicate what event / fact took place when and where. To determine what event took place on a specific Place ICON will open a note with the details of that location and what event took place there.

Note, that the New Jersey, USA ICON is "in the water". It can be moved. But for this example, it would indicate a FACT that needs to be looked at in more detail.


Figure 167

Below is the Map showing the places where Hiram Deats is recorded in a FACT.

Posted by Picasa

Library Visit - Family Tree Maker Version 2009

In an earlier Blog entry, Library Visit - Family Tree Maker Version 16 Custom Reports were generated to take to a library to do research, but the use of a computer was not available. This entry will review what can be done with Family Tree Maker Version 2009.

In the previous blog, this is what was stated:

I take with me three reports created by Family Tree Maker Version 16.
  1. Birth Report, for a specific Location, Sorted by Name
  2. Death Report, for a specific Location, Sorted by Name
  3. Marriage Report, for a specific Location, Sorted by Name
It may also be helpful, depending on how many people are in that Location, these same three reports sorted by Date.

These specific reports a different in Version 2009. However, the Custom Report format is different. And, instead of 3 or more reports, one can be generated.

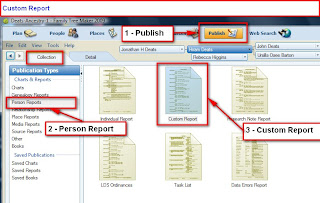
To start, the Publish (1) Button is depressed and you will be taken to the Publish Work Space. The first screen is the Collection (of reports) screen. In this case, the Custom Report is a Person Report (2). There are 6 possible Person Reports, and Custom Report is selected and generated.


Figure 161

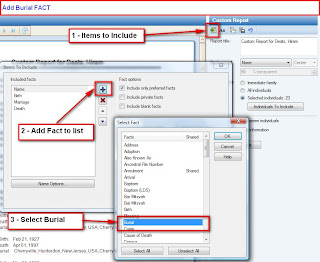
There is an "Items to Include" ICON, when the default or last report is displayed. Normal Name, Birth, Marriage, and Death Facts are there by default. Since this is the Same file that was used in Version 16, much of the information in this file, came from a Cemetery Visit. To Add the Burial FACT, the Plus Sign (2) is clicked on, and another pop-up window is opened where Burial is selected (3).


Figure 162

The Report name was changes to New Jersey (1). To limit the Individuals for this report to New Jersey, Select Individuals (2) is clicked. In the window that opens, Filter In (3) is clicked, which will bring up another window. There is a lot of flexibility, as with previous versions. In this case, we want Burial FACT as a Place, and enter "New Jersey, USA" as the location.


Figure 163

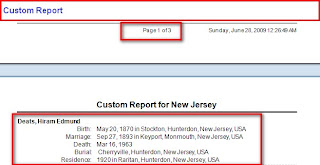
The report is then generated. This time, the report is 3 pages long listed by individual. One of the individuals in this report listed the Birth, Marriage, Death, Burial, and Residence locations. The Residence FACT was from a 1920 Census Record.


Figure 164

This three page report lists details of everyone buried in New Jersey.

For more information please click on the following links:

Custom Report in Family Tree Maker 2009

Individual Report in Family Tree Maker 2009

Place Usage Report in Family Tree Maker 2009

Choosing Facts to Include in a Report in Family Tree Maker 2009

Posted by Picasa

Saturday, June 27, 2009

Library Visit - Family Tree Maker Version 16

From time to time, you may visit a Genealogy Research Library or a Library where you can not take your computer. You may or may not know what type of information that they have, but you want enough information with you to take advantage of what might be there in your research.

When I am in this situation, I take with me three reports created by Family Tree Maker Version 16. These same steps can be used with previous versions as well.

  1. Birth Report, for a specific Location, Sorted by Name
  2. Death Report, for a specific Location, Sorted by Name
  3. Marriage Report, for a specific Location, Sorted by Name
It may also be helpful, depending on how many people are in that Location, these same three reports sorted by Date.

There may be other reports that may be helpful for you, but using the technique below, you should be able to generate a report that is useful for you.


From the Family View screen, you click on View (1), Select Reports (2), and Custom (3).


Figure 150

This will bring up a Default Custom Report (Name, Birth, and Death Date). or the last Custom Report that you had created.

In order for the Sort to be done by Name, I want the Names to be sorted by Surname.

From the Contents Menu, Selecting Items to Include, will bring up the Fields and Format of those fields in a new window. The current Name format (from the Default report) has First, Middle, and Last Name. Hi-lighting that entry in the Right panel of that window (1), then selecting Options (2), will bring up a new window (3), where you select Last, First, Middle.


Figure 151

Wanting to focus this report on the Name, Birth Date, and Birth Location, the Death Date field needs to be removed. Return to the Contents, Items to Include, hi-light the Death Date field and clicking the < Button.


Figure 152

Now, we want to add the Birth Location, return again to the Contents, Items to Include, select the Birth Location Field and push the > Button.


Figure 153

As you complete these steps, you will see what the current report will look like. At this point there are too many people in this report. Most likely, including Individuals who have no events in this specific location.

To reduce or refine the list, return to Content, Individuals to Include in Report ....
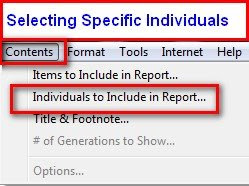

Figure 154

That will bring up a small window, where you select Selected Individuals and click on Individuals to Include.
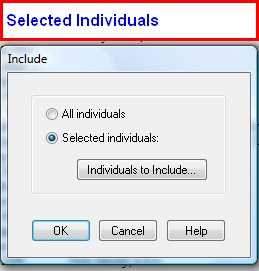


Figure 155

The new window will indicate that no one has been selected. If there ARE names in the Right Panel, use the << Button to remove everyone from the Right Panel.

Selecting Find > will allow you to select only those that meet certain criteria. The Help menu is very helpful at this point. For this example, Everyone with a Birth Location in New Jersey is what is wanted. Click on Find, in the Smaller window, there is a downward pointing button, you can select any of the FACTs that are listed. In this example, Birth Location is what is wanted. In the Right side of that window "New Jersey, USA" is typed. Looking at the complete report, from Figure 153, New Jersey, USA is what was there, and the individuals that were to be included.
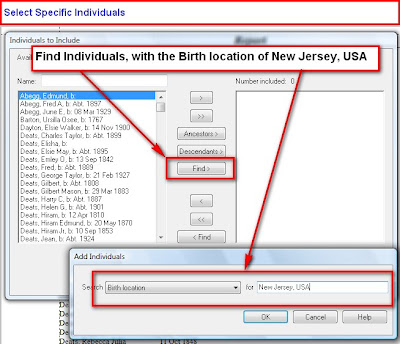


Figure 156

Those individuals who meet this criteria will be listed in the Right Panel. Notice the number of Individuals at the top of the list. In this example, there are 14 people with the Birth Location of New Jersey, USA.


Figure 157

The Custom Report looks like this:
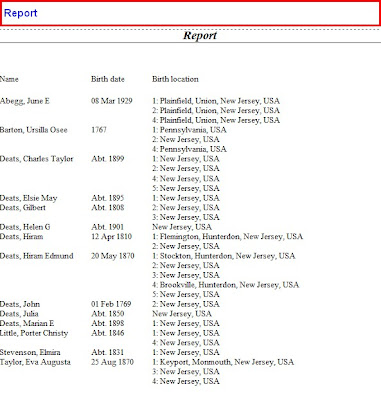

Figure 158


There is a choice, when you select the Items to Include, to only show Preferred Only FACT. You will notice in Figure 158 that there are multiple Birth FACTs for these individuals. Some have Dates while others have multiple locations. Since the report is only One Page, a Sort by Date is not required. Please note that you have a Sort by option available with two choices. Sort by Birth Date, then Sort by Name would be the 2nd report, if required.

In this specific file, a lot of the information was taken from Headstone Information after a visit to a Cemetery. There is very little Death Location information in this file, for these individuals. However, Burial Location information is within this file. This file also has very little Marriage Date and Location information, that report would not be generated. However, changing the Birth Date and Birth Location to Death Date and Death Location; and then Death Date and Death Location to Marriage Date and Marriage Location would be used to generate the other two reports.

Important: remember to clear the Individuals in the Right Panel of the Individuals to Include screen before selecting that Find, Death Location, or Find, Marriage Location criteria, as shown below.
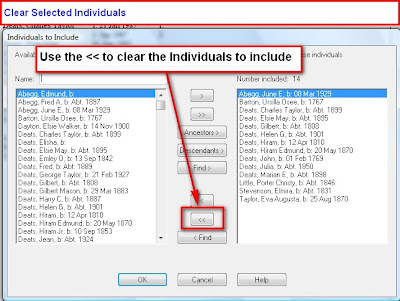


Figure 159

From the Headstones, the Death Date information was available, and the Burial Location was also know, those are the FACTs that were selected in Content, Items to Include: (Death Date and Burial Location). The Individuals to Include where those with New Jersey, USA in the Burial Location field.
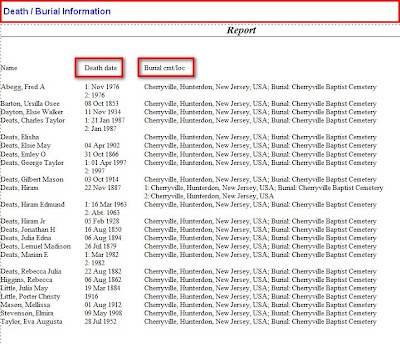


Figure 160

When this report was first displayed, the Page Break lines indicated that the lines were too long. Clicking on File, Page Set Up and selecting the Landscape mode, allowed the report to print on one page.

There is enough information in these two reports, for this trip, to have a successful research trip.

For more information, please click on the following links:


How to Select a group of Individuals?

FTM: How do I sort the custom report?


Posted by Picasa

Tuesday, June 16, 2009

Getting Files Organized

After listening to Family History Made Easy, Episode 32, a podcast Genealogical Hard Drive Organization by Lisa Louise Cook, I patiently waited for her next Podcast. There was no disappointment with Episode 33, Hard Drive Organization Part 2.


Having a recent Hard Drive issue, I realized that over time, I had my genealogy information all over my C: Drive, Several CD's of information, and a number of Folders on a new External Drive. Over time, we each may have our own way to organize our information and over that time we may figure out to organize differently. That we me.


After listening to Liza, I wanted to see how her suggestion would work with a Family Tree Maker Version 2009 might look at how we store our Genealogy information and Family Tree Maker program information.


The suggestion that Lisa made was to have a Genealogy folder created. So, I have, under My Documents, a folder called Genealogy. Actually, I already had one, but the next step was from Lisa. I have found that with Vista, the My Documents folder is Documents (no My). That will be reflected below.


Note
: below you will see \..\ to indicate information that may be specific to you, especially with Vista


C:\..\Documents\Genealogy\


Now, I maintain four (4) very separate family lines, so I have each of those four lines as a subfolder of Genealogy.


C:\..\Documents\Genealogy\Byberry (where this line arrived in the US)


C:\..\Documents\Genealogy\Dunblaen (an AKA for this line)


C:\..\Documents\Genealogy\Nicholas (a line that came into the US about 1649 in New England)


C:\..\Documents\Genealogy\CaptJohn (my line)


I have also done for a friend.


C:\..\Documents\Genealogy\Deats (for this blog)


Some other researchers, have for years, understand these names. Lisa is more specific of how she has her files, this i just my implementation of her Podcast and show notes.


For more details to Expand these folders, please read her show notes. I have.


Now to the Family Tree Maker program.


If Family Tree Maker was installed by default, Family Files would be stored in:


C:\..\Documents\Family Tree Maker\


Each of the four (4) lines mentioned above, there are four different Family Files, each with a specific filename.


With Version 2008 and 2009, the program will create a
media folder for storage of any images that are included in the Family File. The change in 2008 and 2009 is that the images are NOT included in the Family File, but are linked to the file in the media folder. If a Web Merge is done, as talked about earlier, any Media (image) of the web merge will be saved in this folder.


So far, my Family File is in the Family Tree Maker folder and amy images are saved in a subfolder.


C:\..\Documents\Family Tree Maker\Nicholas-Media\


Going back to this entry in the blog:
Family Tree Maker 2009 - Web Search #1, Figure 15, you will see a way [1] to view the images from Ancestry.com. What wasn't in that blog was the when that Images is displayed, to look at in more detail, I SAVE that image as a PDF file and need a place to store it.


This is where Lisa fits into the picture again. That PDF file would be saved in:


C:\..\Documents\Genealogy\Deats\Census


The filenaming that I use is
YearFamilyLocation. Since it is a Census Record, census isn't in the filename. Seeing that there may be other families in that location at that time, the naming convention, for this example, that I use is:


C:\..\Documents\Genealogy\Deats\Census\1860-DeatsHiram-FranklinHunterdon.pdf


Year if four characters

Surname and Head of Housefold forename
Town County


The use of Upper case and Lower case helps seperete the information.


For me, this process and filing does a couple of things.


1 - When my automatic Back Up application backs up the Document folder and sub-folders, ALL if the information is backed up


2 - Can easily locate an Image without opening the Family Tree Maker program


3 - Have an extra "copy" of the image


The same image can be seen directly from within the Family Tree Maker program.


Another entry here will expand on filenaming within the program.


There will also be an entry in this blog about handling of images / photographs both within Family Tree Maker and the organization within the hard drive.


Please leave any comments on how YOU organize your files.

Sunday, June 7, 2009

Add Repository to a Source Citation

In reviewing Source Citations in this file, one of them does not have a Repository as an indication of where the Source is located.

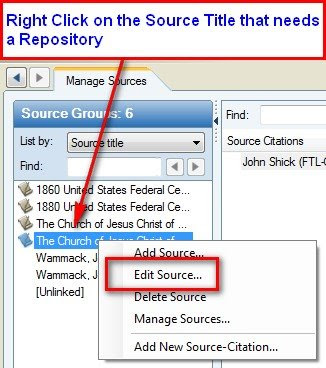
From the Source Work Space you right Click on the Specific Source-Citation in the Left Hand Panel on this Source screen, Under Manage Sources, Source Group.


Figure 145

Clicking on the Edit Source item on the pull out menu will show that the Repository has "No repository is specified for this source."


Figure 146

Click on Edit on the next window


Figure 147

Here, type in the Repository Name. It is in the Local "Family History Center". That is typed into the Source Repository Field(1), then Click New (2).

A New Repository Source(3) window will open and click OK.


Figure 148

This Source-Citation now has the appropriate Repository.


Figure 149

Clicking OK completes this task.

Posted by Picasa

Wednesday, June 3, 2009

Adding LiveRoots.com Search Engine

In an earlier Blog, I described how to Add another Search Engine from the Web Search Tab.

I have started to use another search engine on the LiveRoots.Com website. For me, it helps to search various Subscription based and Free based websites from one website.

In figure 142, below, I have two individuals with the same name and similar birth date.


Figure 142

The task is to determine if these are two individuals or one individual. In previous posts on this blog, it does appear that there were two Hiram Deats, in the same area of New Jersey, born about the same time. Not able to find any information on the normal search engine to determine the answer to this problem.

Using the Blog entry at the beginning of the Blog Entry, I added http://liveroots.com to my Personal Favorite Site list. Figure 143 is the result of adding that site to my Favorite list.


Figure 143

#1 shows the new Favorite. #2 gives the information of the Individual that I am searching for. Entered the Name in #3. Clicking on Search Button in LiveRoots.


Figure 144

The results shows a number of from a number of websites. There is an indication of where the "hit" was from and IF the website is a subscription based website or not. Again, the information in the Family File is still showing.

Following the links in the results, let to a free website at Find-A-Grave with a picture of a headstone. This page provided


Birth: unknown
Death: Nov. 22, 1887

Aged 77 years, 7 months and 10 days.

Now this really didn't answer the question BUT it did provided a Death Date and more detailed Birth Information that can be determined using the Date Calculator.

Another items to add to the ToDo list. Added the New Information there to follow up with.

Bottom line here, is that I don't have to move out of Family Tree Maker to do a broader search on the Internet.


Posted by Picasa

Print Friendly