From time to time, you may visit a Genealogy Research Library or a Library where you can not take your computer. You may or may not know what type of information that they have, but you want enough information with you to take advantage of what might be there in your research.
When I am in this situation, I take with me three reports created by Family Tree Maker Version 16. These same steps can be used with previous versions as well.
There may be other reports that may be helpful for you, but using the technique below, you should be able to generate a report that is useful for you.
When I am in this situation, I take with me three reports created by Family Tree Maker Version 16. These same steps can be used with previous versions as well.
- Birth Report, for a specific Location, Sorted by Name
- Death Report, for a specific Location, Sorted by Name
- Marriage Report, for a specific Location, Sorted by Name
There may be other reports that may be helpful for you, but using the technique below, you should be able to generate a report that is useful for you.
From the Family View screen, you click on View (1), Select Reports (2), and Custom (3).

Figure 150
This will bring up a Default Custom Report (Name, Birth, and Death Date). or the last Custom Report that you had created.
In order for the Sort to be done by Name, I want the Names to be sorted by Surname.
From the Contents Menu, Selecting Items to Include, will bring up the Fields and Format of those fields in a new window. The current Name format (from the Default report) has First, Middle, and Last Name. Hi-lighting that entry in the Right panel of that window (1), then selecting Options (2), will bring up a new window (3), where you select Last, First, Middle.

Figure 151

Figure 152

The new window will indicate that no one has been selected. If there ARE names in the Right Panel, use the << Button to remove everyone from the Right Panel.
Selecting Find > will allow you to select only those that meet certain criteria. The Help menu is very helpful at this point. For this example, Everyone with a Birth Location in New Jersey is what is wanted. Click on Find, in the Smaller window, there is a downward pointing button, you can select any of the FACTs that are listed. In this example, Birth Location is what is wanted. In the Right side of that window "New Jersey, USA" is typed. Looking at the complete report, from Figure 153, New Jersey, USA is what was there, and the individuals that were to be included.
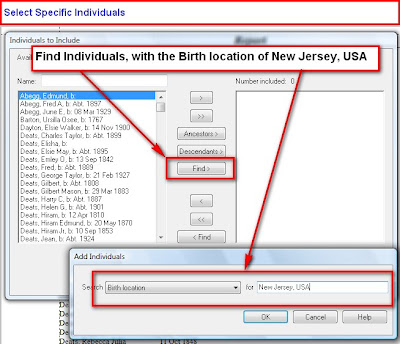
Those individuals who meet this criteria will be listed in the Right Panel. Notice the number of Individuals at the top of the list. In this example, there are 14 people with the Birth Location of New Jersey, USA.
 Figure 157
The Custom Report looks like this:
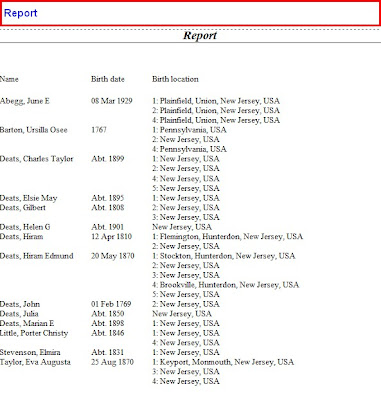
There is a choice, when you select the Items to Include, to only show Preferred Only FACT. You will notice in Figure 158 that there are multiple Birth FACTs for these individuals. Some have Dates while others have multiple locations. Since the report is only One Page, a Sort by Date is not required. Please note that you have a Sort by option available with two choices. Sort by Birth Date, then Sort by Name would be the 2nd report, if required.
In this specific file, a lot of the information was taken from Headstone Information after a visit to a Cemetery. There is very little Death Location information in this file, for these individuals. However, Burial Location information is within this file. This file also has very little Marriage Date and Location information, that report would not be generated. However, changing the Birth Date and Birth Location to Death Date and Death Location; and then Death Date and Death Location to Marriage Date and Marriage Location would be used to generate the other two reports.
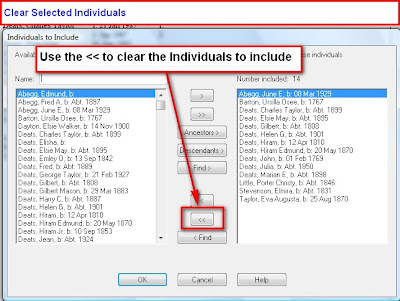
Important: remember to clear the Individuals in the Right Panel of the Individuals to Include screen before selecting that Find, Death Location, or Find, Marriage Location criteria, as shown below.
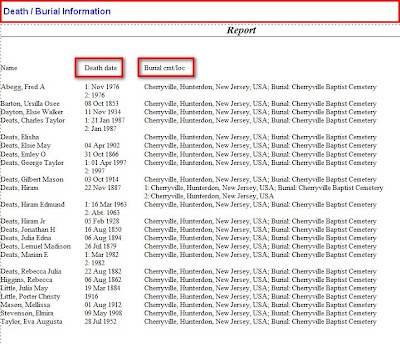
From the Headstones, the Death Date information was available, and the Burial Location was also know, those are the FACTs that were selected in Content, Items to Include: (Death Date and Burial Location). The Individuals to Include where those with New Jersey, USA in the Burial Location field.
When this report was first displayed, the Page Break lines indicated that the lines were too long. Clicking on File, Page Set Up and selecting the Landscape mode, allowed the report to print on one page.
There is enough information in these two reports, for this trip, to have a successful research trip.
For more information, please click on the following links:
How to Select a group of Individuals?
FTM: How do I sort the custom report?


Figure 150
In order for the Sort to be done by Name, I want the Names to be sorted by Surname.
From the Contents Menu, Selecting Items to Include, will bring up the Fields and Format of those fields in a new window. The current Name format (from the Default report) has First, Middle, and Last Name. Hi-lighting that entry in the Right panel of that window (1), then selecting Options (2), will bring up a new window (3), where you select Last, First, Middle.

Figure 151

Figure 152

Figure 153
As you complete these steps, you will see what the current report will look like. At this point there are too many people in this report. Most likely, including Individuals who have no events in this specific location.
To reduce or refine the list, return to Content, Individuals to Include in Report ....
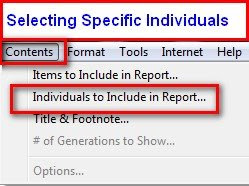
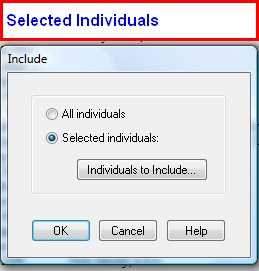
That will bring up a small window, where you select Selected Individuals and click on Individuals to Include.
To reduce or refine the list, return to Content, Individuals to Include in Report ....

Figure 154
That will bring up a small window, where you select Selected Individuals and click on Individuals to Include.

Figure 155
The new window will indicate that no one has been selected. If there ARE names in the Right Panel, use the << Button to remove everyone from the Right Panel.
Selecting Find > will allow you to select only those that meet certain criteria. The Help menu is very helpful at this point. For this example, Everyone with a Birth Location in New Jersey is what is wanted. Click on Find, in the Smaller window, there is a downward pointing button, you can select any of the FACTs that are listed. In this example, Birth Location is what is wanted. In the Right side of that window "New Jersey, USA" is typed. Looking at the complete report, from Figure 153, New Jersey, USA is what was there, and the individuals that were to be included.

Figure 156
Those individuals who meet this criteria will be listed in the Right Panel. Notice the number of Individuals at the top of the list. In this example, there are 14 people with the Birth Location of New Jersey, USA.
 Figure 157
The Custom Report looks like this:

Figure 158
There is a choice, when you select the Items to Include, to only show Preferred Only FACT. You will notice in Figure 158 that there are multiple Birth FACTs for these individuals. Some have Dates while others have multiple locations. Since the report is only One Page, a Sort by Date is not required. Please note that you have a Sort by option available with two choices. Sort by Birth Date, then Sort by Name would be the 2nd report, if required.
In this specific file, a lot of the information was taken from Headstone Information after a visit to a Cemetery. There is very little Death Location information in this file, for these individuals. However, Burial Location information is within this file. This file also has very little Marriage Date and Location information, that report would not be generated. However, changing the Birth Date and Birth Location to Death Date and Death Location; and then Death Date and Death Location to Marriage Date and Marriage Location would be used to generate the other two reports.
Important: remember to clear the Individuals in the Right Panel of the Individuals to Include screen before selecting that Find, Death Location, or Find, Marriage Location criteria, as shown below.

Figure 159
From the Headstones, the Death Date information was available, and the Burial Location was also know, those are the FACTs that were selected in Content, Items to Include: (Death Date and Burial Location). The Individuals to Include where those with New Jersey, USA in the Burial Location field.

Figure 160
When this report was first displayed, the Page Break lines indicated that the lines were too long. Clicking on File, Page Set Up and selecting the Landscape mode, allowed the report to print on one page.
There is enough information in these two reports, for this trip, to have a successful research trip.
For more information, please click on the following links:
How to Select a group of Individuals?
FTM: How do I sort the custom report?

