Wednesday, February 18, 2009

How to Re-Order Spouses

When you have multiple marriages, Family Tree Maker version 2009 (18.0.0.305) has a feature to allow the user to re-sort the order of Marriages.


Figure 91

You will notice that Helen Hammond was the first spouse. However, for descendant reports, Comfort Hammond (yes, they were sisters) is the Preferred Spouse. Comfort is marked as Preferred, but is listed first.

Select one of the spouses, in this case, Helen was selected and RIGHT CLICK on that line.


Figure 92

Select Set Spouse Order. The next window will appear.


Figure 93

Click on the Up Arrow to move Helen above Comfort and click OK.


Figure 94

The order is in Marriage Order, but has the second spouse as Preferred.

This is is especially helpful is the Marriage Dates are Unknown, but the Marriage Order IS know.

Monday, February 9, 2009

Import an Old Version of Family Tree Maker into Version 2009

There are two limitations for importing or opening a Family Tree Maker file in 2009.

1) 2009 does not recognize the Compressed Back Up (FBC) created by Version 16 of Family Tree Maker and earlier

This is covered Transfer Old Computer to New, Version 16 to 2009

2) 2009 will not open older versions of Family Tree Maker directly

One option is to generate a GEDCOM file, from your Previous Version and open that file in 2009. However, a GEDCOM file will NOT include any Scrapbook Items that may be in that file. Also, earlier versions of Family Tree Maker generate an OLD version of the GEDCOM format. If this old format is what is exported, you will receive an error message that indicates that 2009 requires "GEDCOM 5.5 and higher".

These steps will allow you to get your old Version of Family File to open in 2009 without using a GEDCOM file, but will let you import your Family File.

Before proceeding, make a Copy of your Family File and put it in a safe place on your Computer. You can do this with Windows Explorer.

Then Download and Install the Family Archive Viewer (its free) from this website:

http://www.genealogy.com/abtffiv.html

That download site has been removed. However, this download will also work:

http://c.ancestry.com/Affiliate/Knowledgebase/Images/Ftm/ftm2005se.exe


Figure 84

The file size of the FAV is 20 MB, as noted above.

When the FAV is open, click on [ 1 ] File, Open, and [ 2 ] Open window will appear. Navigate to where you have Saved your Family File. The file [ FAV.FTW ] is located in the FAV11 Folder [ 3 ] on my computer. Selecting FAV.FTW will put the filename in the Filename field [ 4 ]


Figure 85

You will open your old Version of Family File with the Familiy Archive View (FAV) (Version 11) then Close the FAV down. Your Family File is now up to Version 11 which can be opened with 2009.


Figure 86

Next, close the FAV program as usual. Open 2009, then click on File, Open.


Figure 87


After you click on File, Open [ 1 ], and locate your Family Family File (Version 11), hi-light the filename (FAV.ftw) [ 2 ], then filename will populate the filename file, and it will open that file in 2009.


Figure 88

The Plan screen will show you the Path and File Name of the file being imported into 2009 [ 1 ], and the Location and File Name of the New 2009 Family File. [ 2 ]


Figure 89


Clicking on Continue will have several importing screens and will take you to the People screen. Navigating to the person that was seen in Figure 86 you will see the same information in 2009.


Figure 89Importing an Existing File in Family Tree Maker 2009 can be found on the Knowledge Base website: Please go to this website:

http://ftm.custhelp.com/

1 - Enter 3673 into the Keyword Search box and read that Article for another way to get the same result.

2 - Enter 4363 into the Keyword Search box and read that Article about importing a file directly into 2009 with out the GEDCOM 5.5 warning on import..

There is a downloadable PDF file with more details about the update for 2009 here:

http://www.familytreemaker.com/content/FTM2009/FTM2009_SoftwareUpdateGuide.pdf

Saturday, February 7, 2009

Descendant Chart - Page Breaks

One topic that comes up, from time to time, is the ability to print Descendant Charts. They generally are long (wide) when they are to be printed. There are at least two ways to print this type of chart. One is to print individual pages then tape them together. The second is to print the Chart on "Banner Paper" or Continuous Form paper. Version 2009 has the capability to do both.

The first step is to select the Individual that is the focus of the Chart.


Figure 78

Then click on Pubish, where all of the Reports and Charts can be found. Will select Descendant Chart


Figure 80

There are other options in the creation of a Descendant Chart that will be covered elsewhere, but details will be provided in a link to a Knowledge Base Article at the end of this post. The purpose of this Blog entry is for dealing with page breaks.

It's important to look at the Check Marks in the red box on the Right. No Check Mark in the Boxes overlap Page Breaks. You can visually see the changes. The Figure below would be used if you are going to tape the pages together.


Figure 81

Another way to control this, is by using the Advanced Button to the Right of the Layout Poster field, under the Chart Title. This figure is the Default with Page Overlap. The screen gives you an idea of what the pages will look like.


Figure 82

Clicking on the No Page Overlap is seen below. This would be used for Banner Paper. To return to the previous view, click on the Reset Button.


Figure 83

Note where the page breaks are.

Details on how to change the Formatting of a Chart in Family Tree Maker 2009 can be found here:

of by going to this website:

http://ftm.custhelp.com/

Enter 4303 into the Keyword Search box and read that Article.

Thursday, February 5, 2009

FTM2009 - Update Web Site

As the Update patch for Version 2009 is available using the Help, Check Update menu, I thought I would post a link to a more detailed website provided for Family Tree Maker Version 2009.

Family Tree Maker 2009 - Program Updates Help
<== Click on this link
Are you having trouble installing the new update? Help is on the way!

There is a downloadable PDF file with more details about this update here:

http://www.familytreemaker.com/content/FTM2009/FTM2009_SoftwareUpdateGuide.pdf

Wednesday, January 28, 2009

How to create a Bow Tie Chart

One of the new Features of Family Tree Maker version 2009, is the Bow Tie Tree. This tree also has the capability to put an image behind or as background to the tree.

To do this, select the individual (one person) to be the focus of the tree. Select, from the People button (1), and select the Individual (2)
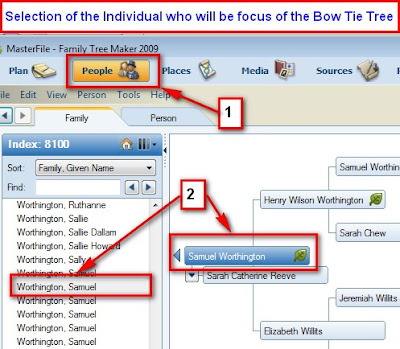


Figure 69


Now select the Publish button (1), and the desired Chart. In this case, the Bow Tie Chart (2) from the Collection and click on Create Chart/Tree (3)
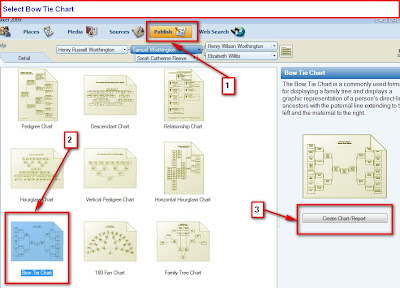


Figure 70


The first version of the Bow Tie Chart indicates 2 Pages. For this example, a One Page Chart is what is needed. The 2 pages are indicated on the top part of the Chart and the bar across the screen (2 pages). Will reduce the Number of Generations from 4 to 3 (1) and will add the Background (2).
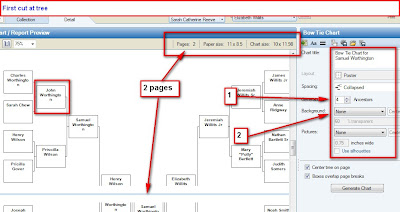


Figure 71


Reducing the number of generations allowed the Chart to be on one page.
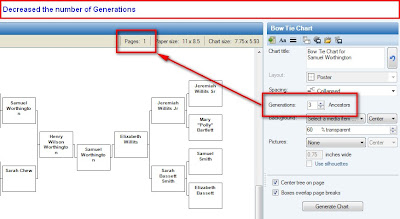


Figure 72


Clicking on the "Aa" ICON at the top of the Right Pane will bring up a Font screen. as indicated below. Please note the "n" not being on the same line as the rest of the surname.
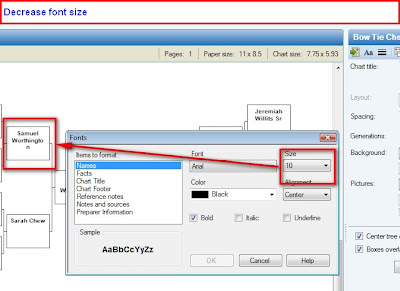
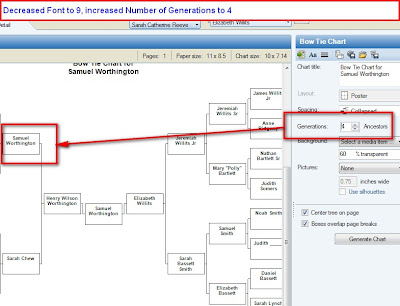


Figure 73


Figure 74


Reducing the font size to 9, allowed the number of Generations to be reset to 4. The changes continues to allow the Chart to be on one page..
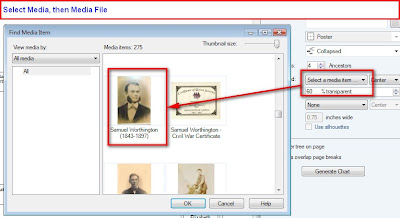
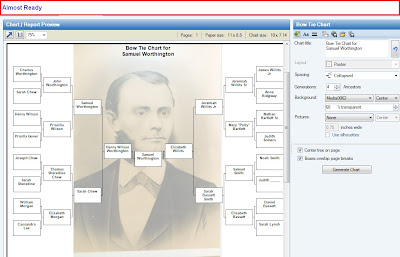
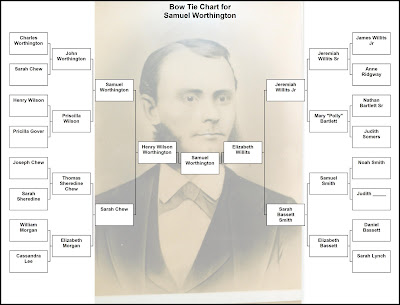


By selecting the Background button, a pull down menu will appear. There are background options available. The last menu option is Select Media. The media files, pictures will be displayed from which to select.

This can be Printed by clicking on the Print ICON. There are Share options available to Export the Chart in a number of formats. The final images is a JPG file.

Monday, January 26, 2009

Viewing a Time Line

Family Tree Maker 2009 has a feature to View a Timeline for an Individual.

To do this, go to the Individual you want to see this timeline. Click on the People button on the tool bar and select the Individual and the Person tab for that individual. Once there, click on the Timeline button.
See below:


Figure 66

To view any Historical Events, click on the Timeline button and you will see a pull down menu. Select "Show Historical Events". See below:


Figure 67

The results are below:


Figure 68

For more details, please visit the Family Tree Maker Knowledge Base website, Article 4216.

Tuesday, November 11, 2008

Family Tree Maker Blog

There is a very helpful Blog at Ancestry.Com on where to Get Help for Family Tree Maker Version 2009.

Please visit this resource as is shows various Help options available to us.

http://blogs.ancestry.com/ancestry/2008/11/11/getting-help/

Wednesday, October 29, 2008

Transfer Old Computer to New, Version 16 to 2009

So, I have a new computer and want to move my Version 16 (or earlier) of Family Tree Maker, to my New computer with Version 2009. How do I do that?

On the New Computer, Install both Family Tree Maker Version 2009 AND Version 16 (or earlier). The reason is that Version 2008 and 2009 will NOT read or open a Back Up file from Version 16 or earlier.

The method suggested here will ensure that any Scrapbook Items in Version 16 or earlier will be moved to the new PC then opened by version 2008 or 2009. The new versions do NOT read and open the Family Tree Maker Compressed Back Up (FBC) files. This is a work around for that issue. Also, it will provide a known working Back Up file, on the CD used to transfer the file.

First, Open Family Tree Maker Version 16 (or earlier) on the Old computer. There are two Utilities in these versions to help maintain the file. Go to any Family Page and run these two Utilities:

CTRL+ALT+C = FileCompression. This does some file maintenance, re-index the file, remove any unused file space.

CTRL+ALT+SHFT+UpArrow = FileChecker. When you see the "Start" button in the pop up window, click Start. If there are any errors in the file, they will be reported.

IF there are errors reported, run this Utility from any Individual's Family Page:

CTRL+ALT+SHFT+LeftArrow = FileChecker with Fixer. This utility will attempt to resolve any errors report.

Please go to this website:

http://pastftm.custhelp.com/

Enter 1396 into the "Keyword Search" box and read that Knowledge Base Article. It should help you with this Error Message, and describe how to use the LOG file.

Once this has been performed,


Figure 55

Click on File [#1], the Back Up [#2]


Figure 56

Select Writable CD Drive. Make sure that you have a CD in your drive. At the end of that process:


Figure 57

Now move to the New computer.

First Install Family Tree Maker Version 16 onto that new PC. Remember that Version 2008 and 2009 will NOT read the Compressed Back Up (FBC) file that was created by version 16. Now do a File, Restore from Back Up in Version 16. That will create a Family File (FTW) on your new PC.

Close Family Tree Maker Version 16.

Install Family Tree Maker Version 2008 or 2009 onto the New PC. It should normally open that existing Version 16 Family File and create a New, Version 2008 or 2009 Family File. All Family information and scrapbook items will be imported into 2008 or 2009.

If that does not happen, then continue.


Figure 60

Click on File [#1], Open (not shown) and select the Family File [#2] that you just put onto the new PC.

Please read previous posts on this Blog to continue from here.

To help with the File Name Extensions used in the Blog, go to the Knowledge Base Website article 1719

Knowledge Base Article 1507
will provide more details on Backing up a Family File.

Knowledge Base Article 2647 will provide more details on Restoring from a Back Up in Version 16.

Print Friendly