Friday, March 30, 2012

1940 Census Preparation - Identify ED's

A couple of weeks ago, I showed how to generate a report for everyone I expect to find on the 1940 Census.

Are you ready for the 1940 Census ? 

I have signed up and have done a couple of Indexing practice runs. We are go to go there. The focus this week around the Genea-Blogging community, a couple of Google+ hang outs, and the Genea-Blogging Talk Radio show this evening, we were encouraged to identify the Enumeration Districts for "our people". Remembering that the indexing won't be available to us for some time.

It was suggested that we go to Steve Morse's website 

http://stevemorse.org/

Once there, select US Census, then Unified 1940 Census ED Finder:

In my report I have the Street Address for everyone in the 1930 Census and in the Citation for that "Residence" Fact, I have the 1930 ED Number.

Going to the Steve Morse's website, I selected the State, County, and City, for those who lived within a city, and entered their street address.


It returned the 1940 ED Number. One cool feature, was that you can link to Google Maps, to actually see the street and where on the street the address is. I actually saw the street view of my grandparents house.

For me, I don't KNOW when they moved from the address in the 1930 Census, to the address where I know they lived in the early 1950's. This Census should help me with that. In addition, I may get that date a little closer when I see the 1935 information that may be included in the 1940 Census.

Here is a piece of a marked up copy of my report, which will be my working copy on Monday, April 2, 2012 at 9:00 am


I noted the 1930 ED, and the Residence Fact for the 1930 Census is in the report.

There was one person on the report that I don't have a death date for, so I am not expecting to find her in the 1940 Census, as I haven't found her since the 1900 Census.

I reviewed the entire list (1+ pages) and marked that a couple of people had died since the 1930 Census, and one couple got married after the 1930 Census. So my printed report has notations on where I expect to find them in the 1940 Census.

I am ready to go,

In the Blog Talk Radio show tonight, we heard that on Day 1, Delaware, Virginia, Kansas, Oregon, and Colorado will be ready for indexing. Day 2 will include Pennsylvania. So, with any luck, I will be able to find "my folk" on Tuesday, with out the 1940 Census being indexed. Links are ready, from what I can tell, on the Steve Morse's website.

Then I can get on with Indexing.
So, I pulled up my 1940 Census Report and took a look at it

________________________________________________________________ Copyright © 2012 by H R Worthington

Wednesday, March 28, 2012

How to High-Light a Branch of your Chart

So, you created a Descendant Chart for a display or sending it to a cousin. This cousin may not be a genealogist or not familiar with such a Chart. So, you want to High Light or Color Code that chart for a couple of branches of this Chart.

Here is a piece of such a chart:


This chart covers 40 pages of 8.5 x 11. The red box indicates the branch to be highlighted for this person (or branch).

To Select the individual boxes, select the first box, hold the CTRL key, and select the other boxes that you want to highlight.

This will turn the outline of the boxes Blue.

Right Click on one of the boxes and a window will appear.


We're going to Mark Selected this group as Marking 1. So now this group of boxes, (or branch) are marked.

Selecting the 3rd ICON in the Right Hand Panel, will bring up a window where you can define the Color of the Border, Shading of the box, Shadow of the box, for Marked Boxes 1.


So all of the boxes Marked 1 will have a Red Outline and will have a gray fill, within the box. Make your own choices. I used these colors for the Blog, not necessarily good for reading on a chart. Below are the result of the choices what were made.


There are three Marked Groups available and many other options for how the Chart will display. This is only an example of highlighting a specific branch.

If you are going to Email this type of chart, you can Generate a PDF file, and attach it to an Email. Color another Branch to be sent to another cousin. Select Share, and select Export to PDF, and that will bring up a window to name the PDF file to be attached to the email.


________________________________________________________________  

Copyright © 2012 by H R Worthington

Thursday, March 22, 2012

Duplicate Place Names

When doing a Web Merge, there are times when the Place Name provided by Ancestry.com do NOT match the Place Name Authority in FTM2012 (and earlier versions). So, you end up with Duplicate Place Names, one of which is NOT resolved.

Go to the Place Workspace and here is what you will see:


 You will see the duplicate, the first one has the Unresolved ICON, the other does not. Selecting the "resolved" place name, you will see the GPS information in the upper right area. What needs to be done is to Replace the Unresolved Place Name with the Resolved Place Name.

Select the Unresolved Place Name (with the ICON) and Right Click on that Place Name and  window will appear. Select Replace With Other Place Name ....


The next window will open, where the Unresolved and the Resolved Place Name, and others from the Place Name list are displayed, and select the Resolved Place Name. This is Usually the one with the Country Name, in this case USA.

A "Are you sure" window will appear, where you would select, Yes.


 The Place Name is Resolved and the GPS information is now shown.


 Lesson Learned: Clean Up after a Web Merge is suggested

________________________________________________________________  

Copyright © 2012 by H R Worthington

Wednesday, March 21, 2012

Why do a Web Merge

While cleaning up my Sources and Citations, I made an observation. It's always been there, but I hadn't figured out how it got there. It's a Link to the Online Image.

Go to the Sources Workspace, and select any Citation, where there was an Online Image. If you performed a Web Merge, you will see a link back to the online Image.


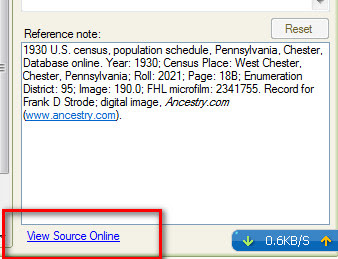
Look in the Lower Right panel, just below the Reference Note. That link will allow you to view the online Image. If you included the Media file in the Web Merge, it will also be in the Media Workspace.

If this link isn't there, then there either wasn't a Media file, or the Web Merge feature wasn't used.

Lesson Learned: This link is a good reason to use the Web Merge feature.

________________________________________________________________

Copyright © 2012 by H R Worthington

Tuesday, March 20, 2012

Family Group Sheets - Which Template

 I have a number of Family Group Sheets in my collection from various family members. Question: Which Family Tree Maker Template do I use? (Evidence Explained! Templates)

At the moment, I have them all over the place, but many family members. So, here is how I selected the Template:

In the Source Workspace, selected New, (upper right of the screen capture), Selected New on the next window, and started to type "fam". Three character Keyword search will bring up a list of options, and selected Family Chart or Group Sheets.


The Compiler is the person who created the Family Group Sheet, so that information is filled in (this example the name and address has been blanked out). The Collection, is my Surname Collection, and the Owner, is the Compiler. The Current Address is entered. 

If the person has an email address, I entered that into the Comments field.


Because these specific Family Group Sheets were numbered, I entered that information into the Citation Details field [ Family Group Sheet #1 ]. The Citation Text has the Name of the Person, whose Family this group sheet is for.


Looking at the Source Group list, it's easy to identify the Source for these Family Group Sheets, both from the Source Group Listing and from when selecting a Source and Citation when adding a Fact Citation. Hovering over the Source list, will show that this is a Family Group Sheet and who the compiler was.


When I make changes or look to make changes, I look to see what the Output looks like. This is the Source Bibliography Report, showing how this change will show up in the Bibliography.


Each compiler will have their own listing by their Surname.
________________________________________________________________  

Copyright © 2012 by H R Worthington

Sunday, March 18, 2012

Media File Clean Up

As you may be able to tell, I am cleaning up my family file. I have had this same file since the beginning. This post will deal with my media files. All of those photographs that I have added to the file over the years.

One of the issues has to do with multiple copies of the SAME photograph, linked to the several people in the photograph. To have a starting point, I have 349 Images in my linked within my file.

Going to the Media Workspace, and scrolling down, I can see the same image appearing. For example:


There are several images that are the SAME. Not to mention the "Media" followed by a number issue, which is a Filename Issue. I want to clean up both the duplication and the filename problem. I do have a filenaming convention that has been posted before.

If I select an image, in the Media Workspace, Collection Tab I see on the right the Caption and year of the photograph, in this example. The filename is Birth Surname, First and Middle name and year of the photograph. This is fine, so far.


By switching over to the Detail tab, at the bottom, there is a link from this Media file to the Media Tab for that person. All is good, so far.


But, lets look at a "family" or group Photo. This is one of the photos that shows up 3 times in the Media Folder. Each with a different filename (by person media file), each linked to that person with the filename. The Caption is the same, so sorting by Caption (Tools, Option menu), showed the duplicates.


What I want to do now, is to Link this ONE image, to the three people in the photograph, and be able to delete the two other media files. Below and on the Left is the Links Tab, where New, Link to Person is selected.


Since I have the names of the individuals in the photograph in the Caption, I can now select the person from the list of individuals, starting by typing the surname, comma, then the first name, until the first name can be selected.    


The options in the upper right at Linking to the Person Only, or to a specific Fact. I accepted the default of Link to person only, because I want this picture to be in the Media Tab for this person, and to be in this persons Gallery in the Ancestry  Member Tree. The third person is linked in the same manner.

Returning to the Media Workspace, Details, the Caption and Linked to people are the same.

Now to the Filename issue. 

Clicking on the Media Tab, and selecting the Rename Media File menu item, the filename can be changed (renamed)


What I found that worked best for me, wast to use the Surname, of the Family, followed by the complete Name, in the order listed in the Lower Left corner (Linked People). In this case, the Date that the picture was taken is known, so I added the year to the filename. This way, if these three people appear together, in a different year, they will have different filenames, sorted by that year.


I have a number of Family Portraits. I use the same basic file naming convention, but I add the word Family_ to be beginning of the Filename. It's a reminder to me that it's a family portrait, vs members of a family.


The description field is a great place to put the names and where they are in the photograph and other details that you might have.


This one photograph is linked to 7 people.

By doing this process, I got rid of all of my Media-####.jpg filenames, and got rid of the duplicates that I had in my file. Went from 349 Media files down to 338, with no duplicates and each media appears with the person in the file, both in FTM2012 and in the Ancestry Member Tree.

NOTE: The Media filename came from the import of these images from Version 16, where all of the scrapbook items were within the family file.

________________________________________________________________ Copyright © 2012 by H R Worthington

Thursday, March 15, 2012

Free Form Sources to Templates

 For 2012, I have taken on the task of cleaning up my family file. I started this file, "in the beginning", with Version 3.4. Many, many things have changed, both within the Family Tree Maker program and how I do and record my research. This will not be an easy task.

For this blog post, I will focus on how to get the Source and Citations from the Free Form Source / Citations what have been with Family Tree Maker, into the Template feature that was introduced in FTM2010. The end result, being the End Notes, and Bibliography Reports are so much improved using the Template, that it's worth the time, for me, to address this issue first. I have done some testing before, and with cleaning up about 5 Sources, I took 10 pages off of a report that I did.

This may sound complicated, and it may be for some, but once you have done it, it becomes easy.

BEFORE you do Anything, BACK UP YOUR FILE !!!!

I am going to do my Sources for the 1850 Census.

Below I have selected the Source Workspace, scrolled down to where the "collection" of 1850 Census Records are, that are in the Free Form format. I can tell, because it just says 1850 U.S. Census, Population Schedule. Other years will say YYYY United States Federal Census. That is the hint, to me, Free Form.

I want the Census to be by Location. (1850 U.S. Census, State, County)

The first entry is Jefferson County, Tennessee, and will select that entry.


 In the upper right, is the "Add" Button, to add a New Source, and in the pop-up window, will select New.


 This will bring up a new window, where a Keyword can be entered, to select a Template. Only type the first 3 characters of what you are looking for. In this case CEN (for Census)


Carefully select what Census you are working with. In this case, I am working with an 1850 Population Schedule. I have two choices, by  Census Year, and by Census Year and Location. That is the one I want. What this does, will allow you to save your Sources by State and by County. Having tried the first choice (by Census Year), I found that it was easier to choose the 2nd option. (users choice). I looked at the Output in both formats, and liked the output better, and locating Source and Citations later was easier, for me, with this format.


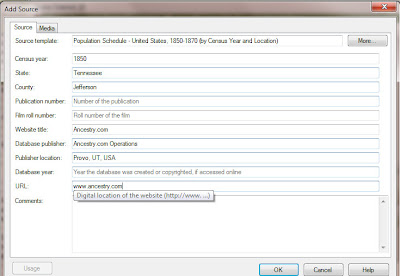
The following screen is presented. Entered the Census Year, State, and County. Let the next two fields blank, because at this point, at the Source level, that is unknown, but can be added later. The web site is Ancestry.com. The Database Publisher is Ancestry.com Operations, Inc, and are located in Provo, UT, USA. Looking at all of the Source Material from Ancestry, this is the information provided by them. The Publish Year, will leave blank, but will edit that later, and the website is www.ancestry.com.


Clicking OK, will create a New, Template, for the 1850 Census, for Tennessee, Jefferson County. Will leave the Citation Detail and Citation Text blank, as that will be filled in later.


 Returning to the unformatted Source, (1850 U.S. Population Schedule) and selecting that first Jefferson County, Tennessee Citation, in the Right Hand Panel, on the Right of that Source title, is a Pull Down Menu. Will now select the newly create, Template for the 1850 Census for Tennessee, Jefferson County.

What this will do, is to take this existing Citation, currently in the 1850 U.S. Population Schedule, and MOVE it to the 1850 U.S. Census, Tennessee, Jefferson County Template.


Going to that Source (Left Hand panel), you will now see TWO entries. The one we just put there, and the "no Source-Citation information" or Empty Citation. Right click on that Entry, after making sure there is nothing in the Right Hand Panel, and Delete that Entry. That entry was created with we just clicked OK a couple of steps ago.


This Citation is shown on the Right, and the Links (Facts) that came from that Citation are shown in the Linked Tab.

Not quit done, for me at least for this clean up.


I want to make sure that the Citation Detail information is complete. Some times, all of the citation details do not make it into the Citation Detail when doing a Web Merge. I want to make sure that I have the details.

In the lower right, there is a Link to View the online Record.

I pull up that screen and Copy (high-light and CTRL+C) the text as indicated below:


Back to FTM2012, selecting the Notes Tab, I will Paste (CTRL+V) that information into the notes. Then High-lite that first line and Paste it into the Citation Details in the Right Hand Panel.


The Citation Detail is now complete, but I want to make sure that I have the Image of that Census Record. The Media Tab is selected and I have that image. Other Blog posts have shown how to Add Media files to a record.


This process is repeated, moving or changing the Source from the Free Form format into the Template Format, adding New Census Sources as required.

It took me about 15 minutes to clean up my 1850 Census Records, from the Free Form format to the Template format. 10 new templates, 36 citations.
________________________________________________________________ Copyright © 2012 by H R Worthington

Tuesday, March 13, 2012

Are you ready for the 1940 Census - A Test

 Earlier, I have posted how to generate a list of people you might find in the 1940 Census.


There is flexibility in how you can start with. This does NOT get into Where to find them, since the 1940 Census, initially, will not be indexed.

The next piece is the ability to update that list, by removing those you have already found.

I created a 1900, 1910, 1920, 1930, and 1940 Census Report. Each as it's own Saved Report, with the Selected Individuals. 

To take this to the next step, as we find our ancestors in any Census, how about the report removing them from the list, once you have found them, without having to do anything but to run the Saved Report again.

NOTE:  When I find someone in a Census Record, I record that as a Residence Fact, with the Census Record Citation, as the documentation of where the person lived on that specific date.

In preparation for the 1940 Census release, I wanted to test out HOW to know who I still need to look for. I decided to test how I was doing with the 1930 Census. This will be my test, or further preparation for the 1940 Census.

Go to the Publish Workspace, Saved Reports, and select, for this example, the 1930 Census Record. This was created in the earlier blog postings. Selecting this Saved Report will bring up the list of people I had in that report.


What I want to do now, is to Add the Residence FACT to the Report. Selecting the Items To Include ICON, in the Right Hand (RH) Panel will bring up the Items to include menu. Clicking on the Green Plus (+) ICON, will bring up the list of Facts to be included in the Report. Scrolling down and selecting Residence. 


Below is a piece of the report just created. You will notice that there are already two 1930 Residence Facts in the report. One shows a Family Number, from that Census Record. But, I want that person not to show up in the list of people I am searching for in the 1930 Census.


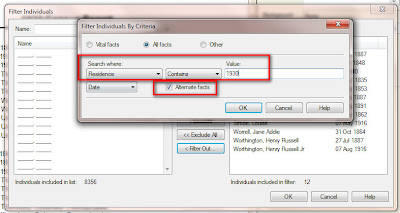
Will now select the Selected Individuals Button on the Right, as we did earlier, with the Names still in the Left Window, we will now < Filter OUT, all Facts, and scrolling down to Residence, and select Contains. This is indicating that we want the Residence Fact that Contains, something. That will be defined next. 


Continuing, Residence Fact that Contains 1930. Further, not knowing, nor caring at this point, the Alternate Facts box is selected. I normally select the most recent Residence Fact as preferred. But, for this test, that is not important..  


So, the resulting report showed that I only have 2 people to look for in the 1930 census. It should be noted, that this is my Direct Line. The earlier blog posts can then be adjusted to include others.


This was a test to see if I am ready for the 1940 Census. It worked so well, that I am using this same procedure for previous census years. The Adjustments for the Birth and Death Dates are changed based on the Census Year.

In working with the Filter In and Filter Out, and based on the data in my files, I used the Census Year, not the date the Census was taken. (01 April 1940). 

The next task will be to identify Enumeration Districts for Browsing the Census Records when they are made available to us.


________________________________________________________________
 Copyright © 2012 by H R Worthington

Print Friendly