Sunday, March 30, 2014

FTM2014 and Mastering Genealogical Proof - Chapter 4 Source Citations

I have been in a study group on the book, Mastering Genealogical Proof (Jones, 2013) by Dr. Thomas W Jones in the Google+ Dear MYRTLE Genealogy Community.

In Chapter 4, we discussed “Source Citations” (Jones, 2013), 33. One of my readers was having some difficulty taking that chapter along with Evidence Explained (Mills, 2007) and how they work with the Family Tree Maker template feature.

I am going to try to explain this as I understand it. I had to break the Chapter title apart, to be Source and Citation. The Source being the Container of information and the Citation the information within the Container.

In Family Tree Maker, that is the Template Feature, where the proper Template defines the Container (our source). The Information within that container is entered into the appropriate Facts in the program for that person or persons.

What we learned in this Chapter is that a “Source Citation” is made up of 5 parts.
  • 1.      Who
  • 2.      What
  • 3.      When
  • 4.      Where
  • 5.      Where In


The Template feature, no matter the Source or Contain, is a fill in the blanks for 1 through 4. I have blogged about this many times.


Depending on the Container, there will be various fields to complete, but the Template form asks the right questions.

It’s the Where In question that has been the difficult piece for me and others. As with each of the Citations, based on the Source, what is put into one or two fields is what is important.

We have two fields that the Source Template screen does not include. Citation Detail and Citation Text.

As I have blogged in the past about this, the information that I enter in the Citation Text field, for the most part, is information for me and that I do NOT put a Check Mark to the right of that field meaning it doesn’t get published in an EndNote or Reference Note.

It’s the Citation Detail field that takes the work.

The question is “Where In” did this information come from.

I have a book that has lots of information in it about my family. I want to capture that information and I do that one or two ways. The most obvious way is to record the information into Fact fields. The date, place, and perhaps a description. Later I want to be able to answer the question ‘Where did I get THAT information from?” That usually, for me, comes after I review all of the facts and try to do some analysis on what I have (Chapter 5 and later) (Jones, 2013).

So, in my book example, the Where In question is simply answered with a Page Number, or in the case of a newspaper article, page and column number. I have given more information about the Citation Detail field for Census Records.

Basically, in the past, I have been working too hard on my citations. Understanding the 5 questions above, has helped me make my citations simpler and more effective for me.

Do you need both of the books I have mentioned? No, but they certainly do help.

There is a very helpful website, Evidence Explained and a related Facebook page, that helps me understand what I am trying to do. There is a Forum on the Website for questions and for “peer review”. What a better way to see if your Citations are meaningful for someone else than to post it on the Forum page.

I am certainly not an expert in fact I consider myself a beginner, but I think I better understand a very difficult topic.

A special Thank you do Elizabeth Shown Mills and Dr. Thomas W. Jones  for making these two resources available to us. Also, for the Family Tree Maker program to help take the guess work out of the first 4 questions.

References

Jones, D. T. (2013). Mastering Genealogical Proof. Arlington, Virginia: National Genealogical Society. Retrieved from http://www.ngsgenealogy.org/
Mills, E. S. (2007). Evidence Explained, Citing History Sources from Artifacts to Cyberspace. Ba;timore: Genea;pgical Publishing Company.


_______________________________________________________________
Copyright © 2014 by H R Worthington

Friday, March 28, 2014

Family View - Version 16 and FTM2014

I must be missing something. A long time user of Family Tree Maker much prefers the "old" screens vs the "new" ones.

I thought I would check the difference out, since I have reinstalled Vesion 16 my Windows 8.1 computer

Here is the Family View in Family Tree Maker Version 16


The same family in FTM2014


What is in Red is the SAME information and format as Version 16. However, I can see three more generations of Ancestors, making the Navigation so much easier. At least for me.

The only difference between the data in the two screens is that two people died between the last time I updated the Version 16 file and the FTM2014 file.

I find the navigation around FTM2014 so much easier, far fewer mouse clicks, but that's just me.
_____________________________________________________________
Copyright © 2014 by H R Worthington

Tuesday, March 25, 2014

FTM2014 - Saving Web Address not associated with a specific Citation

I was listening to Crista Cowan, the Barefoot Genealogist, on Ancestry.com a few minutes ago and realized that I haven't brought up this topic before. I like it went I can have links to my Citations and do that every time I get a chance. I have blogged about  that, in most of the Citation blog posts.

BUT, we have another way to record web addresses (URL)'s that my not be for a specific Citation.

I found a book on Google Books and I want to have a link to the book in my family file.

Colonial Mansions of Maryland and Delaware

 By John Martin Hammond
There are a number of pages about a number of families in that book. For Example, John Brice is mentioned. The book doesn't say John Brice II, but based on the information in the book, it's my person.

Here he is my my Family File, People Workspace, Tree View.


I go from the Tree View to the Person View.

I click on the Web Links tab, and select New.


That brings up this window.


Were I enter the URL (Copied from the Google Books Item, and Pasted into the Web address field.

I then typed in the Title of the Book.


Clicking OK, the link and the title are in the Web Links tab.

To go to the Website, I click on the "globe" ICON

Which takes be back to the Google Books Item that I am referring to.

This specific book has an index with links from that index to the specific chapter I want to have linked to John Brice II.

Here is a picture of the house, from that book, where John Brice II lived. I have actually been to this house.


_______________________________________________________________
Copyright © 2014 by H R Worthington

FTM2014 - Merging of Two Files

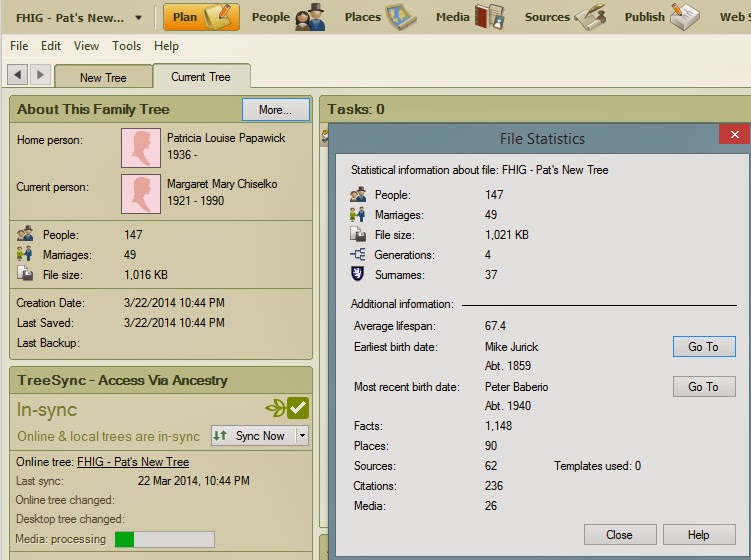
For a presentation I was to give, a friend of mine gave me a research question to help identify her step grandmothers name. She gave be some basic information and I did my research and was able to answer that question. I ended up with 147 people in the tree  (file) with the associated records.

She then wanted me to merge the two files together, as she had a file of 901 people.

This is what I did to merge the two files.

This is the file that my friend had been working on. 901 People, 3,457 Facts, 81 Sources, 332 Citations and 14 Media Files.


Now that the file is open, I am going to Compact the file and Back it up. Going to the Tools menu I select Compact File.


When offered, I will Back Up the file before compacting.


I back it up to a Custom directory, with for me is an External Drive.


If anything goes wrong, I have a file that I can go back to.

I then click on File, and Close. Next, I open the file I created.


There are 147 people in my file, 1,148 Facts, 62 Sources, 236 Citations and 26 Media files.

Because I worked hard on this file, I ran an Undocumented Report from the Publish Workspace, Source Group, because I wanted to merge into the larger file a completely document file.


It's blank, meaning that all facts have a citation on them.

I Compact and Back Up my file, just like it did the first file.

Now for the fun part. Close my file and reopen that first file and click on File, Merge.


There are options here. I can select people to include in the merge and I can add individuals from the 2nd file into this file without merging them. I want to include EVERYONE and Merge any matching individuals. For me it's easier to clean up and merge during this process, then try to remember who was "added" without merging. Remember that both files are Backed Up.

You will notice the "Advanced" option on the above image, I haven't found it to be helpful, especially on these two files.


Clicking on "Next" Family Tree Maker will begin the Merging process by Matching people between the two files.


The files are not merged yet, this is just matching people. The process will then provide a screen where the User gets to make choices.


You select the first person, in BOLD on the Left, and in the right the information from the HOST file, in this case the file that I was given with 901 people in it, and the IMPORT file, the file I created. I then get to choose the Preferred Fact, Alternate Fact, or I can discard the fact. If I discard the fact but keep the Source information on discarding the Source.

I most of the Facts in this file, I allowed for the Preferred Fact to be the one that was in the HOST file.

Each of the names, down the left column should be reviewed, one by one. NOT clicking on the "Merge" option in the lower right. BUT review each person in Bold on the Left.

There will be a point where there are the new people from the Import file that are not in the Hose File. They will be added and there isn't anything to review. There is a break between the people that need to be reviewed and the new people. When you get there, click on Merge.


Now Family Tree Maker is merging the two files.

The end result was, 988 people, 4,382 Facts, 109 Sources, 418 Citations and 40 Media files.


As with any other Merge that I have done, and have posted here, I go back and do some clean up of the Merge. In this specific case, I had done the clean up before I did the merge. Basically, I was just adding information to that first file.

I have since backed up this new, merged file, and sent it to my friend who did a File, Restore and how has that file to maintain.
_______________________________________________________________
Copyright © 2014 by H R Worthington

Monday, March 24, 2014

FTM2014 - Moving an FTM2012 file into FTM2014 on a New Windows based computer

With FTM2012 and FTM2014, there is a unique feature that needs to be handled when Moving a file from one Windows based computer to another Windows based computer and the new computer has FTM2014 installed. The TreeSync™ feature must be handled correctly. The Default settings are designed to do this correctly, but this blog post will walk you through the process.

For this blog post, I am going to start in FTM2012 on one computer, because I want to open this file on a New Computer, without loosing the Sync Feature, but the new computer has FTM2014 installed. This same process will also work going from FTM2012 computer to FTM2014 on the SAME computer. The steps are the same.

The Plan Workspace shows that FTM2012 and the Ancestry Member Tree are in Sync, with the Check Mark in the right side of that screen and is says "In-Sync"


From the Plan Workspace in FTM2012, Click on File, then Back Up.

Just want to point out, the Filename at the top, followed by Family Tree Maker 2012. My filenames include the Version, and the Product Version number from the Help menu.

In this case the file is my Master file, followed by 2012 and 732. FTM2012_723.ftm is the full filename. (the text box doesn't include the 3). So, I know what version of Family Tree Maker this file was worked on.

Clicked on File, and selected Back Up


This next screen is very important and the details need to be reviewed.

The normal Back Up command ADDs the Date of the Back Up. So, the Back Up full filename is

Master2012_723_2013-09-30.ftmb

 At a glance, I know what version of Family Tree Maker I was using and the Date of the Back up.


The Custom Directory, for this example, was changed so that this Back Up was put into my Dropbox Account. The Change button below the Custom Directory line was selected and I browsed to the special Dropbox folder on my computer. In the Dropbox folder, I had created an FTM2014 folder for this purpose. That is to put a file or files to go between computers.

Reason: That Back Up is in the Cloud. So, if I wanted to move this file from an Old Computer to a New Computer, I could do that using Dropbox. When I restore the file, I just go to the Special Dropbox folder on that computer, or, for this blog post, to the same computer.

I don't normally use Dropbox with Family Tree Maker, since FTM2012 came out with the TreeSync feature, as you can only use ONE computer to Sync with ONE Ancestry Member Tree.

The lower left set of options are really important as they indicate that in the Back Up, you want the Media files included, any Historical events that you created in the past, AND any Web Favorites that you added in the Web Search Workspace. Each of these features have been discussed on this blog.

The lower Right box is where the Sync magic happens. It says to Allow restored file to resume syncing. With a check mark in the box, the TreeSync feature is included in the Back Up.

Clicking OK started the Back Up process.


The Back up is now complete. The FTMB file is now in Dropbox.


Now to FTM2014 (same computer or another computer)

In the Plan Workspace, click on File, and Restore


In Dropbox, I went to the FTM2014 folder for this purpose and there is that Back Up file that I had created earlier.


 I select that file and the filename is moved to the Open field.

STOP before you click Open:

That is NOT the way I want to name this file. By high lighting the filename it can be renamed.


I want it to be Master2014_1207. Family Tree Maker Version 2014, and the 64 bit Product Version of 1207


The Restore starts:

But will stop, because there are options on the restored file.

Like the Back Up, we are asked if we want to Restore the Sync Files in this case Yes, and do we want to Replace any user created Historical Events on the computer and Restore the web favorites in the Web Search Workspace. Yes to both with a Check Mark


Now the Restore process continues


At the end of this process, you are taken to the Plan Workspace of the New file. I immediately do a Tools, Compact file, use the Back Up feature that is offered and let the Compact file run one time.

Than, its back to work


_______________________________________________________________
Copyright © 2014 by H R Worthington

Saturday, March 22, 2014

FTM2014 from FTMM-3 File Exchange

I haven't blogged much about Family Tree Maker for the Mac, because it's more difficult for me to do good screen captures, etc., but I am working on that issue. Until the most recent version FTMM-3, the feature set was behind that of the PC version (FTM2014) and it's been that way since the Mac version came out.

However, that has changed. The feature set between the two versions are very close. From what I can tell it's more about how you do some items on the Mac vs how you do the same thing on the PC. The Mac is not my strength.

There is a feature of Family Tree Maker for the Mac, version 3 (FTMM-3), that really needs to be talked about. That is the ability to exchange a file from the Mac to the PC or the other way around. Prior to FTMM-3, there was a migration tool, that allowed you to migrate a file between the two application. That has changed.

In FTMM-3, I went into File, Export, to Export the complete file, and Saved it into Dropbox that is on my Mac. That creates a .FTMB or a Family Tree Maker Back Up file that is user created.

When the Dropbox notification appear on my PC, I opened FTM2014, did a File, Restore from Back Up, selected that Mac created back up file,  and FTM2014 opened that file without any problems at all. The file had Media files that came over correctly. So far, I have not been able to find anything that I hadn't expected to see.

So, we can seamlessly open a file created on the Mac (FTMM-3), on the PC in FTM2014. Using Dropbox made the transport of that file effortless.
_______________________________________________________________
Copyright © 2014 by H R Worthington

Sunday, March 16, 2014

FTM2014 - Historic Canadian Place Name

One of my Facebook friends posted this:
The places are Port-Royal (today Annapolis Royal), Beaubassin (no longer exists as a village) and Chipoudy/ie to name a few
FTM2014 wasn't working for this person using the place name.

Since I knew this was a historic place name, and I certainly don't know that much about Canada, I went to Wikipedia and did a search for "Port Royal" paused while the search caught up to me and saw Annapolis Royal, Nova Scotia.

https://en.wikipedia.org/wiki/Port_Royal,_Annapolis_County,_Nova_Scotia

I read the information in that Wikipedia then put Port Royal into a Place in FTM2014. It showed me that it was an Unresolved place name so I clicked on the ICON to the right end of the place name.


Don't think that Pennsylvania was the one I wanted, but none of the rest helped either. BUT, what if I added Nova Scotia after a comma.
Port Royal, Nova Scotia

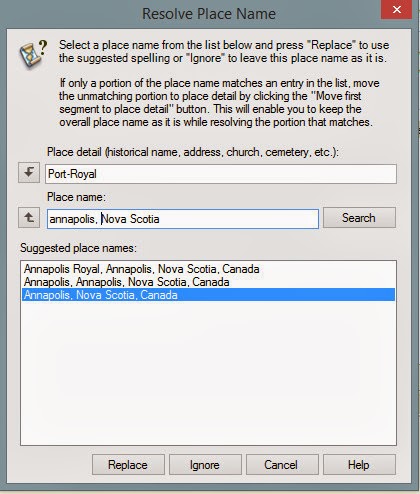
Nova Scotia, Canada is right, but I don't want to loose the Port-Royal. So, I move it up to the "Place detail (historical name, address, church, cemetery, etc) field.


Look what I got when I clicked on Search: Annapolis, Nova Scotia.


I accepted (Replaced) what I had and now have the right place.

The question came about because of the Map Feature. So, what does the Map say about this place?


In the Place Workspace, Map view, it's under the country of Canada, Nova Scotia, Annapolis, and that pin point is very, very close to the map that is on Wikipedia.

I went back to Wikipedia for Beaubassin, that doesn't exist any more, but I was able to pin point in FTM2014 that location.


Yes, it does take some work, outside of Family Tree Maker, BUT, on the Ariel View in FTM2014 that pin will be just about where that Historic Place WAS located.

_______________________________________________________________
Copyright © 2014 by H R Worthington

Friday, March 14, 2014

FTM2014 - Image Citations

I recently made this blog post:

FTM2014 - How to include a 2nd Image for a merged Record with two pages.

But I have one more step for ALL of my media files or images. That is to put a Citation "on" them. I want to be able to look at a Media File (image, picture, census record) and see where I got it from and any other detail. I also want to be able to view that "citation" in my Ancestry Member Tree (AMT).

In the Sources Workspace, I have selected the 1870 U.S. Census for Maryland, Baltimore County. I have selected the Citation for the Record I was looking at. The Citation detail is combined with the Source Template and presents the Reference Note.

But, there are two Media files. The one on the left says 1870 Federal C and the second one has some random filename that came from Ancestry.com.


None of that is very helpful for me.

I need to do two things to both of these images. I had put them into the Census Category in the Media Folder, as I showed in the above blog post, but I can do better AND then include a Citation with that image.

There are two items below that are important for the next step. The first is the Reference Note, and the Media Detail ICON. I want to Copy the Reference Note (my good citation) and use that in the Media Detail Screen.


If I Right Click in the Reference Note and use the Select All, then Copy that text, the Citation will be in my computer's Clipboard.


In the above image, the COPY text will become active and I will right click again and click on Copy.

Back to that tool bar, I will select the Media Detail ICON and the image will open.


I will select everything in the Description box on the right, and Paste (CTRL+V) the Reference Note that is in the Clipboard. You can also Right click on the Hi-lighted text and select paste.

The Caption is the way I want it.

1870 Federal Census Record for William Howard - Page 1

The Category is Census - Citation

(That category was created to remind me that I need to put a Citation on that image. The filename is the format I want.

1870_Fed_MD_Baltimore_Ward11-HowardWilliam-p1.jpg

Now the Description has my Citation. I clicked on Edit to the Right of Categories and put this image into the Census Category, as it has a Citation.

To the 2nd page.

Selecting the Media Detail for this one, doesn't meet any of my standards. The Caption has no meaning. If you look closely, the Caption and the Filename are the Same, and not helpful at all. Both need to be changed. The Category is right but the Description is blank. I will have to rename the file so that the Filename reflects the 2nd page and the Caption reflects the 2nd page.

Remembering that I still have the Reference Note on my Clipboard, I will put the Citation in the Description box. (CTRL+V)

I will also replace the Caption to:

1870 Federal Census Record for William Howard - Page 2

Clicking on OK will take me back to the Source Workspace, where I will Right Click on the 2nd image and it will allow me to RENAME the file.


 I will rename it to:

1870_Fed_MD_Baltimore_Ward11-HowardWilliam-p2.jpg

Here is the final Media Detail for the 2nd page:.


All is well within Family Tree Maker but, what about the AMT?

Here is that image in the Ancestry Member Tree.


_______________________________________________________________
Copyright © 2014 by H R Worthington

Sunday, March 9, 2014

FTM2014 - Relationship to Me

Here is a new one for me. It may not be new, but I just noticed this window.

I am in the People Workspace, Tree View and see someone in my tree. I see that this person is my 2nd great grandmother. But, who is our nearest relative.

By hovering your mouse over that relationship, you will see a window open up, for a short while, with the answer to that question.


It's quicker then going through the relationship calculator to answer that question.
_______________________________________________________________
Copyright © 2014 by H R Worthington

Print Friendly