Sunday, November 27, 2011

File Sharing and Brick Walls - Part 12 - Research Begun

Just an update. The clean up of the database is done. Really happy with the information that was provided. Great research has been documented, as I expected. But, now to get to this brick wall.

There are some hints for me to look at a little deeper. I find that the Find-A-Grave website can provide some hints. Some times the headstones have more information then what might be on Find-A-Grave, but there are hints.

Recently, I discovered a way to keep track of relationships that might be clear in Census Records and Find-A-Grave information. How? With the use of the Name Fact Notes screen. It's in the People Workspace, Person View. I have been putting these Notes in the Preferred Name Fact. An entry might look like this:

  • Find-A-Grave links William Knapp to Sarah Cutter as wife
  • Find-A-Grave links David Auble to spouse Sarah G Knapp, and her parents William Knapp and Sarah Cutter
  • 1880 Census links David Auble to Parents Birth States; Spouse; Sarah G Auble; Children: Charles Auble; Fannie Auble; Katherine Auble; Anna M Auble
This shows two Find-A-Grave findings and an 1880 Census Record. In the Find-A-Grave pages, the relationship was noted. In these two examples, the Headstone was NOT on the page. I visited the Cemetery, but it was locked. I will re-visit the burial ground to take pictures.

It also shows a possible Task / To Do List item. In this example, David Auble has a daughter, in the database of Frances M, while I have now seen twice a reference to Fannie. Could the Census Record be wrong? But, I have found that my having a note dedicated to tracking relationships has been very helpful.

These notes are NOT available in the Ancestry Member Tree (ATM) screens. That's good, as they are my notes. BUT I can pull a report on Notes.

There was a reference to an old Book for the Cutter Surname. That is of interest, at the moment, because Sarah Cutter is William Knapp's wife's name. What brought William Knapp and Sarah Cutter together, one from Dutchess County, New York and the other from Woodbridge, New Jersey. Perhaps there is a hint in that book. I found it as a Google Book and have been reviewing what was provided. I am able to put Sarah's family together, with an ancestor who was in the Revolutionary War. There appears to be a pull back to that part of New Jersey once William dies. There may be a couple of other surnames in the book that has connections to William.

Several times, looking at some census records, Shoemaker, as a trade shows up.

In an earlier post by Randy, he brought up the topic of a Research Journal. It's not clear to make that Family Tree Maker has a good way to do this, but what I started to do, is to Share, using Dropbox, the Status of my ToDoList. The ToDo / Task List is not part of the TreeSync™ feature of FTM2012. But it does indicate what has been done, and what needs to be done. The other view, is to look at the Sources list. Glancing down the Source Workspace, it is already showing the number of Citations that are in the Source Group list. If there is a Source with very few, or no Citations, that indicates one of two things. 1) haven't looked at it, or 2) nothing found in it. Adding those Sources to the Task List, not assigned to a person, will show what has been looked at and what hasn't.

But, the search has begun. Randy's research log and notes are pretty clear that records may be few and far between. So the search has to be broader.. Will be looking at that Revolutionary War ancestor of Sarah my give a clue.

The next task will be to look at the history of Dutchess County, to see what was going on in the late 1700's that would cause William to head "south" to New Jersey.

Lesson Learned: Broaden the research, step sideways then back. Check out some history.

The "sideways" in this context is looking at his wife's ancestry.


Copyright © 2011 by H R Worthington

Saturday, November 26, 2011

File Sharing and Brick Walls - Part 11 - Comment and Status

 I want to make a couple of comments, as the Clean Up is almost complete.

The file that I received has 86 People in the file. All 460 Facts have now been documented at least once, with where and when the GEDCOM came from. So, the Search can begin.

My comments about "clean up" are NOT a reflection on anyone, nor any software program. The GEDCOM file was generated by Roots Magic 4, and Family Tree Maker Version 2012 opened that GEDCOM file.

It is NOT my intent to say one program is right nor wrong, only that the End User may have work to do, on that GEDCOM file before merging that information into their own file. And, don't forget to Back Up the file as you go. Don't rely on any "automatic" back up that any program does. That is my own opinion. The Back Up feature, from what I have seen over the various versions of Family Tree Maker includes some file maintenance that the automatic back up doesn't do.

Each of us, over time, create our own way of using what ever program we use for our Family Research. I certainly have, and change frequently, as I may find a "new" or different way to find what I am looking for. This "clean up" is of my own doing, to bring the file to what I am comfortable in working with it.

Now that the file is pretty clean, still have a couple of things to do, I have posted this FTM2012 file into an Ancestry Member Tree, that is Private, and not searchable, and have Invited Randy to the AMT as Editor.

After reviewing the comments on Randy's Blog and this one, I chose to delete any Death Facts that only carried the "Y" in the Description field. It doesn't contribute to the Brick Wall that is the Task at hand.

For those interested in the overall GEDCOM Issues, please visit the BetterGEDCOM Blog and the BetterGEDCOM Wiki. You might want to get interested in this activity, to share your experience and to help with a solution. Links are:


http://bettergedcom.blogspot.com/

http://bettergedcom.wikispaces.com/


Copyright © 2011 by H R Worthington

File Sharing and Brick Walls - Part 10 - Burial Fact Report.

In the continuing effort to clean up this file, the Burial Fact "problem" was identified here:

File Sharing and Brick Walls - Part 9 - Burial Fact


The problem now is to determine how much work is this and is it worth the  time to clean this up. For me it is, especially so that Cemetery locations and what information might be on a Headstone may be important in breaking down a brick wall. (probably not in this case) but the family patterns might be important. The Cemetery Report that was mentioned in that lost blog post is nice in that you can see multiple cemeteries based on the Place Name.

Need another Custom Report to see what work needs to be done. Will go to the Publish Space, Person Collection, and select Custom Report.

The first ICON in the Right Hand Panel, left end of that panel is the Items to Include ICON. Clicking on that will bring up the Items to Include Screen. In this case, the "default" Fact, Birth , Marriage, and Death facts will be selected, but will add Burial. To the right, the Fact Notes are checked. So, if there are any Name, Birth, Marriage, Death, and Burial Facts that have NOTE's will be included in the Report.


It may be overkill for this issue, but, I want to see all of the notes. In order to see the Notes in the  Fact information will be displayed.


The above example show some additional Notes, which is why I made the selections that I did. May have to review other facts later on, but this is still in the Clean Up mode.

This report was 7 pages long, but I know who I have to look at a little more closely for this, not so obvious, information.

Since this report appears to be of use, I want to Generate this Report later on to see how the Clean Up is doing.

With the Report still on the screen, looking in the RH Panel, far right ICON, is the Save Report Option. This will save this report in the Saved Report Menu. I named this report "Custom Report for Fact Notes, and the report name is in the bottom field, and added to the list of Saved Reports.


Lesson Learned: If you create a Custom Report or any Chart or Report that is helpful, use the Save Report Feature. 

Note: if Selected Individuals are part of the set up of the Report, remember to bring up again,port again, and re-do the Filtering that was done the first time. The key for me, is in the Naming of the Saved Report.


Copyright © 2011 by H R Worthington

File Sharing and Brick Walls - Part 9 - Burial Fact

While cleaning up the import of the GEDCOM file, I noted that there were not Cemeteries Listed. There were hints in the notes, that there were some Burial's where the cemetery was known. I for one, use burial information, as some headstones can provide clues to my research.

There was also a number of persons who had Notes for the Burial Fact.

Having done some testing in this area (GEDCOM between Roots Magic 4 and Family Tree Maker) I thought I knew what the problem was.

Take for example this entry:


It is noted that in the third column of numbers on the Burial Fact, there is a "1". That means that there is a Note for this Burial Fact.

Secondly, the Burial Fact, in the RH Panel only shows two fields, Date, and Place. Looking an the Help Menu in Family Tree Maker, it says:

If you have imported all or portions of your tree, you may need to edit many facts to correct information. For example, you may have recorded cemeteries in the Place field of the Burial fact. You can easily move the cemetery information to the Description field using the Fact Data Options dialog box.

So, we need to look at or Add the Description field for the Name of the Cemetery.

The advantage here is the ability to generate a Cemetery Report. I talked about there here:

How To Generate an Address Report

To change the Fact Properties, select the Fact, then Options, and in the Drop Down menu, Fact Properties.


The current Burial Fact Properties only will display Date / Place. Selecting Date / Place / Description will add the Description field.

Please note, that within FTM2012, the ability to Edit the Fact Sentence was added. Will leave that along for the moment.


The Description field was added, but there was no information in that field. Remembering my experience with Roots Magic 4 last year, I remembered that RM4 and FTM2011 don't "agree" on what do do with the Name of the Cemetery. RM4 uses an Address Field, while Family Tree Maker, according to the Help Menu uses the Description field for that. The Cemetery Report shows the advantage for that.


Noting that there is a "1" in the Notes column and selecting the Notes Tab, the "address" field and cemetery name is listed. Another Clean up task for this person. That is, moving the Nates information into the Description Field. Copy and Paste will do that.

A follow up post will describe how to generate a Custom Report to Identify what needs to be cleaned up.

Lesson Learned: How different genealogy programs handle the Burial Fact and where the Name of the Cemetery will appear.

I'll let Randy show the Roots Magic 4 View of the Burial Fact, if he so chooses.

Copyright © 2011 by H R Worthington

Friday, November 25, 2011

File Sharing and Brick Walls - "Y" in Death Fact

As a follow up to an earlier post, for the Clean Up of this GEDCOM file, Randy just posted his study of the issue. His genealogy software is Roots Magic 4, and he wanted to see what the cause of the "Y" in the Death Fact that I was seeing. He posted the following: The Strange "Y" in a Death Description Field in a RootsMagic 4 GEDCOM File

What is important about that blog post, is a comment from Roots Magic.

Wanting to test what Randy's theory is and the comment about the GEDCOM "spec", I ran a test but creating a Custom Report for Everyone in the File, with the report showing Birth fact information, and Death fact information, including the Death Description, where we were seeing the "Y".

The report shows that if there is a Birth and Death fact, with date, there will be no "Y". If there IS a Birth fact and no Death Date or Death Place, there will be a "Y" in the Death Description field.


Lesson Learned: Not every software vendor implements or interprets the GEDCOM standards the same way.


Copyright © 2011 by H R Worthington

File Sharing and Brick Walls - Part 8 - Import Citations

The last major piece of the preparation of this file for use, is to put a Citation on Each Fact that was provided by the GEDCOM. It's not important to me, at this point, to know where my Genea-Blogging Colleague got the data from. In fact, the GEDCOM process may have interfered with the Citation being imported into FTM2012. That has happened to me before.

If this was a serious file for me to consider to be included / merged into my own file, this step might look a little different. No Citations would normally raise issues for me.

A feature that was lost many versions ago, was that importing any GEDCOM file into Family Tree Maker would include some information about who the file came from and the date of Import into Family Tree Maker. Many users complained about that feature so when Version 2008 came out, that "feature" was dropped.

For the purposes of the Brick Wall problem, I want to be able to see what Facts came with the file, and what data was added to the file for sharing later.

The first thing that I normally do, when I pick up a new Document, or in this case an Email with a GEDCOM file, is to go to the Sources Workspace and create a Source. A new source can be added in a number of ways, but I have found that I keep myself out of trouble by starting with the Source Workspace. Do I already have a Source for this document? is one of the reasons that I start there. In the older versions of Family Tree Maker, we had the Master Source list. The Source list is much like that and serves the same purpose, but just called Source.

Since Family Tree Maker started to offer the Evidence Explained! Templates, I try to use them when ever possible. The Output is really cleaned up and consistent, in the Bibliography, EndNotes, etc.

Going to the Sources Workspace, clicking on Add in the upper right, a window will open, where "new" will be selected. I have found that using the Key Word search (3 characters) is the easiest way to select the right Template. For this example, EMA (for email) will be the key word that I will enter on the More line.


The first choice is Person Email.

A blank screen will be presented to be filled out. Because there is some private information that I will enter I will not show a screen capture of the completed screen, but the Field information and the field hints will help you complete this template.


The completed Source screen is here, with the information for the Citation. The Citation Detail says "11/24/2011 GEDCOM file Received and Imported into FTM2012". That is what is important for me in this specific file. But is very useful when sharing data with another researcher.


The Citation has been created but not linked anywhere.

The next step is to start to apply the Citations to all Facts. Looking at the First Person in the Index, there are NO Citations, for what ever reason. That isn't important to me for this Brick Wall. The source information may still be in my colleague's database.


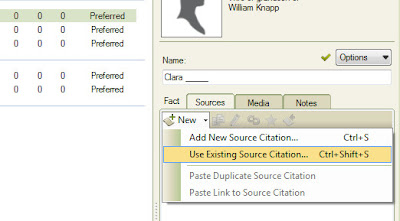
Clicking on New, for the Name Fact, in the RH Panel of Sources, will select Use Existing Source Citation, because the Source and Citation as already been entered.


Choosing that Source and Citation is done next.


Again, part of that Citation is whited out on purpose. But that is the Existing Citation for this first Fact.

The subsequent "Use Existing Source Citation" is used, FTM2012 will "remember" your last selection, so you don't have to scroll down to the Citation, it will have a very light background so that you can tell it has been selected.

The end result for this first person now looks like this.


This step will be repeated for each of the 86 people in this file. Time consuming, yes, and it is not necessary, if that is your choice.

Lesson Learned: Document what information you find, or in this case, what you were given.


Copyright © 2011 by H R Worthington

File Sharing and Brick Walls - Part 7 - Clean Up Notes

This is a continuation of what might be done when sharing information from another researcher. I am using a specific file as an example to help my colleague Randy Seaver of the Genea-Musings Blog. I encourage to follow his side of this story, as well as her other MOST interesting Blog posts.

This next task is to identify everyone in the file who has a Person Note. The issue here is caused by the way GEDCOMs are marked, sent, and received. In this case, my initial review showed extra spaces in the notes. I talked about this here: File Sharing and Brick Walls - Part 4 - Person Review

The easiest way for me to know who has Notes, would be to generate a Custom Report. This report is in the Publish Workspace, Person Collection, and selecting the Custom Report.


Then I want to Name this Report - Custom Report for People with Notes. This naming will help me remember how the report was created, as I will be Selecting ONLY those Persons with Notes. I will be selecting Individuals To Include for this report.


When that button is selected, a "filter" screen will open. There have been other blog posts on this feature. http://ftmuser.blogspot.com/search/label/Filter

On the screen that opens will select "Other", and in the Search Where, will select Any Persons / Fact Notes and keeping "exists". This will move the people who meet that criteria into the Right Hand (RH) Panel.


 In this case there will be 12 people with notes.


Now the only thing we want in this report is the Notes and the Name of the Person. In the RH Panel, there are a number of settings, but for this report, we want to select Items To Include, which is the Left most ICON in the RH Panel.


In the Left side of this screen, normally, there is Name, Birth, Marriage, Death Fact. Each with their own control. We only want the Name. To remove a Fact, select it, and click on the "X" on the right.

In the Right side of thew screen, we want ALL of the Notes that are available. There are Person Notes, Fact Notes, Research Notes, Private Notes, and Relationship Notes. We want all.


The report was generated. In this case, it is an 11 page report. 


The names are identified as well as their notes. Some people had long notes, other, not much at all.

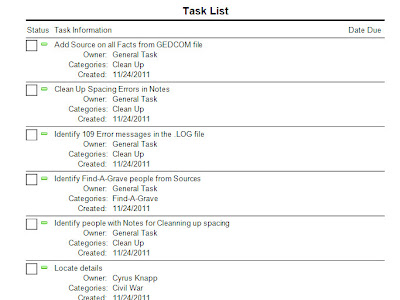
Creating a new Task was made to "Clean up Spacing in notes", assigned it to the Clean Up Category, and made it a low priority.

While the Notes are being reviewed / cleaned up, I want to run the Spell Checker on the notes. So that was a second task added, as a clean up, and Low Priority.

There are now 42 Tasks in the List. As I added the Tasks, I cleaned up a couple, and ran the Spell Checker on that set of notes. Those that I cleaned up are marked as Complete.

Control over the Task List has been touched on for FTM2009 here http://ftmuser.blogspot.com/2008/09/family-tree-maker-2009-tasks.html


Lesson Learned: Importing of a GEDCOM may require some clean up of the data. Its so much easier to do BEFORE it is merged with your own data. Leave some time to do this clean up. Don't be in a hurry. (sounds like a voice from experience).


Copyright © 2011 by H R Worthington

File Sharing and Brick Walls - Part 6 - Abt Dates

FTM2012 - Index of People Report (edit)

In the above blog post I talked about how to use the Index of People Report to edit information already in their record. That same process will be used here to take care of the Abt Dates for Birth , Marriage, and Death Dates. Again, this is my preference, to have something stick out in areas where there is work to do. The option would be to make a To Do list for everyone, but after thinking about it I chose to use the Abt term for these three dates. We have options, and this is the one that has worked for me.

So, to the Publish Workspace, Person Collection, selected the Index of People Report. Reviewed the list, and selected the first person with a year only date.


I selected Aube, David, and double clicked on his Name. You will note, that only the Name will bring up the next screen. On this screen, you can edit the Facts as presented, and in this case I am adding Abt in front of the Date (YYYY).


I had already updated the Birth fact and have selected the Marriage Fact and added Abt there too.

The final result is.


This process was completed for everyone in the file in less time then it took to create this blog post.

Again, this is my preference for handling this situation. The goal here is to help break down a brick wall.

However, what I am posting here, is how I would normally handle my own data, as well as looking a data BEFORE I would consider merging this data into my own file.


Copyright © 2011 by H R Worthington

File Sharing and Brick Walls - Part 5 - Task List

In Part 4, I left us with a couple of Tasks.

ToDo List: 

Add a Source of the person who sent me this file, and a Citation for Each FACT that is included.

Add "Abt" for Birth, Marriage, or Death Dates.

Clean up the Spacing in the Notes for Individuals with Notes.


Part 5 will show how I will track this work. The first two a generic across the file, while the 3rd item, only impacts those persons with notes.


Going to the Plan Workspace, Current Tree, most of the bottom part of the screen is for the Task List / To Do List. Clicking on New, will bring up a screen where you enter the information about the task. Will use the wording above.


Over time, putting Tasks into Categories may be helpful. For this example, will create a New Category or Clean Up.


It should be noted that the placement of these screens are not what you will see. They have been moved so that that various screens can be seen at one time.


The first generic Task has been entered and the next one, will only have to select the Clean Up Category and select it.


OK, to the third Task, I will specify the people that needs to have their Notes Reviewed. Since I have only looked at one person, will select him, and add a Task to View his notes for the extra Spacing.

The starting point for this is, on the People Workspace, Person View and selecting Tasks. The next screens are the same.


The End Result adds this person's task to the Plan Workspace, but with his name.


By selecting that line, and clicking on Go To, you will be taken back to that Person View in the People Workspace.

 One of the features of the Task List / ToDo List, is the ability to prioritize them. I added a Task for our Home Person 'to find his parents', which is the Brick Wall, and that the Spacing Issue isn't that important at this time and will be a little time consuming. So, I lowered it's priority and put the Finding the parents in a higher priority. So the new Plan Workspace looks like this.


Copyright © 2011 by H R Worthington

File Sharing and Brick Walls - Part 4 - Person Review

On to the People Workspace, Person View. Just want to see what is in the Home Persons record. As a review, the right side of the list of Facts, are 3 columns of Numbers. The first column is the number of Citations for that Fact. The second column indicates if that fact has any Media Files, like an Image of a Census Record. The third column indicates if there are any Notes for that Fact.

What is Missing, here for me, is that there is no indication about who provided me with this file, the Facts that were provided in the file, so that I can see later, what I provided. In this specific person's file, there are a couple of Zero's in that first column. It may be that a Citation was not put the Name Fact, or Sex Fact. Not important at this point.

Two other issues, and they are only issues for me, is the Birth Date being 1775, and the spacing in the Person Notes at the bottom of the screen.

When I see Year Only Dates, I choose to make that Abt. YYYY, or Abt 1775 in the case. This becomes a little more important, again this is for me, to see Abt dates for Birth, Marriage, and Death Dates.

The extra spacing in the Notes aren't very important, but they will in the future. That spacing, from what I have seen, is caused by the construction or reading of the GEDCOM file.


ToDo List: 

Add a Source of the person who sent me this file, and a Citation for Each FACT that is included.

Add "Abt" for Birth, Marriage, or Death Dates.

Clean up the Spacing in the Notes for Individuals with Notes.

I blogged about the ToDo / Task list already, but for this series, I'll be more specific for this file.

Copyright © 2011 by H R Worthington

File Sharing and Brick Walls - Part 3a - Why Map

Perhaps a quick look at the Map feature will shed some light as to why this Place Name feature may be important. After the last post, I went to the Place Workspace, and selected Person, in the Left Hand Panel, drop down menu, to see the journey of the Home Person, based on data that we have so far.


The Right Hand Panel, shows the Facts we have for this person. The Birth (1775) is in Dutchess County, New York (upper right end of line), it is believed that he was married (1804) in Woodbridge, New Jersey, the bottom and mid point in the line, and Newton, Sussex County, New Jersey. (1856).

The brick wall, is to locate the parents of our Home Person.  Just this view, might raise some questions, not with the data, but why and how. Is there a reason? Far to early to tell, but there may be a hint in to looking into this movement of our Home Person.

There is another bit of information, not in this file, but this Surname shows up in a location that is almost a direct line between the starting point and ending point that this map shows. Today, there is almost a  single road that connects these two end points. So, visually, this points out that the movement over time, of the home person, may help with the Brick Wall.

Copyright © 2011 by H R Worthington

File Sharing and Brick Walls - Part 3 - Place Names

Continuing Clean Up of file. Again, this is for my purposes with no reflection on the person who sent me this file, but our common goal is to attempt to attach a brick wall.

Earlier, I addressed how to import a GEDCOM file, then how to address Unknown Names. Each of us needs to identify these unknown names as we each have them.

This next step is to deal with Place Names. For this example, at this point, Historical Place Names may not play a role in this brick wall. But, for me, based on some observations in this file, the use of the Map feature will be important. In the 1700's the travel between Dutchess County, New York, to Woodbridge, New Jersey, to Newton, Sussex County, New Jersey needs to be looked at. For me, at this point, the use of the Map feature is important. Who had an event (or Fact for Family Tree Maker) in the various locations will be important.

Going to the Places Workspace and looking down the Left Column is an ICON that indicates that that Place Name is not in the format that the Place Name Authority (PNA) of Family Tree Maker 'wants' or suggests. This ICON will appear any time a new Place is entered as seen in the upper right of this screen.


At the top of the Left Hand Panel is a Resolve All option (its in that green bar). Clicking on Resolve All will bring up a Chart of all of the Place Names that are not part of the Place Name Authority. However, it is NOT required that we accept or use the PNA. In this specific case, MOST, but not all suggestions will be accepted.

There are four columns. with out check marks. The first column indicates that the user accepts the suggested PNA name. If the list looks like the entry is really a Description, then the 2nd column can be used for that, and there are other choices.


There are several here that I will leave as Unresolved (those in blue). They appear to be valid place names, but at this point, I am just cleaning up the "easy ones". There others can be resolved later. At this point, it's data consistency that is important for me, for this project.


The Unresolved ICONs are still on the left, and they are the ones I chose not to resolve. What is important, at this point, is that I have a good look at who has a Fact that took place in Newton, Sussex County, New Jersey AND I can see where it is. There are zooming in and out which will be used later. But This gives me a good handle locations within this file.


Copyright © 2011 by H R Worthington

File Sharing and Brick Walls - Part 2 - Unknown Names

Continuing this series of File Sharing and Brick Walls - Part 1 - Import and wanting to help a colleague with a Brick Wall, the next step is to take a look at what is in this new file.

There are a couple of things that I want to do here:

  • Unknown Names

  • Place Name

  • Citations

 I have a way of handling Unknown Names. I use 5 Underscores, if I don't know a name, be it a given name or a surname. [ _____ _____] for example. Before I started to look at how to do this, I considered the input and the output. What really caught my eye was on the output. People want to help "fill in the blanks". The 5 underscores, from my experience, has helped with this.

The Place Names Authority in Family Tree Maker has a purpose, mostly to get the data consistent but is very helpful when using the Place Workspace, and the Map feature. 

In my own file, some times it is obvious that a Place Name is a historical place name, like St. Mary's Parish, Maryland. In this case, I generally will double enter data. Once with the Historical Place name that would be reflected in a document (source) that I am looking at, but I may also include the "current" place name that the Place Name Authority of Family Tree Maker would suggest. I do want to use the Mapping feature. There are resources that may help over lay the Historical Place Name with the Current Place Name.

In this specific case, I am not sure that this will be an issue.

For Citations, I want to see what is and what is not documented AND I want to be able to have a Citation on Every FACT that was included in this imported file. That isn't a feature to do this in FTM2012, but I will show how I did that in this case.

Going to the People Workspace, I wanted to Set the Home Person for this project. I entered Knapp, William in the "Find" field, and right clicked on that name and selected Set As Home Person. The advantage of this is for quickly being able to see any relationship between anyone in the file and this Home Person.


Looking at the Index (Left Hand Panel), here are a few people with our Surnames. C. Mary, Clara, and two Elizabeth's. I will now change them to make their surname _____.


I selected Clara, and entered "_____" (without the quotes) after "Clara" and moved to the next field. Below is the result of that. The Pedigree shows her with the 5 underscores, the Family View, the wife's surname has the same underscores. This is just a reminder that so far, we don't have the surname for this person.


What I did notice on Clara, was the letter "Y" in the Death Fact for her. There isn't a Death Date, nor Place. The Description field would normally be filled in with a more specific location, like "At Home" or the name of a hospital, an address, or a little more detail for where the death took place. If it was a Burial Fact, the Description might be for the name of a Cemetery.


So, what is this "Y" all about?

Looking at Roots Magic 4, there is an option to make a person as "living" when death information is not present. Or said differently, no check mark would indicate that the person had died. Below is a screen capture from Roots Magic 4.


That lack of a Check Mark, in that GEDCOM file, shows up as "Y" in the Death Description filed on import into FTM2012. Running a Custom Report in FTM2012, there were 49 people in this file with this indication. For now, I won't clean this up. Only pointing out A reason to Look carefully at your data before merging a file into your own file.


All of the Unknown Surnames have been updated as seen by the Index on the Left.

Lesson Learned: How do YOU handle Unknown Names?


Copyright © 2011 by H R Worthington

File Sharing and Brick Walls - Part 1 - Import

Over the past couple of days, I have been helping a Genea-Blogger with a brick wall. I thought that it might be worth some time to document the steps, and perhaps my approach for this type of problem, that is a Brick Wall.

Having worked with file sharing before, there are a couple of things that I like to do from the very beginning. The file sharing that is being used in this case is a GEDCOM generated by Roots Magic 4.

Last year about this time, I had done some testing with file sharing using a GEDCOM from Family Tree Maker to Roots Magic 4. I sent a GEDCOM file to another Genea-Blogger, who was at that point a potential "cousin". However, when my GEDCOM file was opened in RM4, none of my Citation information was brought into Roots Magic. That kicked of the BetterGEDCOM project. I did a lot of testing for that project, trying to show the issues that the GEDCOM process that made file sharing very difficult. I spent a lot of time documenting the information that is in my database, and for it not to show up, was alarming.

All that to say, is I know that there are issues, so when I receive a GEDCOM file I KNOW it want to "clean up" that file before I start to work on it. I want to document what I do, before I start to research with that file.


The GEDCOM file was emailed to me, I detached the email and saved the GEDCOM file on my computer where I know where it is. I then go to the Plan Workspace, New Tree Tab, and select the  Import from an Existing file. When the Import is selected a window opens where you navigate to where that file is on the computer.


The filename is put into the filename field at the bottom of that window, then you are asked to Name the Tree. In this case, I named it GEDCOM for Blog. This is the file that will be used to start the clean up process. This is NOT a clean up because of the Sender of the file, but for my own purposes. Some because of what the GEDCOM will do and some for some "standards" that I have found to work for me and my own research.

Just as a reminder, I am only looking for information to help with a Brick Wall. I am not trying to duplicate or create a new tree for the Genea-Blogger. Only, if there is such information, a record or two to help with the brick wall.


When the Continue Button is depressed the Import process begins.


The status of the import is see above. Note that at the 84% mark, there are 3 Errors. In reality, this file was a new file that I received this morning. The first file had 109 Errors. After some investigation by the sender, there were records in the first GEDCOM file that were unique to Roots Magic 4, but eliminating those unique records, were were left with 3 Errors. The sender and I did some investigating into the 109 errors as we both wanted to know what that was about. Which we did. (Unique Roots Magic Data).

After the import is complete a .LOG file is created to allow the user to see some details about the import.


This is the Summary, with some numbers, including the 3 Warnings. Clicking on the View Log File we see:


We had seen these same errors before, so they are not unique to Roots Magic. In reality, this is a pretty clean handoff.

The next post will show what the result is.

Learning: When I receive a GEDCOM file from another researcher, I use this process, especially IF I am considering merging this data into my own file.


Copyright © 2011 by H R Worthington

Thursday, November 24, 2011

FTM2012 Research Log

Genea-Blogger Randy Seaver posted an interesting blog post on Research Logs. Research Logs in Genealogy Software.

I had to look to see IF I kept a "Research Log". Family Tree Maker hasn't, in the past, had a good way to keep a research Log as Randy presented a Research Log. However, I have in fact been keeping a Research Log based on the Task Feature or the To Do List.

Here is my ToDo List for one of my files: This in in the Plan Workspace and look at it every time the program opens.


In the above list, there are generic file issues, and people specific items on the To Do List. I keep File notes at High Priority, (none in this file at the moment), and completed items, as Low Priority. When you select one of the Task For lines, and click Go To, you will be taken to that person's Task List.


To Add to a person's Task List, clicking on Task (4th tab), then New, you can enter the task. It's helpful for me to assign a Category to that task, for sorting purposes on the Plan Workspace.

This is also a Research Note ICON on the Person's Note page. It's the 2nd ICON under Notes:


Clicking on that will bring up the Research Notes to that person.


I had discovered that this person had been in the Civil War and I wanted to follow up on  that. That is what the Task was, to follow up. I found some information but haven't followed up on getting all of the information into this persons page yet, but wanted to put the link to where I found some of the information.

I also put Sources in the Source workspace that I want to do more research from. So, if I look at my Source List and don't see any Citations, that is a reminder for me that I need to look at that Source a little more closely.

As for reports, the Task list in one of the Reports in the Publish Workspace, in the Person Collection.


That list can also include the Completed Tasks


Copyright © 2011 by H R Worthington

Print Friendly